# MH Themes
> The best Premium Magazine WordPress Themes
We have developed some of the most popular magazine themes for WordPress. Join thousands of happy customers from over 110 countries around the world and get access to our collection of WordPress themes.
---
# MH Magazine 5.x Update: Required Changes for Child Themes
Source: https://mhthemes.com/support/knb/mh-magazine-5-x-update-required-changes-for-child-themes/
With the release of **MH Magazine 5.x**, the theme underwent a major internal refactor.
Many core functions were renamed and reorganised as part of a move from a legacy, function-based structure to a more modular and class-based architecture.
If your **child theme or custom code relies on old MH Magazine function names**, these changes are required to ensure compatibility.
This article lists the **most important function renames**, grouped by location, to help you update your child theme quickly and safely.
## Main Functions File (functions.php)
The following core setup and utility functions were renamed:
| Old Function Name | New Function Name |
| ----------------- | ----------------- |
| mh_magazine_theme_setup() | mh_theme_setup() |
| mh_magazine_custom_menus() | mh_custom_menus() |
| mh_magazine_image_sizes() | mh_image_sizes() |
| mh_magazine_content_width() | mh_content_width() |
| mh_magazine_scripts() | mh_scripts() |
| mh_magazine_fs() | mh_freemius() |
| mh_magazine_fs_settings_url() | mh_fs_settings_url() |
| mh_magazine_fs_icon_url() | mh_fs_icon_url() |
## Core Functions
**Location:** includes/core/Custom-Functions.php
These functions are commonly used inside templates, hooks, and child theme overrides:
| Old Function Name | New Function Name |
| ----------------- | ----------------- |
| mh_magazine_theme_options() | mh_get_theme_options() |
| mh_magazine_get_option() | mh_get_option() |
| mh_magazine_excerpt() | mh_excerpt() |
| mh_magazine_custom_excerpt() | mh_custom_excerpt() |
| mh_magazine_post_meta() | mh_post_meta() |
| mh_magazine_comment_count() | mh_comment_count() |
| mh_magazine_container_class() | mh_container_class() |
| mh_magazine_sidebar_class() | mh_sidebar_class() |
| mh_magazine_sidebar_layout() | mh_sidebar_layout() |
| mh_magazine_detect_color() | mh_detect_color() |
| mh_magazine_slider_terms() | mh_slider_terms() |
| mh_magazine_featured_posts_small() | mh_featured_posts_small() |
| mh_magazine_featured_posts_large() | mh_featured_posts_large() |
| mh_magazine_featured_posts_grid() | mh_featured_posts_grid() |
| mh_magazine_featured_posts_list() | mh_featured_posts_list() |
| mh_magazine_featured_posts_ticker() | mh_featured_posts_ticker() |
| mh_magazine_featured_posts() | mh_featured_posts() |
| mh_magazine_spotlight() | mh_spotlight() |
| mh_magazine_magazine_grid() | mh_magazine_grid() |
| mh_magazine_magazine_list() | mh_magazine_list() |
| mh_magazine_magazine_content() | mh_magazine_content() |
| mh_magazine_widget_post_subheading() | mh_widget_post_subheading() |
| mh_magazine_loop_ads() | mh_loop_ads() |
| mh_magazine_sanitize_id_list() | mh_sanitize_id_list() |
| mh_magazine_sort_id_list() | mh_sort_id_list() |
| mh_magazine_html_class() | mh_add_html_class() |
| mh_magazine_body_class() | mh_add_body_class() |
| mh_magazine_boxed_container_open() | mh_boxed_container_open() |
| mh_magazine_boxed_container_close() | mh_boxed_container_close() |
| mh_magazine_wide_container_open() | mh_wide_container_open() |
| mh_magazine_wide_container_close() | mh_wide_container_close() |
| mh_magazine_featured_image() | mh_featured_image() |
| mh_magazine_excerpt_length() | mh_excerpt_length() |
| mh_magazine_excerpt_more() | mh_excerpt_more() |
| mh_magazine_pagination() | mh_pagination() |
| mh_magazine_author_box() | mh_author_box() |
| mh_magazine_postnav() | mh_postnav() |
| mh_magazine_related_content() | mh_related_content() |
| mh_magazine_archive_title_prefix() | mh_archive_title_prefix() |
| mh_magazine_loop_meta() | mh_loop_meta() / mh_widget_loop_meta() **(1)** |
| mh_magazine_loop_layout() | mh_loop_layout() |
| mh_magazine_cat_subheading() | mh_cat_subheading() |
| mh_magazine_subheading() | mh_post_subheading() |
| mh_magazine_media_queries() | mh_add_media_queries_support() |
| mh_magazine_back_to_top() | mh_back_to_top() |
| mh_magazine_footer_widgets() | mh_footer_widgets() |
| mh_magazine_second_sidebar() | mh_second_sidebar() |
| mh_magazine_year() | mh_year() |
***(1)** **mh_magazine_loop_meta()** was deprecated since v3.9.0. Use* ***mh_loop_meta()** for loop templates* *or **mh_widget_loop_meta()** for widget code (e.g. inside widget() methods) instead.*
## Premium Functions
**Location:** includes/premium/classes/
| Old Function name | New Function Name |
| ----------------- | ----------------- |
| mh_magazine_archive_ads() | mh_archive_ads() |
| mh_magazine_register_widgets() | mh_register_widgets() |
## Hook Functions (functions.php)
These hook functions remain available and are used throughout the theme:
mh_html_class()
mh_before_header()
mh_after_header()
mh_before_page_content()
mh_after_page_content()
mh_before_post_content()
mh_after_post_content()
mh_post_header()
mh_post_content_top()
mh_post_content_bottom()
mh_loop_content()
mh_cat_header()
mh_before_footer()
mh_after_footer()
mh_before_container_close()
---
## Functions Used in Template Files
If your child theme overrides templates, check for these function calls:
**Examples:**
**404.php: **
mh_before_page_content(),
mh_second_sidebar()
**archive.php:**
mh_before_page_content(),
mh_cat_subheading(),
mh_cat_header(),
mh_author_box(),
mh_loop_layout(),
mh_pagination(),
mh_second_sidebar()
**content-grid.php: **
mh_post_grid_class(),
mh_post_meta()
**content-header.php: **
mh_custom_header()
**content-large.php: **
mh_post_meta()
**content-list.php:**
mh_post_meta()
**content-single.php: **
mh_post_subheading(),
mh_post_meta(),
mh_post_header(),
mh_featured_image(),
mh_post_content_top(),
mh_post_content_bottom()
**footer.php: **
mh_before_footer(),
mh_footer_widgets(),
mh_wide_container_close(),
mh_boxed_container_close(),
mh_after_footer(),
mh_copyright_notice()
**header.php: **
mh_html_class(),
mh_add_header_widget(),
mh_boxed_container_open(),
mh_before_header(),
mh_wide_container_open(),
mh_after_header()
**index.php: **
mh_before_page_content(),
mh_loop_layout(),
mh_pagination(),
mh_second_sidebar()
**page.php: **
mh_before_page_content(),
mh_after_page_content(),
mh_second_sidebar()
**search.php: **
mh_before_page_content(),
mh_loop_layout(),
mh_pagination(),
mh_second_sidebar()
**single.php: **
mh_before_post_content(),
mh_author_box(),
mh_postnav(),
mh_related_content(),
mh_after_post_content(),
mh_second_sidebar()
**template-authors.php: **
mh_before_page_content(),
mh_second_sidebar()
If these functions are still referenced using the old **mh_magazine_*** prefix, they must be updated.
---
## Widget Class Names
If your child theme uses *unregister_widget()* or references widget class names directly, update them as follows:
| 4.x | 5.x (free) | 5.x (premium) |
| --- | ---------- | ------------- |
| mh_magazine_custom_posts | mh_custom_posts_widget | mh_custom_posts |
| mh_magazine_slider | mh_slider_hp_widget | mh_slider |
| mh_magazine_spotlight | — | mh_spotlight |
## Summary
MH Magazine 5.x introduces **breaking changes** for child themes due to:
- Function renaming
- File reorganisation
- A modernised, class-based architecture
If your child theme or custom code was written for **MH Magazine 4.x**, you will need to update function names and verify template overrides to restore compatibility.
If you are unsure where a function is defined in the new version, search for its new name inside the **includes/core/** and **includes/premium/** folders.
---
# How-To Cancel your Subscription
Source: https://mhthemes.com/support/knb/how-to-cancel-your-subscription/
If you decide that you no longer need your **MH Magazine** subscription or want to stop automatic renewals, you can cancel it at any time through your account. Canceling your subscription will prevent future charges, but it won't affect your current access to the themes, features, or updates you've already received.
**Important:** Canceling your subscription does not affect your current access. You’ll retain full access to your MH Magazine license and features until the end of your billing cycle; however, updates and priority support will no longer be available afterward.
To cancel your MH Magazine subscription, navigate to your account page and log in.
Once logged in, go to the **Renewals & Billings **section and find the **Subscription**.
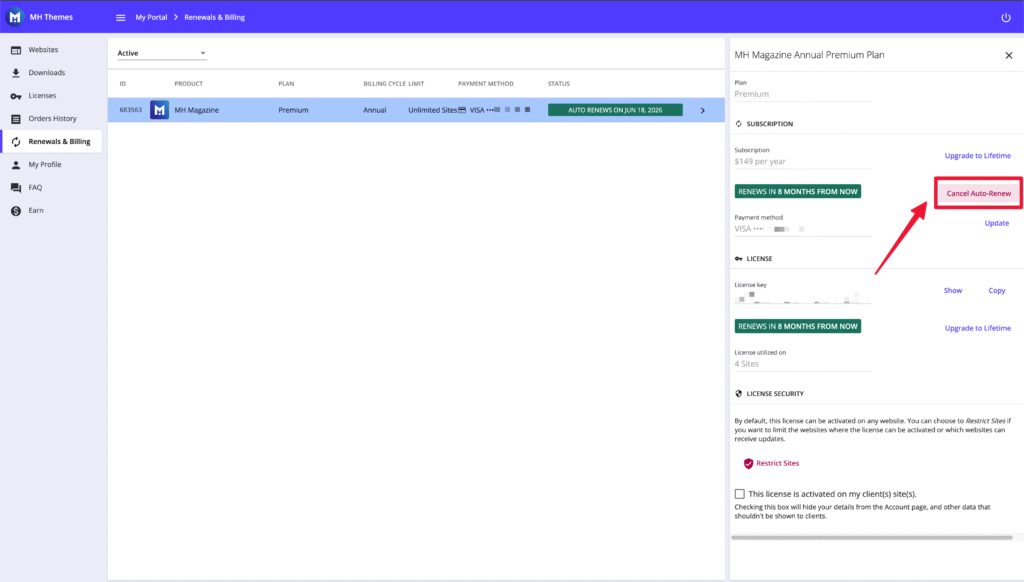
Click **Cancel Auto-Renew** to stop the automatic renewal of your subscription.
Once canceled, your subscription will not renew automatically. If you purchased an annual license key, you will need to manually renew it once it expires.
### Can't Access Your Account to Cancel Your Subscription?
If you're unable to access your account via the **Freemius **account page, you can request a subscription cancellation by either:
👉 Emailing us directly at [**support@mhthemes.com**](mailto:support@mhthemes.com), or
👉 Submit a **support request** via our contact form: [https://mhthemes.com/support/request/](https://mhthemes.com/support/request/)
Once we receive your request and you provide confirmation, our team will proceed with canceling your subscription on your behalf.
---
# How to solve issues with MH Author Box widget
Source: https://mhthemes.com/support/knb/how-to-solve-issues-with-mh-author-box-widget/
Why doesn't the author box appear below my posts?
The author box will only appear if the author has added some biographical information in the "About You" box. This gives the author control if he wants to display the author box or not.
Gravatar not working in author box
The image is automatically retrieved from Gravatar, it is associated with the email address you are using for your WordPress site, so please ensure that the email addresses you are using for both your blog and Gravatar are matching.
Display author box without setting up a user
The author box simply displays whichever author has been assigned to a particular post, so you do need to have a user account in the system to do this.
Twitter URL is broken
You need to add the full Twitter URL in the field, not just the username.
=============
Change background color of author box?
Add this to the style.css file of your child theme:
.mh-author-box { background: #fff; }
How to remove the article count in author box?
Add this to your style.css file of your child theme:
.mh-author-box-postcount { display: none; }
How can I completely customize the author box?
Copy the "mh_magazine_post_meta" function from the "/includes/mh-custom-functions.php" file into your child theme's "functions.php" file and modify to suit your needs.
How can I remove the author box avatar completely?
Add this to your child theme style.css file:
.mh-author-box-avatar { display: none; }
How can I remove the word "Contact:" from the author box?
Add this to your child theme style.css file:
.mh-author-contact-title { display: none; }
---
# How to solve issues with MH Carousel widget
Source: https://mhthemes.com/support/knb/how-to-solve-issues-with-mh-carousel-widget/
Why doesn't it show my most viewed posts?
The "most popular" filter is based on the number of comments, not views. So the more comments an article has, the more popular it is.
How to place Carousel before my footer?
Please navigate to "Appearance => Widgets" in your WordPress dashboard and drag & drop the "MH Carousel" widget into the "Home 11" widget area.
Carousel doesn't span entire site width using the 2-sidebar layout
There is no widget area that goes across the full width of the wide layout with two sidebars.
Carousel images are varied sizes
Regenerate your thumbnails, that will usually solve your issue. If you still have images with inconsistent size in the "MH Carousel" widget after regenerating the thumbnails, then the uploaded images are just too small. In that case you'll need to upload larger images and you won't have an issue anymore.
https://mhthemes.com/support/regenerate-thumbnails-after-theme-change/
Carousel not displaying after upgrading theme
We recommend that you check your plugins as this is usually caused by a Javascript confliction.
How to show multiple categories?
The "MH Carousel" widget has an option to filter categories by IDs. Simply go to "Appearance => Widgets" in your WordPress dashboard. Place the "MH Carousel" widget in a widget area and within the widget you will find an option called "Multiple Categories Filter by ID".
So if you want to display for example only category IDs 1,2,3 you have to insert 1,2,3. To exclude categories - for example catgories 5 and 6, simply insert -5,-6. To find the ID of a category you want to exclude, please see the following article: How to find WordPress category ID.
https://mhthemes.com/support/how-to-find-wordpress-category-id/
=============
How to change the background color of the Layout 1 Carousel?
Use a child theme and add this to the style.css file:
.carousel-layout1 { background: #2a2a2a; }
How to change font size and color of the Layout 2 Carousel?
Use a child theme and add this to the style.css file:
.carousel-layout2 .carousel-item-title { font-size: 16px; color: #000; }
Can I place more than 1 carousel on my frontpage?
You can place as many independent "MH Carousel" widgets on your front page as you like.
How to remove category text from the Layout 2 Carousel?
Use a child theme and add this to the style.css file:
.carousel-layout2 .caption { display: none; }
Can I change the size of image used in the carousel?
You can change the image sizes using the functions.php file of your child theme by modifying the dimensions defined like so:
(add_image_size('carousel', 178, 100, true))
Always regenerate your thumbnails afterwards.
https://mhthemes.com/support/regenerate-thumbnails-after-theme-change/
---
# News in Pictures
Source: https://mhthemes.com/support/knb/news-in-pictures/
How can I remove the mouseover effect?
Just add this to your child theme style.css file:
.mh-nip-item:hover .mh-nip-overlay { opacity: 0; filter: alpha(opacity=0); }
How can I change the size of the News In Pictures images?
You can modify the thumbnail sizes of any theme image by using the functions.php file of your child theme, you need to register every image even if you're just changing the dimensions of 1 image, like so:
function mh_magazine_image_sizes() {
add_image_size('mh-magazine-slider', 1030, 438, true);
add_image_size('mh-magazine-content', 678, 381, true);
add_image_size('mh-magazine-medium', 326, 245, true);
add_image_size('mh-magazine-small', 80, 60, true);
}
The News In Pictures widget makes use of the "mh-magazine-small" image size, so modify the dimensions from 80*60px to suit your requirements.
---
# How to solve issues with MH Authors widget
Source: https://mhthemes.com/support/knb/how-to-solve-issues-with-mh-authors-widget/
Left-side of MH Authors widget is being cut-off!
Try disabling all plugins as this is caused by a conflict between theme CSS and plugin CSS, it seems the reason is the "LDD Directory Lite" plugin on your site. If you don't see changes after disabling the plugin, then you'll need to clear your browser cache and reload the site in your browser.
I want to show post title in this widget too?
The widget you need for your purpose isn't available out of the box. You could try to find a plugin that meets your requirements
New user roles aren't being detected
Currently the widget is displaying a static list of default WordPress roles, which means custom roles aren't supported out-of-the-box I'm afraid, unless you manually extended the array that contains the roles available, and add the role to the dropdown list.
==============
How can I remove the article count from the MH Authors widget?
Using your child theme style.css file, add this:
.mh-user-data { display: none; }
How can I remove the avatars from displaying in the MH Authors widget?
Select "No Avatars" from the Avatar Size dropdown list within the widget settings.
---
# How to solve issues with MH Author Bio widget
Source: https://mhthemes.com/support/knb/how-to-solve-issues-with-mh-author-bio-widget/
How to edit the author bio widget?
To show your author profile image you have to register at Gravatar. For more information please see this tutorial:
https://mhthemes.com/support/using-gravatar-for-user-avatars-wordpress/
And to add text to the widget, simply navigate to "Users => Your Profile" in your WordPress dashboard and add your "Biographical Info".
Can I list all authors without a photo instead?
You can use the "MH Authors" widget to display a list of authors. The widget has also an option to disable the avatars.
Use first name instead of username in Author Bio widget?
Yes you can control what name you are known by via your profile page at "Users => Your Profile => Display Name".
How to disable the author box completely?
There is an option for the author box located in your WordPress dashboard under "Appearance => Customize => Layout Options => Author Box".
Why can I see 2 author boxes on each post?
In case you are using a plugin to add an author box to your site and want to get rid of the author box that comes with the theme, you can disable the built-in author box in your WordPress dashboard under "Appearance => Customize => Layout Options => Author Box".
===================
How can I change the avatar image from a circle to a square?
Using your child theme style.css file, add this:
.mh-author-bio-image-frame { border-radius: 0; -moz-border-radius: 0; -webkit-border-radius: 0; }
How can I completely remove the avatar from the Author Bio widget?
Using your child theme style.css file, add this:
.mh-author-bio-avatar { display: none; }
---
# Theme Options
Source: https://mhthemes.com/support/knb/theme-options/
FAQs on Theme Options
Where are the options for this theme?
All options are contained within the customizer, which you can access via your WordPress administration panel, click the "Appearance => Customize" menu link.
Within are several sub-sections each containing further options which you can modify to suit your needs. There is also a live preview of your site to the right when you are changing any option via this customizer.
FAQs on Theme Options
Where are the options for this theme?
All of the theme options are contained within the Theme Customizer which you can access via the "Appearance => Customize => Theme Options" admin menu link.
The options are divided into sub-sections:
General:
You can modify the amount of text within all text excerpts, along with modifying the "Read More" text. You can also customize the footers copyright text too.
Header:
Using the dropdown selectors, you can choose which theme feature you would like to display in all four corners of the theme header.
Layout:
There are many layout options available to you, you can manage the theme's overall width, how many sidebars you would like to make use of, the sidebars alignment, the design of various titles for widgets and archives, plus several options that allow you to turn on/off a variety of theme features such as Breadcrumbs, Featured Images, Social Buttons, Author Information plus much more.
Typography:
You can change the fonts used and font sizes for titles and text via the dropdown lists, each font has been carefully hand-picked for use with the theme.
News Ticker:
You can manage the themes News Ticker and it's contents by changing the options within, or you can choose to disable the ticker completely.
Advertising:
Easily add advertisements that will be globally displayed throughout all posts and archives, don't forget you can override advertisements on a per-post basis too by editing the post and adding your ad code in the relevant field.
CustomCSS:
You can easily make minor style modifications to the theme by adding CSS code within the field provided, all custom CSS will override the default stylesheet and a child theme stylesheet.
Tracking Code:
If you're using a tracking service to track your website analytics, such as Google Analytics, you can paste your tracking code in this field, be sure you are pasting your tracking code and not just your ID #.
---
# Media Library
Source: https://mhthemes.com/support/knb/media-library/
FAQs on Media Library
Can I create folders within my media library?
Creating folders in the WordPress Media Library is only possible by using a suitable plugin, there are a bunch of plugins available in the official WordPress Plugin Directory.
https://wordpress.org/plugins/search.php?type=term&q=media+library
How do I remove images?
You can remove / delete unused images from the "Media Library" in your WordPress dashboard at "Media". Just use the search function there and if you have found the images, then you can click on "Delete Permanently".
Images uploaded to my media library are the wrong size?
When you insert images into a post through the "Media Library", there are some settings on the right side of the page. Please have a look at "Attachment Display Settings", there you will find an option "Size" where you can select the size for the inserted image. Default in WordPress is "Thumbnail - 150 x 150", "Medium - 300 x 225" and "Full Size - ... x ...". You can just select "Full Size" and the image will be added in original size to your post.
---
# WooCommerce
Source: https://mhthemes.com/support/knb/woocommerce/
FAQs on WooCommerce
Language for WooCommerce
If WooCommerce has translation files for your language included, then there is a pretty good chance that the language will be changed automatically. But in the end this is something you'll need to check at the WooCommerce support desk.
---
# Spotlight
Source: https://mhthemes.com/support/knb/spotlight/
FAQs on Spotlight Widget
How can I remove the post meta information?
There is an option within the widget itself that you can use to disable the post meta information from being displayed.
How can I move the widget title to the top-right of the post image?
Add this to your child theme style.css file:
.mh-spotlight-caption { top: 0; right: 0; }
How can I change the amount of text within the spotlight widget?
You can change the excerpt length via the setting within the widget itself, simply change the default value from 35 words to any other number.
---
# Posts List Widget
Source: https://mhthemes.com/support/knb/posts-list-widget/
How can I remove the post date from this widget?
Add this to your child theme style.css file:
.mh-posts-list-meta .mh-meta-date { display: none; }
How can I remove the comment count from the post list widget?
Add this to your child theme style.css file:
.mh-posts-list-meta .mh-meta-comments { display: none; }
I want to change the image alignment from left to right
Add this to your child theme style.css file:
.mh-posts-list-thumb { float: right; margin-left: 0; margin-right: 20px; }
---
# Social Widget
Source: https://mhthemes.com/support/knb/social-widget/
The MH Social Widget only offers me to add a title, how do I add my social links?
The widget itself simply displays a specific menu which you need to create and configure via the "Appearance => Menus" admin link.
You also need to assign this menu to the "MH Social Widget" location before saving the menu.
How do I change the icon size in the MH Social Widget?
Simply add this to your child theme style.css file and adjust accordingly:
.mh-social-widget li .fa-stack-1x { font-size: 32px; }
How can I additional services that aren't included?
Using your child theme style.css file, you can add more social services like so:
.mh-social-icons li a[href*="github.com"] .fa-mh-social:before { content: '\f09b'; }
The above line will add the social service "GitHub" to the list of available services you're able to link to from within your social menu.
It uses "FontAwesome" icons, please use this page as a resource for finding the "content code" for your chosen social icons.
https://fontawesome.io/icons/
How do I centralize the icons on mobile devices?
Add this to your child theme style.css file:
@media screen and (max-width: 767px) { .mh-social-widget li { float: none; } }
---
# Solving issues when using a logo
Source: https://mhthemes.com/support/knb/solving-issues-when-using-a-logo/
Displaying a logo on your website can have several benefits. Logos can be used to reveal in just one glance what your website is about. It can be a nice design element which stands out or a simple slogan to inform about your website's philosophy. Whatsoever you are using a logo for, sometimes you might encounter issues with uploading your logo or placing it as you prefer. So please see our overview on most common issues when it comes to uploading a logo to your WordPress website.
- How to upload a logo to your WordPress website
- What is the required size of the logo?
- How to replace the logo with title of website
- How to center the logo in the header
- You have not found a solution to your issue?
### How to upload a logo to your WordPress website
WordPress allows to upload one logo to your website by default. To add a logo image, please navigate to **Appearance => Customize => Header Image** in your WordPress dashboard, click the *Add new image* button to open up your Media Library and select a previously uploaded logo image, or drag & drop a new logo into your media library.
Once you have highlighted an image to use, hit the blue *Select and Crop* button to crop your image into a useable size. If you're happy with the image dimensions you can press the *Skip Cropping* button, or you can use the image cropper on-screen to crop out your logo from the image you have uploaded. Hit the blue *Crop Image* button to complete the process.
### What is the required size of the logo?
When you upload your logo through the customizer via **Appearance => Customize => Header Image**, for each theme we have given a recommendation regarding the logo size. For MH Magazine, it says: *While you can crop images to your liking after clicking Add new image, your theme recommends a header size of **300 × 100 pixels**.*
However, this is only a recommendation and you can usually upload logos of different sizes as well. We would advise you to try a few logo sizes through the customizer to preview changes before saving them. In general, you can't break anything by uploading a logo which is too large or too small, so just go ahead and see what fits best for your site.
### How to replace the logo with title of website
You can achieve this by removing the currently selected logo image via the Theme Customizer at **Appearance => Customize => Header Image**, simply click the *Hide Image* button.
You can now activate the blog title & description text which will be positioned where the logo was, you can do so again via the theme customizer at "Appearance => Customize => Site Identity", just be sure to check the box marked "Display Header Text" and enter your Site Title and Tagline in the available fields.
Hit the blue *Save & Publish* button to apply your changes, which you should be able to view via the customizer's theme preview. If you are happy with the result, save and publish your changes.
### How to center the logo in the header
In case you are using one of our WordPress themes which is displaying the logo left aligned, you could add some custom CSS and center the logo in the header. For the [MH Magazine theme](https://mhthemes.com/themes/mh-magazine/), the logo is aligned to the left, to center the logo please see the [required custom CSS](https://mhthemes.com/support/mh-magazine-css-customizations/#center-header-logo). You might need to adapt the custom CSS if you are using a different theme accordingly.
Please notice, if you center your logo, you intervene in the default structure of your header. It might then be possible that you have to do some additional changes here and there, depending on your needs and requirements.
### You have not found a solution to your issue?
In case you have not found answers to your questions in this support article, please also take a look at our [other support topics](https://mhthemes.com/support/), as it is very likely that you will find your answer there. If you have purchased a [WordPress theme by MH Themes](https://mhthemes.com/themes/) and have a valid license to gain access to theme updates and support, then you may also [send a support request](https://mhthemes.support/) for additional assistance.
---
# General Data Protection Regulation (GDPR)
Source: https://mhthemes.com/support/knb/gdpr/
GDPR is a regulation that aims to protect the privacy of EU (European Union) citizens. Among other things, it provides users with more control over the personal data that they share with websites.
In case you want to learn more about GDPR, here you can find some further details:
- [Data protection - Interactive Infographic](https://ec.europa.eu/justice/smedataprotect/index_en.htm)
- [The official General Data Protection Regulation](https://gdpr-info.eu/)
---
## Is the AAWP plugin GDPR compliant?
Yes, our plugin is compliant with GDPR.
### Collection of Personal Data
After installing and activating our plugin on your website, it doesn’t collect, store or send any personal data from either you or your site’s visitors.
The only time data is collected, is during a license activation, deactivation or update request. This data is as expected and includes the license key, AAWP version, WordPress version, website name, website URL, website language, and timezone. This data will only be sent to our very own license server. Without, it wouldn't be possible to activate respectively deactivate a license, as well as updating the plugin to the latest version.
### Cookies
In general, our plugin does not work with cookies, with one exception: Our [geo-targeting](https://getaawp.com/docs/article/geo-targeting/) feature temporarily stores the site visitors origin country inside a session cookie.
### Geo-Targeting
Actually, geo-targeting is not compliant: In order to determine the country of origin, the current IP address of your site visitor will be analyzed via a free online service.
Right now we don't see an alternative way to receive your site visitors origin, so **we highly recommend not to use geo-targeting**, if you want to stay GDPR compliant.
### Product Images
As you know, the plugin embeds product images delivered directly from Amazon's servers, which theoretically grants Amazon access to the IP addresses of your site visitors. In a reverse conclusion, this is GDPR relevant as well.
Unfortunately, Amazon doesn't allow downloading product images due to their terms. Additionally, they didn't come up with a solution for this so far.
That's why we decided to implement a so-called [image proxy](https://getaawp.com/docs/article/image-proxy/), in order to temporarily solve this situation plugin-side.
---
## Conclusion: What you should do now
Summing up, here are our recommendations from the current point of view:
- Disable [geo-targeting](https://getaawp.com/docs/article/geo-targeting/)
- Enable the [image proxy](https://getaawp.com/docs/article/image-proxy/) setting
In case you have any further questions, feel free to get in touch with us.
*We're going to update this article as soon as there is new information available.*
---
## Legal Disclaimer / Disclosure
We are not lawyers. Nothing on this website should be considered legal advice. Due to the dynamic nature of websites, no single plugin or platform can offer 100% legal compliance. When in doubt, it’s best to consult a specialist internet law attorney to determine if you are in compliance with all applicable laws for your jurisdictions and your use cases.
---
# Google Accelerated Mobile Pages (AMP)
Source: https://mhthemes.com/support/knb/google-accelerated-mobile-pages-amp/
Google's Accelerated Mobile Pages (short *AMP*) is an open-source initiative aiming to make the websites faster across all devices and distribution platforms ([read more](https://www.ampproject.org/)).
### Does this plugin support AMP?
Indeed AAWP has built-in support for Google's Accelerated Mobile Pages. Therefore we built a separate template which is optimized for AMP and comes along with less CSS styles in order to be AMP compliant.
### Which AMP plugins are supported?
In order to make use of our AMP support, it's mandatory that you're using an AMP plugin. Right now the following plugins are supported:
- [AMP for WordPress](https://wordpress.org/plugins/amp/) (by Automattic)
- [AMP for WP – Accelerated Mobile Pages](https://wordpress.org/plugins/accelerated-mobile-pages/) (By Ahmed Kaludi, Mohammed Kaludi)
- [WP AMP — Accelerated Mobile Pages for WordPress and WooCommerce](https://codecanyon.net/item/wp-amp-accelerated-mobile-pages-for-wordpress-and-woocommerce/16278608?ref=flowdee) (by teamdev-ltd)
- [tagDIV AMP](https://forum.tagdiv.com/tagdiv-amp-plugin-tutorial/)
---
# Styles/scripts are not loaded properly
Source: https://mhthemes.com/support/knb/styles-scripts-not-loaded-properly/
You may run into the issue that your product boxes/tables are being displayed completely un-styled. This often happens after installing the plugin on a new site or updating it to a newer version.
### What's the problem?
You're using a plugin which minifies CSS/Javascript assets and the newly added/updated styles/scripts of this plugin are not added to the minify cache yet. This might come from a caching plugin (e.g. [WP Rocket](https://getaawp.com/link/wp-rocket)) or a standalone plugin like [Autoptimize](https://wordpress.org/plugins/autoptimize/).
### How-to solve it?
Simply empty/trash the minify cache. The proceeding itself depends on the plugin you're using. In general you will find an "Empty Minify Cache" link/button on the plugin settings page or the top admin menu.
---
Afterwards the styles/scripts should be loaded properly. In case you're still experiencing any issue, feel free to [get in touch with us](https://getaawp.com/contact/).
---
# How-to change the domain of your license
Source: https://mhthemes.com/support/knb/license-domain-change/
In general there are two ways for changing the domain of your license:
### Via plugin settings

The recommended way would look as follows:
- Deactivate your current site via plugin settings (tab "licensing")
- Remove your license key and uninstall the plugin
- Install the plugin on your new site and activate it by entering your license key again
### Via account page
In case you don't have access to your old site any more, don't worry.
Log into your [account page](https://mhthemes.com/account/), locate the license you wish to move and click on "Manage Sites" on the right side of the screen.

Here you can remove your old domain. Afterward, add the new domain to the license.

---
# Quick translate or replace single words
Source: https://mhthemes.com/support/knb/quick-translate-replace-single-words/
In general our plugin is [ready to be translated in your language](https://getaawp.com/docs/article/translate-aawp-into-your-language/). Additionally you can edit certain text strings (e.g. sale ribbon or button text) easily via [plugin settings](https://getaawp.com/docs/article-category/settings/).
Anyway there might be some situation where you don't want to make use of our prepared translations or only want to replace single words.
Therefore we prepared a filter which can be used to quickly replace single terms.

In this example we're going to update the text "Reviews" to "Amazon Reviews".
### Making use of our filter
The filter looks as follows:
`
add_filter( 'aawp_replace_translations', function( $translations ) {
$translations['%s Reviews'] = '%s Amazon Reviews';
return $translations;
});`
[aawp_docs_custom_php_code_snippets_guide]
After adding our little PHP snippet the output looks as follows:

### Frequently asked text replacements
Here you can find more examples of frequently asked text replacements which can be done by using the filter above:
| Description | String to be replaced |
| ----------- | --------------------- |
| "Reviews" label | `%s Reviews` |
*We will to update this collection continuously.*
---
# Documentation: MH BeBold WordPress Theme
Source: https://mhthemes.com/support/knb/documentation-mh-bebold/
MH BeBold WordPress Theme is a beautiful, modern and attractive magazine theme for WordPress which includes cool features, options and custom widgets to create awesome online magazines or other editorial websites. This modern magazine theme for WordPress of course is fully responsive and looks great on mobile devices like tablets and smartphones.
This documentation is about the MH BeBold WordPress Theme itself and not about WordPress in general. In case you are new to WordPress, we recommend that you have a look at a few basic WordPress tutorials. A good place to start can be the WordPress Codex: [Getting Started with WordPress](https://codex.wordpress.org/Getting_Started_with_WordPress). Now have fun creating stunning websites with MH BeBold WordPress Theme.
[Buy Now](https://mhthemes.com/buy/bebold)[Live Demo](https://mhthemes.com/demo/?theme=bebold)[Learn more](https://mhthemes.com/themes/mh-bebold/)
---
### Create a Static Front Page
If you would like to configure your website like the layout you can see in the [theme demo](https://mhthemes.com/demo/?theme=bebold) of MH BeBold, you have to create a static front page first. Then you can place the widgets on the front page. To create a static front page with the widgetized layout, please navigate to "Pages" in your WordPress dashboard and create a new page named *"Home"* (or anything else) and select **"Homepage"** as page template:
After you have created your static page and have selected the **"Homepage"** template, please navigate to **"Settings => Reading"** in your WordPress dashboard and set that page as static front page:
In case you need further help and instructions with creating a static front page in WordPress, please read and follow this tutorial: [How to set a Static Front Page in WordPress](https://mhthemes.com/support/how-to-create-a-static-front-page/).
---
### Available Widget Locations of MH BeBold
MH BeBold WordPress Theme comes with 11 widget locations in total. Within these widget locations you can place default WordPress widgets, custom widgets or add any HTML code you like (by using a text widget). After you have completed the setup of your static front page (as stated above), please navigate to **"Appearance => Widgets"** in your WordPress dashboard to easily drag & drop widgets into the specific widget locations you prefer:
- **Header - Advertisement:** widget area located just below the header *(premium)*
- **Home 1 - Main Column:** large widget area on *"Homepage"* for all widgets
- **Home 2 - Sidebar:** sidebar widget area on *"Homepage"* for all widgets
- **Global - Sidebar:** widget area / sidebar on posts and pages (not Homepage)
- **Posts 1 - Advertisement (Top):** widget area above the post content *(premium)*
- **Posts 2 - Advertisement (Bottom):** widget area below the post content *(premium)*
- **Footer - Advertisement:** widget area above the footer *(premium)*
- **Footer 1 - First Column:** widget area located in the footer *(premium)*
- **Footer 2 - Second Column:** widget area located in the footer *(premium)*
- **Footer 3 - Third Column:** widget area located in the footer *(premium)*
- **Contact - Sidebar:** widget area on contact page template *(premium)*
You can easily put widgets into the several widget locations / sidebars via drag & drop. To do so, simply navigate to **"Appearance => Widgets"** in your WordPress dashboard. There you will find an extensive collection of default WordPress widgets and custom widgets that are included in MH BeBold WordPress Theme, like for example: *MH Slider*, *MH Custom Posts*, *MH Posts Large*, *MH Posts Grid*, *MH YouTube Video*, *MH Authors Widget*, *MH Facebook Page* and more.
---
### How to place the Widgets like in the Theme Demo
If you like the layout and the way we have arranged the widgets in the MH BeBold [theme demo](https://mhthemes.com/demo/?theme=bebold), you are welcome to reproduce the same demo layout. Just go to **"Appearance => Widgets"** in your WordPress dashboard and place the widgets as stated here:
#### Widgets visible on all pages
- **Header - Advertisement:** Default WordPress Text widget with banner
- **Footer - Advertisement:** Default WordPress Text widget with banner
- **Footer 1:** Default WordPress Custom Menu widget
- **Footer 2:** MH Recent Comments widget with three comments
- **Footer 3:** Default WordPress Text widget with banner
#### Widgets visible on homepage only
- **Home 1 - Main Column:** MH Slider widget with image sizes of 728 x 409px
- **Home 1 - Main Column:** MH Posts Grid widget with 3 posts
- **Home 1 - Main Column:** Default WordPress Text widget with banner
- **Home 1 - Main Column:** MH Custom Posts widget with 4 posts
- **Home 1 - Main Column:** Default WordPress Text widget with banner
- **Home 1 - Main Column:** MH YouTube Video widget
- **Home 1 - Main Column:** MH Custom Posts widget with 5 posts
- **Home 2 - Sidebar:** Default WordPress Text widget with banner
- **Home 2 - Sidebar:** Default WordPress Search widget
- **Home 2 - Sidebar:** Default WordPress Recent Posts widget
- **Home 2 - Sidebar:** MH Authors widget with three authors
- **Home 2 - Sidebar:** Default WordPress Text widget with banner
- **Home 2 - Sidebar:** MH Recent Comments widget with four comments
- **Home 2 - Sidebar:** Default WordPress Text widget with banner
- **Home 2 - Sidebar:** Default WordPress Tag Cloud widget
#### Widgets visible on posts & pages
- **Posts 1 - Advertisement (Top):** Default WordPress Text widget with banner
- **Posts 2 - Advertisement (Bottom):** Default WordPress Text widget with banner
- **Global - Sidebar:** Default WordPress Text widget with banner
- **Global - Sidebar:** Default WordPress Search widget
- **Global - Sidebar:** MH Facebook Page widget
- **Global - Sidebar:** MH YouTube Video widget
- **Global - Sidebar:** MH Custom Posts widget with 4 posts
- **Global - Sidebar:** Default WordPress Text widget with banner
- **Global - Sidebar:** MH Custom Posts widget with 2 posts
---
### Map of Widget Locations on the "Homepage" Template
Here you can see the locations of the widget areas on the fully widgetized *"Homepage"* template of MH BeBold WordPress Theme:
---
### Images in MH BeBold WordPress Theme
In general WordPress themes have defined their own image dimensions and thumbnail sizes. These thumbnails are automatically generated by WordPress when you upload an image. In case you change your WordPress theme, it may happen that the thumbnail requirements of your new theme do not match the sizes of the available thumbnails in your media folder. If that is the case, your thumbnails won't look consistent in size. You can solve this by [regenerating your thumbnails](https://mhthemes.com/support/regenerate-thumbnails-after-theme-change/).
Image dimensions in MH BeBold:
- **728 x 409px** (Thumbnails for archives, posts and *"MH Slider"* widget)
- **676 x 380px** (Thumbnails for *"MH Posts Large"* widget)
- **326 x 183px** (Thumbnails for *"MH Posts Grid"* & *"MH Custom Posts"* widget)
- **139 x 78px** (Thumbnails for *"MH Custom Posts"* widget)
- **70 x 70px** (Thumbnails for news ticker)
MH BeBold WordPress Theme uses featured images for thumbnails on archives and within custom widgets. If you have already uploaded images to your site or added images manually to your posts, it could happen that these images don’t appear as thumbnails. In that case please read and follow this: [How to use featured images in WordPress](https://mhthemes.com/support/how-to-use-featured-images-wordpress/).
---
### Additional Features/Options
If you have successfully followed the above mentioned steps of this documentation, you have completed the basic theme setup of MH BeBold WordPress Theme. Now you can start creating and adding your awesome content. In addition if you like, have a look at the other available theme options and use additional theme features. To access the theme options panel, simply navigate to **"Appearance => Customize => Theme Options"** in your WordPress dashboard, there you will find the following sections:
- **General**
- **Layout** *(premium)*
- **News Ticker** *(premium)*
- **Typography** *(premium)*
---
### General Options
In the "General" options section you'll find some basic options to upload a favicon, manage excerpts and modify the copyright notice in the footer:
- Upload a favicon *(premium)*
- Modify custom excerpt length in words
- Change custom excerpt more-text
- Change copyright text in footer *(premium)*
- Hide theme credit link in footer *(premium)*
---
### Layout Options (premium)
In the "Layout" options section you can easily change the look of your theme and enable/disable several elements with only a few simple clicks. In the layout options section you can find the following options:
- Change position of sidebar right or left
- Enable/Disable breadcrumb navigation
- Enable/Disable featured image on posts
- Enable/Disable categories on posts
- Enable/Disable date on posts
- Enable/Disable author name on posts
- Enable/Disable comment count on posts
- Enable/Disable tags on posts
- Enable/Disable sharing buttons on posts
- Enable/Disable author box below post content
- Enable/Disable related articles below post content
- Enable/Disable post navigation
- Enable/Disable comments on pages
---
### News Ticker Options (premium)

This beautiful magazine WordPress theme has included a nice and useful news ticker located within the header where you can display articles from any category or tag. You can manage the news ticker with the following options:
- Enable/Disable news ticker
- Change ticker title
- Set number of posts on ticker
- Filter posts by categories (use [category ID](https://mhthemes.com/support/how-to-find-wordpress-category-id/))
- Filter posts by tags (use tag slug)
- Skip posts (Offset)
- Ignore sticky posts
---
### Typography & Color Options (premium)
To customize the typography of your website, you can select your favourite font from a collection of most popular Google webfonts in the theme options panel under *"Typography"*. Besides, you may also easily change the color scheme of your theme with a few simple clicks by using some awesome colorpickers. We have extended the basic color options of WordPress under **"Appearance => Customize => Colors"** in your WordPress dashboard with some new options to change the color scheme of your theme. Just check it out and create your favourite color scheme.
---
### Related Articles (premium)

MH BeBold WordPress theme includes a built-in box with related articles below the content on posts. These recommendations are based on tags. So if you would like to use this feature to show related articles, please ensure that you have tagged your posts. As soon as tags match, articles will be recommended in the *"Related Articles"* box. Here you can find more information: [How do related posts work](https://mhthemes.com/support/how-do-related-posts-work/).
---
### Social Icons above Header (premium)

To display the social icons in the header, you’ll simply need to create a custom menu with custom links to your social media channels in your WordPress dashboard under **"Appearance => Menus"** and assign this menu to the *"Header Social Icons"* menu slot. The theme will automatically recognize the social networks based on their URLs and display the related icons. Currently the following networks are supported: *Behance*, *Dribbble*, *Facebook*, *Flickr*, *Google*, *Instagram*, *LinkedIn*, *Pinterest*, *Reddit*, *Soundcloud*, *Tumblr*, *Twitter*, *Vimeo*, *Xing* and *YouTube*.
---
### Contact Page (premium)
MH BeBold Magazine WordPress Theme offers a *"Contact"* page template with an additional sidebar to display a different sidebar on your contact page than on other posts and pages. In case you want to use this template for your contact page, you could for example place the *"MH Facebook Page"* widget and a text widget with your contact details in the *"Contact"* widget location under **"Appearance => Widgets"**. MH BeBold WordPress Theme also supports the popular *"Contact Form 7"* plugin to easily create working contact forms with only a few clicks. Please read the following to learn more: [How to create a working contact page in WordPress](https://mhthemes.com/support/create-contact-page-wordpress/).
---
### Font Awesome Icons

MH BeBold WordPress Theme comes with a nice collection of over 400 great icons by Font Awesome. You can view these icons in detail on the [Font Awesome website](https://fortawesome.github.io/Font-Awesome/icons/) and use them as you like on your own website to give your content a personal or professional touch. You can easily display the icons by adding the small HTML snippet of the specific icon in the WordPress **text editor** (not visual), for example a cloud icon:
---
### Shortcodes

If you prefer to use shortcodes to easily add styled elements like tabs, columns, boxes, accordions or else to your website, we recommend the *"Shortcodes Ultimate"* plugin. This plugin has included tons of useful shortcodes to easily customize your website. You can find more information and the documentation [on the plugin site](https://wordpress.org/plugins/shortcodes-ultimate/).
In case you want to learn more about WordPress, MH BeBold WordPress Theme or if you would like to read additional tutorials, please have a look at our [support center](https://mhthemes.com/support/).
---
# How-to translate AAWP into your language
Source: https://mhthemes.com/support/knb/translate-aawp-into-your-language/
Our plugin can be easily translated into any language and even includes several non-English translations. If your language is not included in the list below, or your language has an incomplete translation, follow the instructions below to create and/or update a translation.
At this time, AAWP includes translations for the following languages:
- English (default)
- German
- Spanish
- French
- Italian
- Vietnamese
**Please note:** Some translations may not 100% completed yet.
### Centralized translation platform
We think that handling translations should be as easy as possible for you. That's why we decided to setup our very own [translation platform](https://translate.flowdee.de/projects/aawp/).
In case you don't have an account yet, [register here](https://translate.flowdee.de/wp-login.php?action=register).
### Adding new translations
[](https://translate.flowdee.de/projects/aawp/)
First you must select the locale you want to edit (e.g Spanish).
In case you're searching for a certain string, click on the link "Filter", enter the desired string into the "term" field (e.g. "pages") and hit the "filter" button on the right
Double-Click a term or click on the "Details" link on the right. Now you can add your translation and save by hitting "Add translation".
[](https://mhthemes.com/wp-content/uploads/2018/02/aawp-docs-glotpress-edit.png)
### Editing existing translations
In case AAWP already has a translation for your language but it is incomplete or needs improvements, you may update it at anytime using the same steps as above.
### I can't find my language in your locales list
No problem! Just [get in touch with us](https://getaawp.com/contact/) and we will set it up for you.
### Submitting your translations for inclusion
If you have translated AAWP into another language, or made improvements to an existing translation, we would love to include it directly into the plugin. Simply [send us an email](https://getaawp.com/contact/) and let us know that you added/updated translations.
---
# How to Inspect HTML and Tweak CSS Safari, Chrome, Firefox, and Edge: Real Time
Source: https://mhthemes.com/support/knb/how-to-inspect-html-and-tweak-css-safari-chrome-firefox-and-edge-real-time/
Web developers and designers' job when creating a website is for the users to be convinced in one singular entity instead of making it look like just a series of HTML elements formatted to make a website look nice. However, [using the right tool](https://mhthemes.com/support/knb/browser-developer-tools-to-inspect-code-wordpress-websites/), even the non-developers can now check on the back curtain of a website to see what's happening on the site's back-end.
The classic "view page source" trick might be familiar to you, which displays the page's raw HTML in a browser window. However, there's an easier way to do the detective work on your site: The [Inspect Element Feature](https://mhthemes.com/support/knb/browser-developer-tools-to-inspect-code-wordpress-websites/) lets the user view and modify a website's front-end. This feature can be useful when a web developer or designer is [building a website](https://mhthemes.com/support/knb/css-tutorial-to-add-custom-css-to-wordpress-website/) or if an individual is learning how a website works.
This article will help you understand what is "inspect element", and how to do it on four popular or most known browsers.
Web professionals’ secret weapon is the inspect element. It is what developers, designers, and marketers frequently used to see the inside of any website whether it's their own website or not, to preview the website’s content, style, bugs that need to be fixed, or to learn how the website is built. For example, if you as a user or a developer find an interesting interface on your competitor's website, the inspect element will allow you to see the HTML and [CSS](https://mhthemes.com/support/knb/mh-magazine-css-customizations/) that make it up.
## How to Inspect Element
Currently, all modern web browsers have a native tool to inspect the element. Below are the different steps or instructions on how to use the inspect element tool in four major desktop web browsers: Google Chrome, Firefox, Safari, and Edge. In this article, I'll be using [mhthemes.com](https://mhthemes.com/) as an example.
- How To Inspect Elements in Chrome
- How To Inspect Elements in Firefox
- [How To Inspect Elements in Safari]("#how-to-inspect-elements-in-safari)
- How To Inspect Elements in Edge
### How To Inspect Elements in Chrome
There are several ways for you to open the developer tool:
- Using your mouse, right-click on any part of the page and choose Inspect. Choosing the Inspect will bring you to the element in the inspector view.

- In the top right corner of your web browser, you will see the three dots in which you can Customize and control Google Chrome, there, you can click More Tool > Developer Tools > Elements.

- Use shortcuts: For Windows: control-shift-C, for macOS: command-option-C.
With inspect element you can review and check your website's responsiveness. You can do the steps above and click the Icon beside “Elements”.

### How To Inspect Elements in Firefox
To open the Firefox Inspector, you can:
- Using your mouse, right-click on any part of the page and choose Inspect. Choosing the Inspect will bring you to the inspector view.

- In the top right corner of your firefox browser, you will see the three lines in which you can click More Tool > Web Developer Tools > Inspector.
  
- Use shortcuts: For Windows: control-shift-C, for macOS: command-option-C
The inspect element of Firefox is at the bottom of the window by default. To change this, click the three dots in the top right corner of the inspector, there, you can choose the display option that you want.

### How To Inspect Elements in Safari
Before you use Safari's inspect tool, Web Inspector, you first need to enable the Safari Developer tools. To do this, select Safari > Preferences. You will see the preferences window under Advance, there, you have to check the box next to the Show Develop menu in the menu bar. After that, you'll see a Develop option added to the menu above.
Once you've enabled the Safari Developer tools. You can now go to your desired web page. There are three ways to open Web Inspector:
- Using your mouse, right-click on any part of the page and choose Inspect. Choosing the Inspect will bring you to the element in the inspector view.
- From the top menu bar, choose Develop > Show Web Inspector.
- Use the shortcut command-option-I.


By default, Safari's inspector opens at the bottom of the window. You can change this configuration by clicking the icon to position the display on the right side or to open in a separate window - both features are located next to the X icon in the top left corner of the display.
The Safari's inspector panel contains two columns. The first column shows the source HTML, and the second column shows the page's CSS. You can use your cursor to explore the source HTML, there, you can see which lines code of each page (blue highlights are for the content, green highlights for the padding, and orange highlights are for the margins).
### How To Inspect Elements in Edge
To open the Edge Inspector, you can:
- Using your mouse, right-click on any part of the page and choose Inspect. Choosing the Inspect will bring you to the element in the inspector view.
- In the top right corner of your web browser, you will see the three dots, there, you can click More Tool > Developer Tools > Elements.

- Use shortcuts: For Windows: control-shift-C, for macOS: command-option-C
The codes in the “Element” can be edited by clicking the certain codes that you want to edit, from there you can try editing the text, heading tags, paddings, and margins. You can see the changes on the webpage. But don’t worry because the original appearance of the page will re-appear once you reload the page.
Once you learn the basic knowledge of your browser’s inspector tool, you will learn all the information about your favorite websites that are publicly available. With just a few clicks and [editing of CSS](https://mhthemes.com/support/knb/css-tutorial-to-add-custom-css-to-wordpress-website/) and HTML code, you can explore how web pages are built, what styles they use, how these websites are optimized for search engines, how web developers format the websites on mobile, and more.
---
# How to upload optimal images for MH Magazine WordPress theme
Source: https://mhthemes.com/support/knb/optimal-images-for-mh-magazine/
First impressions matter a great deal when it comes to the appearance of your website. With MH Magazine you can create aesthetically pleasing WordPress websites with the minimum of effort. The use of high quality images is quite possibly the most important aspect of your websites' aesthetics as images have the power to instantly grab the attention of visitors like no other content element.
[MH Magazine](https://mhthemes.com/themes/mh-magazine/) and professional-grade imagery work hand-in-hand in providing you a professional-looking, modern and extremely responsive website. This is why it's of the utmost importance to use the correct images for your site contents. Besides, this also ensures that you are using great-looking optimized images that look fantastic on all desktop platforms and mobile devices. Let's see how to completely optimize your images for use with the popular MH Magazine WordPress theme.
### Common mistakes when uploading images for MH Magazine
> **IMPORTANT**: How do you know that you've uploaded images which are not suitable for MH Magazine?
>
> - **Slider oddly resizes** - your slider keeps resizing depending on the shown image.
> - **Bad image quality** - your images have bad quality and are pixelated or blurry.
> - **Wrong image sizes** - your images appear far too large or too small on your website.
When using the MH Magazine theme, a very common mistake users can make when administering their WordPress websites is to upload images with the wrong image format. Two further common mistakes are when uploading images with too small image sizes or the wrong aspect ratio. Let's have a look at these common mistakes in detail - improper image format, aspect ratio and image sizes.
### Image formats - landscape vs. portrait

MH Magazine is optimized to use *Landscape* images, like it's common for most modern online magazines and news websites. So when you're [adding featured images to your posts](https://mhthemes.com/support/how-to-use-featured-images-wordpress/), always use large rectangular images for best results. Using *Portrait* images within a landscape-orientated content slider may force WordPress to crop out large portions of the uploaded image in order for it to generate an optimally sized image for use within the theme. Check this example between both landscape and portrait formats of the same image while using the *MH Slider* widget.
**Landscape Image** - As you can see right below, using a landscape-orientated image that meets the recommended optimal dimensions produces high-quality results with no unwanted disfigurements:

**Portrait Image** - Whereas, when using a portrait-orientated version of the exact same image, you can quickly see how it is affecting the overall appearance of your website in an unwanted way:

The differences are immediately noticeable with the main subject of the image being partially cropped out of view, along with an excessive amount of zoom. The height of the slider widget is also being increased due to the theme attempting to maintain a consistent image aspect ratio of 16:9.
### Image size and aspect ratio
Which brings us to image size and aspect ratio. This is another issue you may struggle with when trying to upload suitable images to your website. Thumbnails in MH Magazine have certain image ratios, depending on where they are being shown - e.g. on archives, posts or within widgets.
> **IMPORTANT:** Recommended image sizes depending on which slider size (large / normal) you are using.
>
> - If you're using the large, full-width slider on your widgetized front page in the *Home 1* widget area, the optimal size of your featured images should be at least **1030 x 438px**.
> - If you're using the smaller slider on your widgetized front page in e.g. the *Home 2* widget area, the optimal size of your featured images should be at least **678 x 381px**.
It's recommended to upload images with a **16:9 aspect ratio** which is the most commonly accepted standard ratio for todays digital media devices. For the large slider in MH Magazine, WordPress will generate a thumbnail with 1:2.35 aspect ratio, which is slightly different to reduce the height of the image. In general, when you upload images, [WordPress will generate suitable thumbnails](https://mhthemes.com/support/regenerate-thumbnails-after-theme-change/) which will be displayed nicely on your posts, archives, within custom widgets and so on.
If you're selecting images that don't meet at least the recommended image dimensions, you will encounter some undesirable stretching, squashing and cropping effects on your images, also usually along with a dramatic decrease in image quality, as shown in the example image below:

Not only has the image the wrong image format (portrait format) causing the slider to be much larger in height than what is intended, but the image size of the featured image within the slider is far less than the optimal dimensions, resulting in a low quality and blurred image. This lethal combination can instantly effect that all-important first impression you should be wanting to make on your visitors. That's why it's important to upload images that are suitable for modern websites.
### How can you edit your images?
First of all keep in mind, that **it's highly recommended to always upload images that meet at least the recommended image sizes**. If you upload images that are larger than recommended, that's fine. But if you're uploading images which are simply too small, then there is of course no way to edit them to become larger without the image loosing in quality.
We've mentioned the recommended image size for MH Magazine further above within this article. In case you're using a different [WordPress theme by MH Themes](https://mhthemes.com/themes/), then please see the [particular theme documentation](https://mhthemes.com/support/category/theme-documentation/) for recommended image sizes in your WordPress theme.
If you upload large images, there usually is no need for further edits, because WordPress will automatically generate suitable thumbnails. However, in case you want to modify your images, you certainly don't need to spend money on additional software. There are lots of free resources available to you, with one being built right into WordPress itself. Almost certainly an under-used feature of WordPress is its built-in image editor, which you can access by selecting any of your images from within your **Media Library** and clicking on the **Edit Image** button.
This will open a very simple, yet more than adequate image editor that allows you to carry out a variety of operations on your chosen image. You can thus crop, rotate, rescale, resize, and flip the selected image using the tools provided by the built-in image editor in WordPress. Get some more information and guidance from this [tutorial on how to edit media within your WordPress dashboard](https://codex.wordpress.org/Edit_Media).
If you're looking for a professional software solution, there are *Photoshop-alternatives* available at your disposal and free of charge. For example [Gimp](https://www.gimp.org/) and [PaintNet](https://www.getpaint.net/index.html). Both of these free software programs allow you to carry out many modern image manipulation tasks with ease. Besides, you can look for [suitable WordPress plugins](https://wordpress.org/plugins/search.php?type=term&q=images) to optimize, modify or edit your images in WordPress.
### Conclusion: Optimal images for usage with MH Magazine
Using professional-grade imagery on your WordPress website sounds expensive. Yet, it doesn't necessarily need to be as there is a wide range of royalty-free images available to you that you can freely use on your WordPress website. The term *Royalty Free* doesn't necessarily mean the image is available to you free of charge. However, you have to dig a little deeper to find *actually free* royalty free imagery, with these [free image sources](https://mhthemes.com/blog/10-image-sources-for-wordpress-websites/) leading the way.
Adhering to the above mentioned pointers and best practices within this article will ensure you're making a positive impression on your website visitors. The [MH Magazine WordPress theme](https://mhthemes.com/themes/mh-magazine/) is a comprehensive creation that presents your content and images in a beautiful and well-organized way. MH Magazine is one of the most popular magazine and news themes available for WordPress, leaving you to take care of the content and take your website to the next level.
More extensive information, basic tutorials and useful sources on images can be found here:
- [Basics of Images in WordPress](https://mhthemes.com/support/basics-of-images-in-wordpress/)
- [How to use featured images in WordPress](https://mhthemes.com/support/how-to-use-featured-images-wordpress/)
- [Solving issues with images on your WordPress website](https://mhthemes.com/support/solving-issues-with-images/)
- [Solving HTTP errors when uploading images in WordPress](https://mhthemes.com/support/solving-http-errors-when-uploading-images-in-wordpress/)
- [How to embed images in WordPress plus adding a caption](https://mhthemes.com/support/how-to-embed-images-in-wordpress-plus-caption/)
- [How to create a clickable background image in WordPress](https://mhthemes.com/blog/create-clickable-background-images-wordpress/)
- [5+ Best Image Optimization Plugins for WordPress Images](https://mhthemes.com/blog/plugins-for-optimizing-wordpress-images/)
- [5 Tips for Enhancing Your WordPress Images](https://mhthemes.com/blog/5-tips-enhancing-wordpress-images/)
- [10 Image Sources For Your WordPress Website Or Blog](https://mhthemes.com/blog/10-image-sources-for-wordpress-websites/)
- [How to fix issue with changing image sizes in slider](https://mhthemes.com/support/fix-issue-with-changing-image-sizes-in-slider/)
---
# Documentation: Diamond WordPress Theme
Source: https://mhthemes.com/support/knb/documentation-diamond/
MH Themes recently has taken over the Diamond WordPress theme from the previous developers at Eightpixeldesign.

---
# Solving issues with the responsive layout of your WordPress theme
Source: https://mhthemes.com/support/knb/solving-issues-responsive-layout/
All of our [WordPress themes](https://mhthemes.com/themes/) are fully responsive and automatically adapt based on the screen resolution of the particular device, be it on tiny mobile screens or large desktop devices. The responsive layout of your WordPress theme usually works out of the box and displays your content in a well-organized way. In case you have any issues with the responsive layout of your website, please have a look at our overview of the most common issues and their solutions.
- How to disable the responsive layout of your WordPress theme
- Responsive layout suddenly stopped working
- Mobile version of WordPress theme doesn't look like the theme demo
- Advertisements and banners are not responsive and are being cut off
- Behavior of sidebars and other widget areas on mobile
- You have not found a solution to your issue?
### How to disable the responsive layout of your WordPress theme
Nowadays all modern and professional websites should be responsive to properly support mobile devices, especially since Google made this one of their important ranking criterias. That means it's highly recommended to ensure that your website is responsive to display well on mobile devices and disabling the responsive layout of your site usually doesn't make sense at all.
That also is the reason why your WordPress theme doesn't include options to disable the responsive layout as these options simply would be redundant. However, if you really want to disable the responsiveness of your website, you would need to remove all code from within the *media queries* within the stylesheet (*style.css* file) of your WordPress theme.
### Responsive layout suddenly stopped working
In case you encounter issues where your website suddenly is not responsive anymore, this can have several reasons. The first thing you should do is check if you are running plugins which conflict with the responsive layout of your website. Sometimes plugins are being updated automatically and this could cause such issues. It's recommended to deactivate your plugins one by one and see if that already solves your issue. Please also ensure that you have not accidentally modified code that could cause your issues. If you have modified code, please restore the original codebase.
### Mobile version of WordPress theme doesn't look like the theme demo
If the mobile layout of your website does not resemble the mobile layout which you can see in the particular [theme demo](https://mhthemes.com/themes/mh-magazine/#demos), then you are most likely running plugins (e.g. Jetpack) that are overriding the responsive layout of your theme. To solve this issue, you could disable the plugin (or that particular feature within the plugin) and the default responsive layout of your WordPress theme will be used instead. In case this doesn't solve your issue, please further debug your site and disable other 3rd party plugins one by one or remove scripts which might cause these conflicts. Please also see: [What if the mobile layout does not look like the theme demo](https://mhthemes.com/support/mobile-layout-does-not-work/).
### Advertisements and banners are not responsive and are being cut off
If your banners and advertisements are being cut off on desktop or mobile or in case your ads don't show up as expected, then there usually is an issue with the implementation of your advertisement itself. Such issues are not related to your WordPress theme, but related to the implementation of your advertisement or related to invalid ad code. You always should ensure that your advertisements fit into the particular location. For example you can't place a 728 x 90px leaderboard banner into a sidebar which has a width of 300px. In such cases it's normal that your advertisement will be cut off and you should use 300 x 250px banners instead.
Please also keep in mind that while you are using responsive WordPress themes, your website will automatically adapt based on the particular screen resolution of the device. This means it might happen that while ads are being displayed fine on desktop, they are cut off on mobile devices because there is not enough space available. That is why you should make use of responsive advertisements wherever possible. You could contact your advertiser and check if there are responsive versions of your advertisements available. For more solutions to issues with advertisements, please see: [Solving issues with ads and banners](https://mhthemes.com/support/solving-issues-ads-and-banners/).
### Behavior of sidebars and other widget areas on mobile
The benefit of responsive layouts is that these layouts will automatically adapt based on screen resolution and display your content nicely on mobile devices. This usually works with fluid grids of containers and these containers will automatically float below each other based on certain breakpoints. That means while the sidebar on your website is displaying left or right of your content on desktop devices, the sidebar will float below your content on mobile devices (e.g. smartphones).
Usually your content (as most important) will always display first on mobile devices and then the sidebars or other widget areas will be shown while scrolling down the page. It's the same when using the widgetized *Homepage* template from our [popular magazine themes](https://mhthemes.com/themes/), there also the widget areas will automatically float below each other on smaller devices. That also means you can't suddenly display the sidebar on top or order the widget areas differently on mobile devices. Such changes always would require custom development based on your personal requirements.
### You have not found a solution to your issue?
In case you have not found answers to your questions in this support article, please also take a look at our [other support topics](https://mhthemes.com/support/), as it is very likely that you will find your answer there. If you have purchased a [WordPress theme by MH Themes](https://mhthemes.com/themes/) and have a valid license to gain access to theme updates and support, then you may also [send a support request](https://mhthemes.com/support/request/) for additional assistance.
---
# How to use Firebug to Inspect HTML and Tweak CSS in Real Time
Source: https://mhthemes.com/support/knb/how-to-use-firebug-to-inspect-html-and-css/
Firebug is a very popular and powerful open source web development tool. It can be used to inspect HTML elements and modify CSS and the layout in real time. [Firebug is an add-on of Mozilla's Firefox browser](https://getfirebug.com/) but it is also available for other browsers in a *lite* version. Still, with Firefox it is most powerful and can be even extended further.
We will keep this Firebug tutorial at a beginner level though. So in case you have a website or blog and want to change the color of your menu bar, modify the font size or tweak the link hover color - this tutorial could be very helpful to you.
### Download and Install Firebug
If you are using Firefox, you can [install Firebug as an add-on](https://getfirebug.com/faq/#How_do_I_install_Firebug). To do so, please go to *Tools => Add-ons*, search for the Firebug add-on and click *Install*. If you are working with other browsers you can use Firebug *lite* - it is basically simply a script written in JavaScript and no installation is necessary. Instead you may simply use the following link and drag & drop this link directly into your browser's bookmark:
[Firebug lite](//getfirebug.com/releases/lite/1.2/firebug-lite-compressed.js)
### Working Correctly with Firebug
How to work with Firebug? This is pretty easy. After installation you will see a small bug icon in your Firefox browser bar (or in your bookmarks when using another browser) - if that's not the case you might want to restart your browser. As soon as you click on the bug a split screen will open. The browser is now showing your website's content in the upper half and the Firebug screen in the lower half.
You may modify the Firebug screen size by pulling the screen up or down as you like. On the left side of the Firebug screen you can see the (mostly collapsed) HTML structure of your currently open website - on the right side you can see all the CSS rules which apply to the selected HTML element.
### Inspecting HTML elements to modify CSS
Now let's start inspecting! There are different ways to use the Firebug inspection tool. One is, to "navigate" within the HTML structure of the Firebug screen and unfold elements to find what you like to change and when marked/clicked, you will see the CSS which applies to this element. As you will have to go through a lot of elements here, this might be quite time consuming.

Here is a shortcut: The second approach would be to activate the square shaped *Inspect Element* icon in the upper left corner of the Firebug screen. Now use your mouse on your website to find exactly the element you want to inspect (e.g. a link, main navigation bar, title, button etc.). Having selected this element you may now further inspect it by unfolding the HTML elements in the Firebug left screen. Again on the right side you can see the applied CSS.
### Tweaking and modifying CSS in real time
You have now inspected your website and you've found the element you want to modify. On the right side in your Firebug screen you can see the CSS from every existing style that is applied to your selected element. To tweak CSS in real time you can now click on the CSS rule which you want to modify and change it. ([To modify CSS you will need to know some basic CSS and HTML](https://mhthemes.com/support/css-tutorial-to-add-custom-css-to-wordpress-website/).) In the example below we have changed the link color from *#1f1e1e* to *#1feded*. Please see the image below.

### How to make permanent CSS changes
Please remember, that the CSS changes you apply with Firebug are only for the moment and only you are able to see the changes, not your website visitors. As soon as you refresh your browser, the modifications will be gone again. Firebug is basically the tool to help you finding the element (HTML element, CSS class or ID) you wish to tweak.
To apply custom CSS permanently, you will have to insert the custom CSS by either using a plugin (e.g. [Simple Custom CSS](https://de.wordpress.org/plugins/simple-custom-css/)), [creating a child theme](https://codex.wordpress.org/Child_Themes) or through an option which is implemented in your WordPress theme. It is not recommended to apply custom CSS directly into the stylesheet of your WordPress theme, because with the next theme update all of your changes will be gone - that's why you always should use one of the mentioned methods (child theme or plugin).
---
# How to open WordPress menu items in new window/tab?
Source: https://mhthemes.com/support/knb/open-wordpress-menu-items-in-new-tab/
In WordPress you can create custom menus very easily through your WordPress dashboard (if supported by your [WordPress theme](https://mhthemes.com/themes/)). But by default the menu items will always open in the same browser window/tab. What if you would like to open WordPress menu items in a new window? In this tutorial you will learn how you can easily open the menu items in a new browser tab.
### Open WordPress Menu Items in new Browser Window/Tab
When adding *normal* links to your content on post or pages, you probably would just use the `target="_blank"` link attribute to open links in a new browser window, for example:
This link will open in a new window
But you will notice that you can't just do that for the menu items in WordPress. At least not without customizing code. The good news is that there is an option to open the menu items in a new browser window/tab. This option can be found in your WordPress dashboard under **"Appearance => Menus"** when you check *"Link Target"* in the *"Screen Options"*, as you can see in this video:
When you have enabled this, each WordPress menu item will have an option to open the link in a new browser window/tab. This comes especially very handy when you want to add external links to your custom menu in WordPress. In case you don't need the option anymore, you can just hide it again via the *"Screen Options"* in the upper right corner of the screen.
### More about Custom Menus in WordPress
If you want to learn more about custom menus in WordPress, you can check the WordPress Codex or this tutorial: [How to create a Custom Menu in WordPress.](/support/knb/create-custom-menu-wordpress/) In case you have purchased a theme and have any questions about your WordPress themes by MH Themes, you can check the [support center](https://mhthemes.com/support/) or open a support ticket at our helpdesk. We will be more than happy to assist you.
---
# Theme customizer not working in WordPress – common solutions
Source: https://mhthemes.com/support/knb/theme-customizer-not-working/
The *WordPress Theme Customizer* is a great and awesome feature to customize your WordPress website very easily with only a few clicks in the options panel. You can change many aspects of your site or [WordPress theme](https://mhthemes.com/themes/) and even see a live preview before you save your changes to the database. But in rare cases it may happen that the theme customizer suddenly stops working.
- Why does the Theme Customizer stop working
- What to do when the Live Preview is not working
- Common fix: Update your WordPress environment
- Theme Customizer is loading without styling
- Theme Customizer is still not working!
### Why does the Theme Customizer stop working
When you notice that the WordPress theme customizer suddenly stops working and if the live preview in your WordPress dashboard was working fine before, then the most common reason for the issue is a plugin conflict. Even if you have changed nothing on your site or have not installed any new plugins, your issue still can be caused by a previously installed plugin, for example when a plugin was updated automatically or in case there are [plugin leftovers](https://mhthemes.com/blog/clean-up-wordpress-websites-plugin-leftovers/) on your website.
The most common issue when the theme customizer is not working anymore, is that people see a blank screen instead of the live preview in their WordPress dashboard. This blank screen can be related to conflicting code on your WordPress website (e.g. conflicting plugins) or even related to a fatal error which usually results in the common [White Screen of Death](https://mhthemes.com/blog/resolving-white-screen-death-wordpress/).
Sometimes also the buttons of the menu items in the theme customizer do not work anymore and in very rare cases even the menu items won't show up. These kind of issues often are related to issues with JavaScript, for example when the JS is blocked by a plugin or other scripts on your site.
### What to do when the Live Preview is not working
In most cases you can solve issues with the theme customizer by [disabling your plugins](https://mhthemes.com/support/troubleshooting-wordpress/#deactivating_plugins) in the WordPress dashboard. You could try deactivating your plugins one by one to identify the plugin that is causing the issue and then just replace the specific plugin with a plugin that doesn't cause issues.
By the way, when a WordPress plugin is causing these kind of issues, it does not necessarily mean that the plugin is bad or not well coded, sometimes the reason simply is that the plugin isn't compatible with other plugins that you may be using on your website or not compatible with your WordPress theme, which also doesn't necessarily mean that you're running a low-quality theme.
There are thousands of WordPress themes and [plugins available on the market](https://mhthemes.com/blog/category/wordpress-plugins/). When running several plugins on your website, you're in the end mixing a lot of 3rd party code together and there always is a risk of conflicts. Compatibility issues can't be 100% avoided in the real world and there never is a guarantee when you install multiple 3rd party plugins on your WordPress website.
### Update your WordPress environment
Also a very common issue is when you are running an outdated version of WordPress and the customizer in WordPress shows a blank page. Many [WordPress themes](https://mhthemes.com/themes/) nowadays have added custom panels and additional options to the customizer, for example to add theme options.
[](https://mhthemes.com/themes/mh-newsdesk/)
For example, panels have been introduced in WordPress 4.0 and if you are running an outdated version of WordPress, the customizer may turn blank if you are using a theme that has added panels. You can easily fix this by updating WordPress to the latest version. Here you can find more information about the panel issue: [How to fix the add_panel() error when customizer does not work](https://mhthemes.com/support/how-to-fix-add-panel-error-in-customizer/).
In general it's always very important to keep your WordPress environment up-to-date, this doesn't only apply to WordPress itself, but also to all WordPress themes and plugins you may have installed on your website. Whenever you're running outdated code on your site, there is a potential risk that this may result in issues with the WordPress customizer or even lead to [security vulnerabilities](/blog/wordpress-security-guide/).
### What if the Theme Customizer is loading without styling
In very rare cases it is possible that the live preview of the theme customizer loads without CSS styling and that you only see blank and ugly HTML output in the customizer, instead of your shiny website. Whenever this happens, it's hard to say what could cause your issue because this would require further analysis and some [troubleshooting on your site](https://mhthemes.com/support/troubleshooting-wordpress/).
In case troubleshooting and disabling your plugins doesn't help and if you are desperate because you also can't find other reasons for your issue, then you could try to add the code snippet below to the file *wp-config.php* of your WordPress installation and it may resolve your issue:
define('CONCATENATE_SCRIPTS', false);
However, if the customizer in WordPress doesn't load CSS stylesheets or else, this also may be related to issues within your hosting environment (e.g. insufficient file permissions on your server). If you can't find the cuplrit of your issue by doing troubleshooting, disabling plugins or adding the mentioned snippet, it may also help to contact your [hosting company](https://mhthemes.com/wordpress-hosting/) for further analysis.
### You've tried everything and the Theme Customizer is still not working!
In case you can't locate the issue on your site, have checked all installed plugins, have reinstalled WordPress and/or your WordPress theme, have contacted your hosting company and if you have no other ideas anymore what could cause your issue with the theme customizer in WordPress, you could try to add the following code snippet to the file *functions.php* of your child theme (or by [using a plugin to add code](https://mhthemes.com/blog/wordpress-plugins-to-implement-code/)) and see if that helps to solve your issue:
remove_action('shutdown', 'wp_ob_end_flush_all', 1);
### Conclusion: Solving issues with the WordPress Theme Customizer
We hope that this article was helpful in order to solve your issues with the customizer in WordPress. If you have any other solutions to common issues with the customizer that are missing in this article or if you're facing other rare issues with the theme customizer, please let us know in the comments below. We'll then update this article from time to time to help as much WordPress users as possible.
This article also helped WordPress users with the following issues:
- Theme Customizer Preview Screen is blank
- Theme Customizer loads without CSS styling
- Theme Customizer not loading JS for live preview
- Customize/Live Preview not working
- Can't customize theme in WordPress
- Theme Customizer does not load anymore
---
# How to place ads and banners in your WordPress theme
Source: https://mhthemes.com/support/knb/place-ads-in-wordpress-theme/
We often receive requests about how to place advertisements (ads or banners) in WordPress themes to monetize a website. With this tutorial we would like to explain how you can place ads on your website very easily using a standard WordPress text widget and how you can make use of the *Advertising* options in our popular [MH Magazine WordPress Theme](https://mhthemes.com/themes/mh-magazine/) to place ads automatically inside the post content or between the posts on archives.
- Placing ads by using a WordPress Text, Blocks and Custom HTML widgets
- What is an ad code and where to get it?
- How to place ads without an ad code
- Placing ads using the Advertising options of MH Magazine
- How to display rotating ads / banners
- What to do if your ads are not showing up on your website?
### Placing ads by using a WordPress text widget
The standard WordPress Text widget, Block widget and Custom HTML widgets are fantastic all-rounder which can be used to do all kind of great things. These three widgets almost have the same function. You can insert almost anything you want in a text widget, starting from normal text, up to images (using HTML) and shortcodes or any other HTML code you want.
The WordPress Text Widget and Custom HTML Widget are ones of the widget options that comes in the basic installation of WordPress and WordPress.com, no Plugin required. It adds an HTML container to your WordPress Theme's sidebar.
The new editor allows users to add blocks to their widget areas using the familiar block editor interface introduced in WordPress 5.0. This gives users powerful new ways to customize their sites using the rich library of core and third party blocks. Block Widget also comes in the basic installation since WordPress 5.0 launched.
Text widget, Block widget and custom HTML widgets are perfect for placing ads on your website. Placing ads on these three widgets is very simple, just insert your ad code (like e.g. Google AdSense or any other ad provider) into a text, block or custom HTML widget and place the widget in any of the available widget areas of your theme, e.g. in one of the many [available widget locations of MH Magazine WordPress Theme](https://mhthemes.com/support/knb/documentation-mh-magazine/#widgets). When you have placed the widget in a widget area, it will automatically display the content you have added.
### What is an ad code and where to get it?
An ad code is a piece of HTML or JavaScript code which you will need to add to your website to properly display the ads. You can get these ad codes from any ad provider of your choice. An ad code of Google AdSense looks e.g. like this:
Just insert this kind of ad code into a text widget, place the widget in any widget area of your choice and it will display your ad. In this example it is a **300 x 250px** AdSense banner ad. Of course **this example code won’t work for you**, so if you want to advertize with Google AdSense, [just register a Google AdSense account](https://mhthemes.com/support/how-to-add-google-adsense-to-wordpress/), grab your own ad code and place it on your website.
### How to place ads without an ad code
If you want to place ads on your website without a pre-defined ad code (e.g. if you got a direct booking from a client), you can display ads very easily by adding simple HTML into a text widget. Example of adding a linked image / banner with HTML:
### Placing ads using the Advertising options of MH Magazine
[MH Magazine WordPress theme](https://mhthemes.com/themes/mh-magazine/) has included *Advertising* options to display ads in your post content or on archives very easily, without using a widget. You can find the *Advertising* options in your WordPress dashboard under **Appearance => Customize => Theme Options => Advertising**.

When you navigate to the *Advertising* options section, you will find several forms where you can insert your ad codes or custom HTML code to display ads, just like you would do with a text widget. This is a very easy and comfortable way of adding ads to your content without the need to modify your content manually.
If you have inserted e.g. the ad code to display a content ad on posts, the theme will automatically display the ad in all your posts, like you can see in the below screenshot. In the *Post Options* below the **post editor on single posts**, you can also overwrite the global ad code with a custom ad code or disable the content ad for a specific post.

As you can see in the *Advertising* options section, there is also a form to insert an ad code to **display ads on archives**. If you have entered the ad code, it will show ads after every X posts on archives. You can modify the number of posts between every ad, **default is 3**, so by default there will be an ad displayed after every third post on archives, like in this example:

### How to display rotating ads / banners
Usually when you implement an advertisement, it will always be displayed on all posts and/or pages where you've embedded the ad code. If you want to display ads dynamically, to show different ads on posts, pages or archives which will automatically be replaced with every page impression for example, you could make use of dynamic content related ads like Google AdSense or make use of ad rotators. An example for a popular plugin to make use of rotating ad slots is [Advanced Ads](https://mhthemes.com/referer/advanced-ads/).
### What to do if your ads are not showing up on your website?
In case your advertisements and banners are not showing up after you have added specific ad codes or HTML code to your WordPress website, please follow the checklist below:
- Make sure you have properly implemented the code
- Make sure your ad code is active (you can check that at your ad provider)
- Check if you are using any plugins that might cause conflicts
- Check if your site is possibly blacklisted or if your content meets the requirements
In addition, if you are using Google AdSense, **it might take a while until your ads will appear** on your website. The Google bot first has to crawl your website properly and it also might happen that AdSense ads won't be displayed on your website if your content is not appropriate based on the [AdSense requirements](https://mhthemes.com/support/how-to-add-google-adsense-to-wordpress/) which are defined by Google.
Please note that in general your WordPress theme doesn't prevent ads from showing up and your theme will only display the ad code which you've added to your site. That means there usually is **no need to send support requests to your WordPress theme provider unless you have checked all the above mentioned scenarios**. In case you've an issue with a particular ad network (e.g. Google AdSense) it's recommended to contact their support desk because your WordPress theme usually doesn't affect if your advertisements are showing up or not.
---
# Solving HTTP errors when uploading images in WordPress
Source: https://mhthemes.com/support/knb/solving-http-errors-when-uploading-images-in-wordpress/
Now and then we received support requests about HTTP errors when uploading images in WordPress. These HTTP errors are actually a quite common WordPress issue and usually not related to the WordPress theme you're running. In fact, if anything, they usually are related to your server environment and more specifically to file permissions or memory limits on your server. In this article we'll talk about why HTTP errors might occur when uploading images to your WordPress website, how to troubleshoot issues and how to easily solve your issues with only a few clicks.
### HTTP errors suddenly occur when uploading images in WordPress

Often HTTP errors related to image uploads seem to happen unexpectedly after updating to the latest version of WordPress or other updates. However, most of the time there are other reasons for these HTTP errors in WordPress, for example if your hosting provider made an update / upgrade or in case you are running plugins or scripts that affect the WordPress media upload. Infiltrated malware or poorly configured shared hosting environments can also cause unexpected HTTP errors in WordPress, for example in case of incorrect file permissions, insufficient memory limits or else.
### How to fix image upload errors in WordPress
#### Incompatible plugins or scripts
To find out the culprit of HTTP errors when uploading images in WordPress, you can start troubleshooting within your own WordPress environment. That means you could disable your plugins, especially those of unreliable providers or plugins that haven't been updated for a long time (e.g. 12 months). The same applies to WordPress themes (even if not in use), especially those which have not been updated for a long time and which might contain malware or incompatible code.
In general it's recommended to always use plugins and themes from reliable sources. These can usually be found in the official WordPress plugin and themes directory. Reliable free and [premium WordPress themes](https://mhthemes.com/themes/) and plugins can also be found at most recognized and popular theme shops. If disabling or removing suspicious scripts and plugins doesn’t help, then please see read the next sections for further ways of solving HTTP errors related to image uploads in WordPress.
#### Incorrect file permissions on web hosting server
When uploading images in WordPress, HTTP errors often occur because of incorrect file permissions for the WordPress uploads folder on your server. That means WordPress doesn't have permission anymore to access the particular directory, where your uploaded images are being stored and saved for further usage. These incorrect permissions prevent WordPress from uploading images to your server and this results in the HTTP error notice. File permissions for example could have been changed by accident per your hosting company when they run updates / upgrades on your server.
If you are familiar with FTP clients like [FileZilla](https://filezilla-project.org/) or else, you can easily check and correct the file permissions for the WordPress uploads directory by yourself. To do so, there are some [comprehensive WordPress tutorials online](https://www.wpbeginner.com/wp-tutorials/how-to-fix-image-upload-issue-in-wordpress/) as well as helpful [support threads](https://wordpress.org/support/topic/http-error-when-uploading-images-17) on the official WordPress support forums. As an alternative, you could contact your hosting company directly as they usually will be able to assist you as well regarding the change of file permissions on your server. In case you're not happy with your current hosting company, you can have a look at our [overview of recommended WordPress hosting companies](https://mhthemes.com/wordpress-hosting/).
#### Insufficient server memory limits
Another reason for HTTP errors when uploading images in WordPress could be insufficient memory limits on your server. There are several threads from people with this issue that can be found online. A thread about limited memory allocated to Apache/PHP server for example can be found [here](https://wordpress.stackexchange.com/questions/59763/how-to-fix-http-error-when-uploading-images).
For a comprehensive tutorial on how to increase the memory and upload limits on your server, please see the following support article: [How to Increase the Memory & Upload Limit in WordPress](https://mhthemes.com/support/increase-memory-upload-limit-wordpress/). However, it is usually recommended to contact your hosting company and let them check the server configuration to provide you with enough memory allocated to your server space. In case you're running your websites on low-priced shared hosting environments, it's possible that you need to [upgrade your hosting plan](https://mhthemes.com/wordpress-hosting/) in order to increase memory and/or upload limits on your server.
### Additional resources related to HTTP errors in WordPress
The recommendations and tips in this article hopefully shed some light on HTTP errors when uploading images in WordPress. To sum up, these HTTP errors can occur because of many reasons related to your server environment, file permissions, malware or limited memory on your server.
In addition to what has been covered in this article, there might be other reasons as well which could lead to HTTP errors. If you can't find the culprit after following the mentioned recommendations, you could contact your hsoting company for further analysis. Information about HTTP errors and HTTP in general you can also have look at this source: [List of HTTP status codes](https://en.wikipedia.org/wiki/List_of_HTTP_status_codes).
This article also helped users with the following questions:
- Uploading image results in HTTP error
- HTTP error when uploading images via the WordPress media uploader
- HTTP error when uploading images to gallery
- Solve image upload problems in WordPress
- Image upload HTTP error fix
- Image upload not working in WordPress
- HTTP error when uploading BuddyPress avatar profile photo
- How to resolve HTTP error while uploading images on WordPress
---
# Solving issues with the Theme Customizer
Source: https://mhthemes.com/support/knb/solving-issues-theme-customizer/
The *Theme Customizer* is perfect to apply changes to your website and immediately preview the changes before saving them. You can enter the customizer through your WordPress dashboard and then take necessary steps to modify your website or easily enable / disable certain theme options. However, depending on your hosting provider or the plugins you're using it can happen that you encounter issues when using the *Theme Customizer*. We have put together an overview of frequently asked questions and their solutions to the most common issues with the customizer.
- How to access the Theme Customizer
- Theme Customizer is not working correctly
- Theme Customizer shows a blank page
- Changes in Theme Customizer won't take effect
- Internal server errors when accessing Theme Customizer
- How to add custom CSS code in Theme Customizer
- You have not found a solution to your issue?
### How to access the Theme Customizer
To access the *Theme Customizer* and customize your website, please navigate to **Appearance => Customize** in your WordPress dashboard. To quickly access specific areas of the customizer, like for example the section where you can edit your header, you can take a short cut and navigate to **Appearance => Header**. But in general it's recommended to simply access the customizer directly where all options are only a few clicks away.
### Theme Customizer is not working correctly
If your *Theme Customizer* is not working, this can have several reasons. Therefore we have created a more detailed tutorial which helps you understand the customizer and gives answers to most common issues you might have: [Theme Customizer not working in WordPress](https://mhthemes.com/support/theme-customizer-not-working/).
In case you can only see a blank page or your changes won't take effect, please have a look at the next section just below. In general, issues with the *Theme Customizer* are most often rooted with 3rd party plugin conflicts or problems with external scripts. So it is best to deactivate / replace plugins or remove scripts and see if that solves the issue.
### Theme Customizer shows a blank page
In WordPress 4.0 *Panels* have been introduced which theme developers allows to add custom panels for their theme options. We have implemented this great feature in our WordPress themes. In case you open the *Theme Customizer* and only see a blank page, then one possible cause might be, that you are running an old version of WordPress. To quickly solve this issue, please see this tutorial: [How to fix the add_panel() error when customizer does not work](https://mhthemes.com/support/how-to-fix-add-panel-error-in-customizer/).
### Changes in Theme Customizer won't take effect
When you are working with the *Theme Customizer*, you can preview changes in real time. After you hit the *Save & Publish* button, these changes should take effect when you look at your website in the front end. If that is not the case on your website and in case changes don't take effect, please ensure that you have saved your changes properly.
In addition please ensure that you have no caching plugins running and clear your browser cache. Whenever you see changes not taking effect on your website after saving the changes, in 99.9% of the time this is related to caching issues which you can fix by clearing the cache (plugins, browser, etc...). In case clearing the cache does not help either, please refer to the above section: Theme Customizer is not working correctly.
### Internal server errors when accessing Theme Customizer
If your site is hosted on a shared [hosting](https://mhthemes.com/wordpress-hosting/) server, it might happen that your server is running out of resources when accessing the *Theme Customizer*. This can not only affect the customizer, but also very likely slow down your entire website.
If you already have done some troubleshooting, deactivated plugins, removed scripts and have an updated WordPress environment running, then we would recommend that you contact your hosting provider and see if they are able to upgrade your hosting plan or if they can check the server logs to narrow down the source of your issue.
### How to add custom CSS code in Theme Customizer
Our popular [MH Magazine WordPress theme](https://mhthemes.com/themes/mh-magazine/) comes with a useful feature to insert custom CSS code through the customizer. Using this feature is recommended and very helpful for minor CSS customizations. Larger customizations usually should be carried out through a [child theme](https://mhthemes.com/support/creating-and-using-child-themes-wordpress/). You can access and use the custom CSS field when navigating to **Appearance => Customize => Theme Options => Custom CSS**. This custom CSS won't get lost after regular theme updates.
### You have not found a solution to your issue?
In case you have not found answers to your questions in this support article, please also take a look at our [other support topics](https://mhthemes.com/support/), as it is very likely that you will find your answer there. If you have purchased a [WordPress theme by MH Themes](https://mhthemes.com/themes/) and have a valid license to gain access to theme updates and support, then you may also [send a support request](https://mhthemes.support/) for additional assistance.
---
# Solving issues with the main menu
Source: https://mhthemes.com/support/knb/solving-issues-main-menu/
In WordPress you can easily create custom menus and assign them to available menu slots within your WordPress theme. It is always recommended to take advantage of the main navigation as that will be most present to your website visitors and help them navigate through your website. In case you are encountering any issues with custom menus in WordPress, especially with the main navigation of your theme, we have collected solutions to the most common issues.
- How to create custom menus in WordPress
- Menu is displaying several random pages after theme activation
- Main menu not showing properly after upgrading from free theme
- How to make custom menu static on scroll
- Use header menu as main navigation
- Menu disappears after installing child theme
- How to customize the design of the main menu bar
- You have not found a solution to your issue?
### How to create custom menus in WordPress
To create a custom menu in WordPress you have to navigate to **Appearance => Menus** in your WordPress dashboard. Here you can create new custom menus, assign categories, pages or custom links as menu items and then assign the menu to your preferred menu slot - if available. Please see this tutorial for more information: [How to create a custom menu in WordPress](https://mhthemes.com/support/knb/create-custom-menu-wordpress/).
When using most of our WordPress themes (e.g. [MH Magazine](https://mhthemes.com/themes/mh-magazine/)), it's also possible to make use of custom menus to display linked social icons that point to your social networks. To create a social menu, please see: [How to create a social icons menu in WordPress](https://mhthemes.com/support/create-social-icons-menu-wordpress/).
### Menu is displaying several random pages after theme activation
If you have activated your new WordPress theme and have never assigned a custom menu with this theme before, the theme usually will display all available pages on your site within the menu. To change this, you can create a custom menu in your WordPress dashboard under **Appearance => Menus** and assign the menu to the particular menu slot in your theme - as explained above.
### Main menu not showing properly after upgrading from free theme
When upgrading your theme from the *lite* to premium version, or if you simply change your WordPress theme, some basic settings will get lost as these are saved on a per theme basis in your database. To ensure that your menus will appear again, you simply need to re-assign your menus to the correct menu slots / locations under **Appearance => Menus** in your WordPress dashboard.
### How to make custom menu static / fixed on scroll
If you would like to have a static menu which stays on a fixed position when you scroll on your website, this usually requires custom coding in case that functionality isn't available out of the box. If you're familiar with coding, you could create a [custom child theme](https://mhthemes.com/support/creating-and-using-child-themes-wordpress/) for your WordPress theme and then apply your customizations as you like. As an example of what route you could take, please have a look at this: [CSS and simple jQuery](https://leafo.net/sticky-kit/).
### Use header menu as main navigation
Most of our WordPress themes are designed to have a main navigation as menu bar and you can display some additional menus for complementary links (e.g. header or footer menu). If you would like to get rid of the main navigation and use the small header menu as main navigation instead, this usually isn't possible out of the box and requires custom coding.
The reason for this is that there usually are several menu slots within your WordPress theme and it's not a good idea to display them all on mobile. For example the [MH Magazine theme](https://mhthemes.com/themes/mh-magazine/) has four menu slots in the header (header, social, main and additional navigation) and displaying all these menus on mobile devices wouldn't be good for usability and doesn't look appealing.
That's also the reason why the header and additional menus will be hidden on small mobile devices (e.g. smartphones) as these menus are only supposed to display complementary menu items anyway and the main navigation will be converted into a nice mobile navigation on mobile devices. However, if you're familiar with coding and would like to have it different, you could apply your own customizations within a [custom child theme](https://mhthemes.com/support/creating-and-using-child-themes-wordpress/).
If you for example would like to prevent that the header and/or additional navigation will be hidden on mobile devices, you could achieve this with come basic custom CSS code. Here you can find more information: [Show header / additional navigation on mobile devices](https://mhthemes.com/support/mh-magazine-css-customizations/#show-header-menu-mobile).
### Menu disappears after installing child theme
When installing and activating child themes in WordPress, it's basically almost the same as installing a new theme. That means it's required to do some basic configuration after the activation of your child theme. If your custom menu (which you previously had created) is not the default menu anymore, you can navigate to **Appearance => Menus** in your WordPress dashboard and assign your custom menu again to the preferred menu slot in your WordPress theme.
### How to customize the design of the main menu bar
If you simply want to change the color of the menu bar, this usually is possible by changing the color scheme of your theme in your WordPress dashboard under **Appearance => Customize => Colors**. In case you want to further customize the design of the main menu bar, you usually need to do this with some custom CSS code. We've collected some examples of custom CSS changes regarding the main navigation in MH Magazine here: [CSS customizations for main menu](https://mhthemes.com/support/mh-magazine-css-customizations/#center-main-menu-items).
### You have not found a solution to your issue?
In case you have not found answers to your questions in this support article, please also take a look at our [other support topics](https://mhthemes.com/support/), as it is very likely that you will find your answer there. If you have purchased a [WordPress theme by MH Themes](https://mhthemes.com/themes/) and have a valid license to gain access to theme updates and support, then you may also [send a support request](https://mhthemes.support/) for additional assistance.
---
# What if the mobile layout does not look like the theme demo
Source: https://mhthemes.com/support/knb/mobile-layout-does-not-work/
In case you have purchased a [premium WordPress theme by MH Themes](https://mhthemes.com/themes/), your WordPress theme will be fully responsive out of the box. That means the layout of the theme will automatically adapt to the screen size of the device your visitors are using. This will improve usability and ensure that your vistors are always having an awesome experience on your website whether they are using smartphones, tablets, notebooks or desktop computers.
### What if the mobile layout looks different than the theme demo?
On a regular basis we receive support requests from users who are confused because the responsive / mobile layout of their theme does not look like in the theme demo. As mentioned before, the responsive layout of our WordPress themes **works out of the box** and you won't need to do anything to make this work. If the mobile layout of your WordPress theme is not working as expected on your site, you are probably using a plugin that overrides the responsive layout of the theme with a different mobile layout that is provided by the plugin.
### Jetpack Mobile Theme
In most cases users are using the Jetpack plugin which adds an army of additional stuff to your site and it's not always easy to keep track of the plugin features you have enabled. But in case you see only a simple blue layout on mobile devices instead of the regular theme layout, you are probably using Jetpack and [have enabled the mobile theme](https://jetpack.me/support/mobile-theme/) of the plugin which overrides the theme layout.
So actually the only thing you'll need to do is to disable Jetpack completely or disable the mobile theme feature of the Jetpack plugin. As soon as you have done that, the responsive layout of your theme will be displayed instead of the mobile theme of the plugin and everything will work as expected.
### Alternative plugins
Of course it's always possible that you'll have the same issue when you are not using the Jetpack plugin. In that case you are just using a different plugin that is overriding the responsive layout of the WordPress theme. In case you are unsure about which plugin is overriding the mobile layout of your theme, you could disable your plugins one by one and check your site after you have disabled each plugin to find out which plugin is causing the issue.
The information in this article has also been helpful for users with the following questions:
- Why does the mobile theme not work?
- How to enable mobile theme?
- How to enable responsive layout?
- Why do I have a blue layout on mobile?
- Responsive layout does not work
- How to disable Jetpack mobile theme?
---
# How to add your website to the MH Themes Showcase
Source: https://mhthemes.com/support/knb/how-to-add-sites-to-showcase/
You might have noticed the [showcase on our website](https://mhthemes.com/themes/showcase/), where we feature some awesome websites of users who are running [Premium WordPress Themes by MH Themes](https://mhthemes.com/themes/). We often get requests from users who want to know how they can list their websites in the MH Themes Showcase. To improve this process, we've created this article where you can submit your website to the MH Themes Showcase.
### Send us your Feedback and Testimonials
If you are happy with your WordPress theme by MH Themes and would like to submit your website to the showcase, please send us your customer feedback and testimonials. We love reading about how you are using your WordPress theme to create fantastic websites and especially what you like most about your WordPress theme. We collect all customer feedback and testimonials, monitor the submitted websites and add the best looking websites to our showcase on a regular basis. The showcase is ideal to present your website to a large audience from around the world and it also helps us to show potential customers what is possible with WordPress themes by MH Themes.
### Requirements for the MH Themes Showcase
To ensure the quality and variety of the websites in the MH Themes Showcase, there are some requirements. Please check the list below and in case your website meets the following requirements, we would love to add your site to the MH Themes Showcase:
- You have purchased a [Premium WordPress Theme by MH Themes](https://mhthemes.com/themes/)
- Your site looks awesome and you're getting great feedback from your users
- The uploaded images on your website are high quality and consistent in size
- You have no offensive or illegal material on your website
- You have no obtrusive advertising on your website, like annoying pop-ups or else
- You have published enough content to fill at least the front page of your website
We are very excited to see what awesome websites you have created with WordPress themes by MH Themes and we're looking forward to your user feedback. In case you want to add your website to the MH Themes Showcase, email us at [support@mhthemes.com](mailto:support@mhthemes.com).
---
# How to enable the author box including author bio?
Source: https://mhthemes.com/support/knb/enable-author-box/
Most of our [Premium WordPress Themes](https://mhthemes.com/themes/) have included a built-in author box to feature your authors and contributors on your website, online magazine or blog. The author box usually can display a photo / avatar of the author, biographical information, number of published posts and contact information like links to the website or social profiles of the author.
### How to enable the Author Box?
The built-in author box will be displayed automatically on your site when the author has filled in his biographical information under **"Users => Your Profile => Biographical Info"** in the WordPress dashboard. We have decided to not display the author box in general so that the author can decide whether he wants to enable the author box or not.
### How to disable the Author Box?
When authors have added their biographical information, the author box will always display on your site. But what if you decide to not display author boxes on your site anymore? At least in case of [MH Magazine WordPress Theme](https://mhthemes.com/themes/mh-magazine/) you can navigate to **"Appearance => Customize => Layout Options"** in your WordPress dashboard. There you will find an option to disable the author box.
### Display Contact Information in the Author Box
MH Magazine WordPress Theme also will display the contact information of your authors out of the box. The authors just need to enter the contact information like Website, Google+, Twitter or Facebook Profile under **"Users => Your Profile"** in the WordPress dashboard.
### How to display the Author Avatar?
Our Premium WordPress Themes will support Gravatar out of the box (default in WordPress). Your authors can [register for free at Gravatar.com](https://en.gravatar.com/), upload their photo and assign the photo to their email address. Now you just need to make sure that the email address matches the email address that is used in the author information on your site and the authors avatar will be displayed automatically. Please be aware that it might take a few minutes until the avatar will be display on your site.
### How to replace the built-in author box with another?
In case you don't like the built-in author box of your WordPress theme, you can just disable the author box and replace it with an author box of your choice, for example by using a 3rd party WordPress plugin like *"Fancier Author Box"*. In case you are looking for recommended plugins that are tested to work fine with your WordPress theme, you can check this resource: [List of Recommended Plugins](https://mhthemes.com/support/recommended-plugins/).
---
# How to create Custom Menus in WordPress
Source: https://mhthemes.com/support/knb/create-custom-menu-wordpress/
Creating custom menus in WordPress belongs to the basics of managing WordPress websites. It's usually one of the first things people do when configuring their website with their new [WordPress theme](https://mhthemes.com/themes/). Custom menus in WordPress are very useful for improving usability and navigation for your website visitors and readers on your WordPress website or blog.
Once you've created your first custom menu, you'll notice that it's a simple task which can be done quickly by making use of the particular options in your WordPress dashboard. In this brief beginner's tutorial we will show you how to create custom menus in WordPress from the start. Please follow this tutorial step-by-step to ensure you've completed every step of the way:
- Step 1 - Creating a custom menu in WordPress
- Step 2 - Add menu items to your custom menu
- Step 3 - Creating multi-level menus (sub-menu items)
- Step 4 - Choose menu location on your website
- Step 5 - Customize or delete certain menu items
> After you've activated your new WordPress theme for the first time, WordPress usually will display a default menu containing the available pages on your website. To change this, it's required to create your own custom menu with all the menu items you prefer (pages, categories, custom links, etc.).
### Step 1 - Creating a custom menu in WordPress
Prior to using and tweaking your WordPress custom menu, you need to create one first. Please log into your WordPress dashboard and navigate to **Appearance => Menus**. Here you can create and edit custom menus in WordPress. Now please enter a name for your menu (e.g. *Main Menu*, *Header Navigation*, etc.) and click on *Create Menu*. Your new custom menu has now been created.
### Step 2 - Add menu items to your custom menu
On the left side of the screen you see a few boxes labeled *Pages*, *Posts*, *Custom Links*, *Categories*. You can expand each box by clicking on the small arrow in the top right corner. Now you can select those menu items you want to add to your custom menu. You may add particular pages or categories and you can even create new menu items like e.g. custom links to link to an external website.
To add your preferred menu items, simply check the checkboxes of those pages, posts, categories or other items you want to add to your custom menu and click on *Add to Menu*. You can display more boxes with available menu items by adding them using the screen options. To display more boxes, just click on *Screen Options* in the upper right corner of the page. After you've added items to your menu, you can arrange them via drag & drop. Once you're done, please click the *Save Menu* button.
> **Quick tip:** If you want to add a custom link as menu item to your custom menu and want to link to an external website, you can enable that the external website will [open in a new browser window / tab](https://mhthemes.com/support/open-wordpress-menu-items-in-new-tab/).
### Step 3 - Creating multi-level menus (sub-menu items)
All WordPress Themes by [MH Themes](https://mhthemes.com/) support multi-level menus. By using this feature you can easily create and display sub-menus on your website. Previously you've learned how you can change the order of appearance of your menu items in the menu by dragging them up or down. To create a sub-menu, just drag items left or right in order to create sub-levels within your custom menu.
### Step 4 - Choose menu location on your website
Usually it always depends on your WordPress theme if and how many custom menu locations are available. The popular [MH Magazine WordPress theme](https://mhthemes.com/themes/mh-magazine/) for instance supports several practical custom menu locations (*Header*, *Main*, *Footer*, etc.). After you've created your menu, you can add it to one of the available menu slots of your theme. In addition WordPress also includes a *Custom Menu* widget which you can use to add one of your custom menus as widget, e.g. into your sidebar.
To add a custom menu to a *Theme Location*, please select the menu name under *Menu Settings* and then click the *Save* button. When you've configured and saved everything correctly, your custom menu now will appear in that particular location on your WordPress website or blog. If not, please make sure you have created the custom menu properly, have assigned menu items to your custom menu and saved everything correctly in WordPress.
### Step 5 - Customize or delete certain menu items
After you have created your custom menu, you can always come back to customize and re-arrange menu items or delete them if you want to remove them from your custom menu. To edit a certain menu item, just click on the arrow in the top right corner of the menu item / box to expand it.
Now you can edit the *Navigation Label* (title of menu item), *Title Attribute* or delete the menu item by clicking on *Remove* in the bottom left corner of the edit menu item box. When you are done customizing, please click the *Save Menu* button to save your changes in WordPress.
### More information on WordPress Custom Menus
This tutorial covers all necessary steps you need to take to create custom menus in WordPress. You could also have a look at the [Menu User Guide](https://codex.wordpress.org/WordPress_Menu_User_Guide) in the WordPress Codex which basically covers the same steps. In case you are using a WordPress theme which supports custom menus for social icons and if you would like to create a social icons menu for your website, the following tutorial will provide the particular information: [How to create a Social Icons Menu in WordPress](https://mhthemes.com/support/create-social-icons-menu-wordpress/).
---
# Create a Temporary Login for Our Support Team
Source: https://mhthemes.com/support/knb/create-a-temporary-login-for-our-support-team/
Our dedicated support team is always ready to assist you. While diagnosing issues remotely via email is often helpful, some problems may require direct access to your website's dashboard. Granting us temporary access allows for faster and more accurate troubleshooting while keeping your data secure. You can revoke access at any time.
Below are the two recommended methods for securely granting temporary access:
## Option 1: Quickly Grant Temporary Access with a Plugin
You can grant our support team temporary access using the [**Temporary Login Without Password**](https://wordpress.org/plugins/temporary-login-without-password/) plugin.
This plugin allows you to create time-limited, password-free logins for users without creating permanent accounts perfect for developers, support teams, or collaborators. You can set expiration dates, assign specific user roles, and revoke access anytime to maintain security.
### How to set it up:
1. Navigate to your **WordPress Dashboard → Plugins → Add New**.
2. Search for "**Temporary Login Without Password**," then install and activate the plugin
3. After activation, go to **Users → Temporary Logins**.

4. Click **Create New** and use the following settings:
- **Email:**support@mhthemes.com
- **Role:** Administrator
- **Redirect After Login:** Dashboard (or the specific page needing assistance)
- **Expiry:** One week
- **Language:** English (US)
Once submitted, the plugin will generate a unique login URL. Securely share this link with our support team.

🔔 **Important:** Once troubleshooting is complete, please delete the temporary login to keep your website secure.
## Option 2: Manually Create an Admin User Account
You can also manually create a temporary user account:

1. Navigate to your **WordPress Dashboard → Users → Add New**.
2. Fill out the required fields: **Username:** MH Themes | **Email:** support@mhthemes.com
3. Assign the **Administrator** role.
4, After creation, send the login credentials securely to our support team.
🔔 **Reminder:** Please delete the temporary user account once the support process is finished to maintain your site's security.
Granting temporary access allows us to resolve your issues faster and more efficiently—while keeping your website safe.
---
# How to Fix Blank Thumbnails in the WordPress Media Library
Source: https://mhthemes.com/support/knb/fix-blank-thumbnails-wordpress-media-library/
Over the last few months, we've received a number of requests for assistance on a WordPress Media Library-related issue. Specifically, WordPress users were reporting that their Media Library image files weren't showing up as proper thumbnails - it seemed as if the thumbnails were missing. Instead, they were getting only greyed-out and blank document icons in the Media Library, like so:
## Common Causes for Blank Thumbnails in the WordPress Media Library
- **Issues with Plugins** - Third-party plugins are often the cause of many issues in WordPress. This particular issue can occur when you install a new plugin or update ones you already own.- **Issues with Themes** - While less likely, new themes and theme updates can sometimes lead to errors on the back and front ends of your site. This is especially true if your new theme uses a different thumbnail size.- **Thumbnail Sizes Changed** - Piggybacking off of the previous cause, blank thumbnails can occur when you change your default thumbnail size and your older images do not switch over to the new size.- **Conflicting File Names** - Usually, when you upload a new image with an identical file name as an old image, WordPress will add a number to the new image to differentiate it from the old one. While rare, uploading images with the same file names as older images can sometimes lead to issues, including blank thumbnails.- **You Moved from HTTP to HTTPS** - Media URLs don't always follow suit, and issues with broken images on the frontend and blank thumbnails on the back can occur.
## 9 Ways to Fix Blank Thumbnails in WordPress
### Fix #1: Make sure your WordPress site is up to date
Sometimes, fixing this issue is as simple as **bringing your WordPress site, themes and plugins up to date**. Go to Dashboard → Updates to see all of the updates that need to be installed. You can also go to the Plugins and Themes pages.

Back up your WordPress site, then update to the latest version of WordPress.
Update your theme and plugins one by one. **Refresh the media library after each update** to see if the issue persists or if new issues arise.
Alternatively, see if your host offers a staging area you can use to test updates without affecting the live version of your site.
### Fix #2: Deactivate all plugins
Go to Plugins → Installed Plugins, and use the checkbox at the top of the list to **select all of your plugins** in one click.
Then, select the **Deactivate option** from the Bulk Actions list. Click Apply.

This deactivates all of the plugins installed on your site and will help you pinpoint whether or not a plugin is causing blank thumbnails on your site.
**Refresh the media library**, and see if the blank thumbnails reappear. If they don't, reactivate your plugins and move on to Fix #3.
If they do, **reactivate each plugin one by one**. Refresh the media library after each reactivation to see which plugin causes the issue.
Your options from this point are simple: delete the plugin or fix the issue. If you don't need the plugin's functionality at all, delete it. If you do, see if an alternative exists.
If you want to keep the plugin, reach out to its support staff on WordPress.org if it's free or its support center if it's premium.
Don't forget to reactivate all of your other plugins.
### Fix #3: Activate a default theme
This method requires a [default WordPress theme](https://wordpress.org/themes/) to be installed on your site. These are free themes that come with every new WordPress installation and are typically named after years, such as "Twenty Twenty-One," "Twenty Seventeen," etc.
It's a good idea to keep at least two of the latest default themes installed on your site as WordPress will activate the most recent one when you deactivate your current theme. You can install them by going to Appearance → Themes → Add New.
Once you're sure you have a default theme installed, deactivate your current theme by **activating a default theme**.

Refresh the media library to see if your thumbnails are still blank. If they are, reactivate your primary theme, and move on to the next fix.
If they aren't, try the next fix anyway, then reactive your primary theme to see if it repaired the issue. Sometimes, regenerating thumbnails can fix thumbnail issues caused by themes.
If Fix #4 doesn't repair the issue for your primary theme, consult your theme developer's support center for assistance.
### Fix #4: Regenerate thumbnails with a plugin
If the above solutions did not work or you recently changed themes and believe your thumbnail sizes have not resized, use a plugin to regenerate your thumbnails in a few simple clicks.
The most popular plugin for this purpose is aptly named [Regenerate Thumbnails](https://wordpress.org/plugins/regenerate-thumbnails/). It's free, so you can install it directly from the Add New plugin page in WordPress.
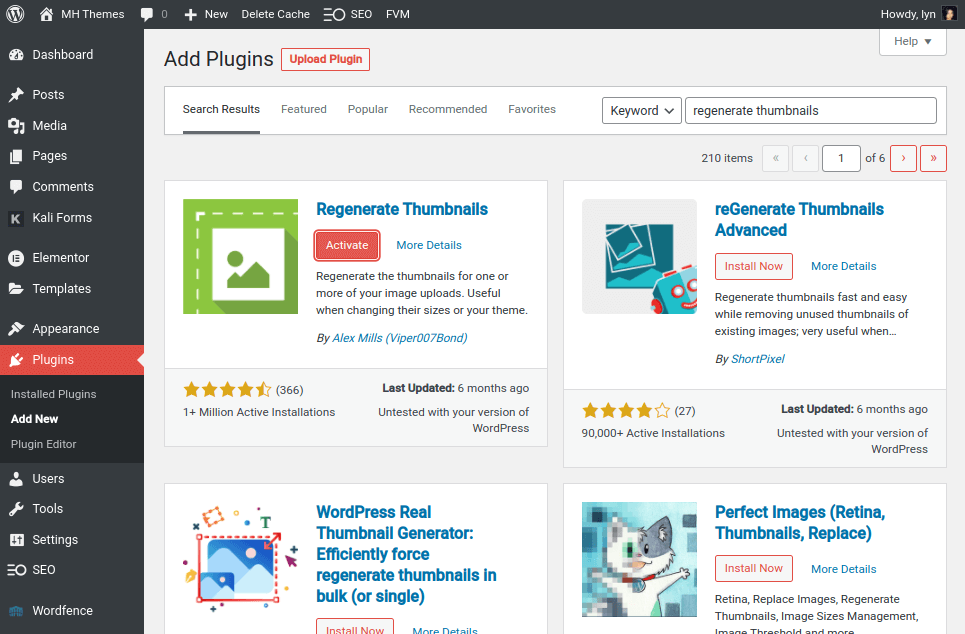
You'll find this plugin's dashboard **under the Tools menu** in the admin menu.
If you know for a fact you're only having trouble with a few thumbnails, feel free to leave the "Skip regenerating existing correctly sized thumbnails" option checked. Uncheck it if you want the plugin to regenerate all of your thumbnails just to be sure. Just know that this will eat up more time and resources.
Leave the "Delete thumbnail files for old unregistered sizes" option unchecked. While it will free up server space, it may lead to broken images across your site.
Click the **Regenerate Thumbnails for All x Attachments button** when you're ready, and wait for the tool to regenerate thumbnails for all of your attachments.

### Fix #5: Reupload images with different names
If you suspect your images with blank thumbnails share file names with older images in your media library, delete the newer images, **give them unique names,** and reupload them.
Again, WordPress *should* recognize these as two different images, but errors may occur from time to time.
Luckily, this one's a quick fix, and you can always move on to Fix #6 if you're still experiencing issues.
### Fix #6: Check folder permissions
Your site's files and folders have different permission parameters you can set to determine who is allowed to read, write and execute them. They're important in the stability and security of your site.
This means if they're not set correctly, hackers may be able to access your files and certain errors may occur across your site, including blank thumbnails on the backend.
Fortunately, it's an easy fix once you learn how to get into your site's file system.
First, go to Settings → Media on the backend of WordPress, and make sure the **"Organize my uploads…" setting is enabled**.
Next, change your folder permissions to optimize them for WordPress. This is easy if your host uses cPanel or has its own file management tool. The tool should be named **File Manager** either way.
If your host doesn't have a file manager, install an FTP client like [FileZilla](https://filezilla-project.org/) on your computer. It has a Quickconnect feature in the panel at the top of the application. Read your host's documentation or contact them directly in search of the following information to connect to your site's file system through FileZilla:
- **Host IP Address (sometimes using your domain here works)**- **FTP Username**- **FTP Password**- **Port**
FileZilla is a popular FTP client, so your host may have instructions specifically for the application.
Once you're in your site's file system, open the root folder (typically named **public_html**). Then, open the **wp-content folder**.
Find the **Uploads folder** (right-click on it or highlight it, then click the Permissions button), and make sure its permissions are set to **755 or 775** (but never 777 as this creates a major security risk), though make a note of its original value. Sometimes, changing permissions creates other problems on your site that are only solved when you restore permissions to their original values.

Refresh your file system from the file manager, then check the media library again to see if your thumbnails restored.
### Fix #7: Force image URLs to use HTTPS
Did you recently install an SSL certificate on an existing website? You should have changed your site URL setting so that it uses https:// instead of http://.
Unfortunately, some URLs, including image URLs, don't convert to HTTPS. This can cause 404 errors, broken images and yes, blank thumbnails.
Be sure to back up your site before you attempt this fix.
Install a plugin called [Better Search Replace](https://wordpress.org/plugins/better-search-replace/). Next, go to **Tools → Better Search Replace**.

Enter **"http" in the Search for box** and **"https" in the Replace with box**, then click Run Search/Replace.
### Fix #8: Change your PHP version
Some users have fixed this issue by changing their PHP versions, then changing them back. Some hosts allow you to change your PHP version yourself. Others require you to contact them to have them do it for you.
Either way, **upgrade or downgrade your PHP version, then change it back** to its original version to see if this restores your thumbnails.
In most cases, you should use the highest version of PHP your host offers. Use a staging area or maintenance mode to test the upgrade to ensure your theme and plugins are compatible with the PHP version you choose.
### Fix #9: Restore your site to a recent backup
If all else fails, you can restore your site to a recent backup before the issue first took place. This is a last resort as it'll undo any additional changes you've made to your site since that backup, including plugin updates, new content and style changes.
If you don't use a backup solution yourself, check with your host. [Most reputable hosts](/blog/best-wordpress-hostings/) offer daily backups and keep seven to 30 days worth of backups on hand.
These hosts usually offer a restore tool as well, allowing you to restore your site to a recent backup in just one click.
Consult your host's help docs or contact their support team if you need help.
---
# How to create individual color schemes for your WordPress website with MH Magazine
Source: https://mhthemes.com/support/knb/create-color-schemes-wordpress/
The [MH Magazine WordPress theme](https://mhthemes.com/themes/mh-magazine/) makes it easy for you to completely customize its color scheme directly from within your WordPress dashboard. By using WordPress' built-in *Customizer* feature, you're able to select from a wide-range of colors by taking advantage of a series of colorpickers. You can thus create your very own individual color scheme. These colorpickers allow you to create an almost endless range of custom color schemes with ease, no coding or additional software required.
### MH Magazine Custom Colors

The MH Magazine WordPress theme comes equipped with several colorpickers that you can use to completely customize the color scheme to suit your needs. To do so, simply navigate to **Appearance => Customize => Colors** from within your WordPress dashboard to get going.
Each colorpicker is clearly labelled to indicate which elements each colorpicker controls. Browsing through the colorpickers you're able to quickly customize header text color, a variety of background colors, colors of textual elements, and hyperlinks. There is also a trio of *Theme Color* colorpickers that you can use to change the color of the primary elements of the theme.
- **Theme Color 1** changes all *dark elements* that by default are colored a shade of black. Modify this color to any other color to maintain the themes' contrast between its elements.
- **Theme Color 2** allows you to change the theme *highlight color*, which by default is an attractive shade of red and is applied on certain elements of this WordPress template.
- **Theme Color 3** controls the majority of the *shaded elements* within the MH Magazine WordPress theme. This allows you to keep a nice contrast with the other *Theme Colors*.
You can take advantage of these three colorpickers to be able to create a wide-range of beautiful and intriguing color schemes within seconds. To find suitable colors that go well together, there are lots of free online tools and resources at your fingertips that you can use to get started right away!
### Online Color Scheme Tools
Create stunning color schemes that you can implement into MH Magazine with ease by using the following inspirational tools that allow you to create a wide range of palettes suitable for everyone.
### Colrd
[Colrd](https://colrd.com/) (formerly *ColorJack*) is a great resource to help you discover beautiful handpicked color schemes taken from inspirational images shared by its community. Along with image-based color palettes, the *Colrd* community has also created a wide-range of pattern and gradient based palettes for you to browse at your leisure, via its clean and simple interface.
### Paletton
[Palleton](https://paletton.com) enables you to create a varied range of color palettes using the powerful and very flexible wheel-based color selector. A handy palette randomizer function is also available allowing you to quickly find color schemes you can use for MH Magazine. You can also view website examples using your chosen color palette allowing you to quickly visualize how your color scheme could look.
### Material Palette
[Material Palette](https://www.materialpalette.com) offers you a quick and intuitive way of creating a wide variety of color schemes for your WordPress website - simply by selecting any two colors. A handy live preview showing your chosen color scheme allows you to quickly view any color scheme in action. Colors of your chosen palette can be copied individually or downloaded in no fewer than 7 formats including CSS, SASS, LESS, SVG, XML, PNG, and Polymer for your convenience.
### Adobe Color
Next is a stunning free tool from [Adobe Color](https://color.adobe.com) (formerly *Kuler*). This great tool allows you to create beautiful color schemes using the most comprehensive color selection tool I have ever come across. Using the *Create From Image* option, you're also able to quickly upload any image and the intuitive selection tool will create a variety of automatically generated color schemes. Adobe members can also save, export, share and view color schemes from the creative community.
### Coolors
[Coolors](https://coolors.co/) is an awesome free tool that allows you to generate beautiful color schemes with ease. Simply click *Generate* to begin generating color schemes, using the *Spacebar* to generate new and exciting color schemes on-the-fly. You can save your favourite color schemes and share with others, and likewise you're able to browse a wide range of color schemes that have been handpicked by thousands of other users. That way you can find some inspiring color schemes suitable for your site.
### Colorotate
Using the awesome [Colorotate](https://web.colorotate.org/) online tool, you can view your color schemes in three-dimensions. You may browse a wide-range of color palettes or create your own using the incredible 3D color palette creator. Easily mix and blend any number of color schemes using the intuitive tool options, saving your favourites for others to browse and being inspired by the color schemes you've created.
### Conclusion: Free tools to create individual color schemes
The versatility of the MH Magazine WordPress theme allows you to express your creativity without having to delve into code, use plugins or create child themes. Using the free tools outlined above, along with the range of colorpickers that come bundled with this theme, you're given the ability to customize the themes' color scheme to suit your taste, directly from the WordPress dashboard.
Accompanied with an attractive background and stylish post images, you can quickly create any number of stunning variations in no time at all. For more inspiration on all kinds of color schemes, please also check out the range of [theme demos of MH Magazine](https://mhthemes.com/themes/mh-magazine/#demos) and [examples of user sites](https://mhthemes.com/themes/showcase/) that are running MH Magazine WordPress theme to see for yourself.
---
# How to add video thumbnails in WordPress
Source: https://mhthemes.com/support/knb/how-to-add-video-thumbnails-in-wordpress/
Usually [WordPress themes](https://mhthemes.com/themes/) nowadays make use of featured images to display thumbnails on various locations within your WordPress theme, like archives, within widgets or inside the post content. In case you're running websites with lots of videos, you might want to automatically add video thumbnails as featured image for a better workflow when creating your content. In this tutorial we'll cover how you can make use of featured images while handling your video content in WordPress.
### Automatically display video thumbnails as featured image
Wouldn't it be great if you could have automatic video thumbnails as featured image so that you don't need to create and upload featured images manually? Well, luckily there are plugin developers who had the same idea and there are various WordPress plugins that can do just that and more. [Video Thumbnails](https://wordpress.org/plugins/video-thumbnails/) for example is a plugin that will find the first video embedded within your content and retrieve thumbnails for you. These thumbnails will be saved within your media library and automatically set as featured image so that you don't need to do this manually anymore.
### Display video content instead of featured images
While the *Video Thumbnails* plugin sets regular featured images for your posts that contain a video, there also are more sophisticated solutions as well. The [Featured Video Plus](https://wordpress.org/plugins/featured-video-plus/) plugin goes one step further and will not set featured images, but instead will replace the featured image with the video itself. That means on your website where usually the featured images would have been displayed, there now will be the video, ready to be watched by your website visitors.
However, please keep in mind that while it's great to display videos instead of featured images and provide your audience a way to easily watch these videos, this also can have some disadvantages. The most importent aspect that needs to be considered is the [performance of your website](https://mhthemes.com/support/optimize-performance-of-wordpress-theme/)! Displaying lots of videos instead of featured images on your WordPress website (e.g. on archives) can have a negative performance impact and heavily slow-down your website. So that's definitely something you should keep in mind while working with plugins like this.
In addition, when you already display the video content instead of the featured image on archives and within widgets, your audience doesn't necessarily need to access your post content anymore to watch the video. That means there is a chance that many people won't read your additional post content anymore and this also can have negative effects on the bounce rate of your website and reduce page impressions, which usually isn't that great for ad revenue.
### Conclusion: Find your own workflow
You see, there are several ways of working with video content on your website instead of displaying featured images which you've [manually uploaded within WordPress](https://mhthemes.com/support/how-to-use-featured-images-wordpress/). While the first approach will simply replace the featured images with video thumbnails, the other solution will display the video content itself instead of featured images. Each way has its own benefits and disadvantages and you can choose whatever suits your personal requirements. But these were only two examples of plugins for this purpose and you'll find more within the official WordPress plugin directory.
This article also helped users with the following questions:
- How to auto create thumbnails from videos
- Is there a way to replace featured images with Vimeo videos
- How to add a video as post thumbnail instead of featured image
- Easily display videos instead of featured images in WordPress
- How to make use of YouTube videos as thumbnails in WordPress
- Can I show YouTube videos instead of featured images in WordPress
---
# How to hide gray image placeholders in your theme
Source: https://mhthemes.com/support/knb/hide-image-placeholders/
Most of our [WordPress themes](https://mhthemes.com/themes/) are supposed to be used to create professional online magazines, dynamic news websites or other editorial websites from any content genre and these kind of websites usually heavily rely on images. However, sometimes there are rare cases where you want to create a website that doesn't make use of images and this article covers how you can get rid of the image placeholders in case you haven't uploaded featured images for your articles.
- Why making use of featured images for your posts
- The purpose of image placeholders
- How to hide image placeholders on your website
- Sources for high-quality free images
- Additional resources regarding images in WordPress
### Why making use of featured images for your posts
Due to the purpose and structure of professional modern editorial websites, images are a very important aspect in order to run an appealing and well structured website. You probably won't see many leading online magazines or news websites nowadays that don't heavily make use of images. Usually the articles on these professional websites include at least one high-quality image.
Uploading images to your articles is not only beneficial for the reading flow of the particular article, but articles with high-quality images usually also are much more appealing and can give your website a professional touch. In addition it's a fact that providing images within your content can have positive effects on your rankings in search engines which can result in an increase of traffic.
### The purpose of image placeholders
If you haven't uploaded [featured images](https://mhthemes.com/support/how-to-use-featured-images-wordpress/) to your posts, your WordPress theme usually will display image placeholders on archives and within widgets to ensure that your layout looks well-organized and consistent, even if you haven't uploaded an image for every article on your website.
By default your WordPress theme will display gray and neutral image placeholders, but you can easily replace these with your own versions that include your branding, like your logo or else, or simply replace them with an image you find appealing. You can find the files for the image placeholders within the */images* folder of your WordPress theme. Simply replace them with your own branded image placeholders by using a FTP client and the theme will use your versions instead.
### How to hide image placeholders on your website
Although it's highly recommended to make use of featured images on your website, especially if you plan to run professional online magazines or news websites, but there might be rare cases where you don't want to upload images for some reason. In that case it would be possible to simply hide the image placeholders with some CSS:
.mh-image-placeholder { display: none; }
You can add this custom CSS code in your WordPress dashboard under **Appearance => Customize => Theme Options => Custom CSS**. In case your WordPress theme doesn't have this section included, you can make use of plugins like [Simple Custom CSS](https://wordpress.org/plugins/simple-custom-css/) in order to add custom CSS code to your website. You can learn more about CSS customizations in this article: [Basic CSS Tutorial to add Custom CSS to your WordPress Website](https://mhthemes.com/support/css-tutorial-to-add-custom-css-to-wordpress-website/).
### Sources for high-quality free images
We noticed that usually the reason why people don't use images on their website isn't that they don't want to use images, but that they simply don't have suitable free images at hand. High-quality images can be quite expensive, especially when purchasing them from professional agencies. But luckily there are lots of sources where you can find high-quality images for free and often you are not even required to link to the image source from your website. You can find an overview of some great images sources in this article: [10 Image sources for your WordPress website or blog](https://mhthemes.com/blog/10-image-sources-for-wordpress-websites/).
### Additional resources regarding images in WordPress
We hope this article was helpful in order to explain the purpose of image placeholders within your [WordPress theme](https://mhthemes.com/themes/) and why it makes sense and is highly recommended to upload featured images to your articles. In case you have additional questions about the handling of images within WordPress, these resources might be helpful as well:
- [How to use featured images in WordPress](https://mhthemes.com/support/how-to-use-featured-images-wordpress/)
- [How to embed images in WordPress plus adding a caption](https://mhthemes.com/support/how-to-embed-images-in-wordpress-plus-caption/)
- [Basics of Images in WordPress](https://mhthemes.com/support/basics-of-images-in-wordpress/)
- [Solving issues with images on your WordPress website](https://mhthemes.com/support/solving-issues-with-images/)
- [Solving HTTP errors when uploading images in WordPress](https://mhthemes.com/support/solving-http-errors-when-uploading-images-in-wordpress/)
This article also helped users with the following questions:
- How to remove grey boxes if no images are used
- How do I turn off featured images
- Eliminating the featured image gray box for posts
- Why only a grey box shows up in place of an image
- How to remove the empty spaceholders if no images have been uploaded
- How to display only text on archives without images
- How to customize theme so it doesn't show gray boxes on homepage
- Why are just gray boxes appearing for images
---
# Documentation: MH Newsdesk WordPress Theme
Source: https://mhthemes.com/support/knb/documentation-mh-newsdesk/
[MH Newsdesk WordPress Theme](https://mhthemes.com/themes/mh-newsdesk/) is ideal for fresh and dynamic news websites and comes with great flexibility. After you have installed the theme to WordPress, you can follow a few simple steps to configure the theme. In case you are new to WordPress, we recommend you have a look at a few basic WordPress tutorials first. A good place to start is the WordPress Codex: [Getting Started with WordPress](https://codex.wordpress.org/Getting_Started_with_WordPress). Now have fun creating amazing websites with MH Newsdesk.
[Buy Now](https://mhthemes.com/buy/newsdesk)[Live Demo](https://mhthemes.com/demo/?theme=newsdesk)[Learn more](https://mhthemes.com/themes/mh-newsdesk/)
### Create a Static Front Page
In case you want to configure your site like the [theme demo](https://mhthemes.com/demo/?theme=newsdesk), you'll need to create a static front page first and then place the widgets on the front page. To set a static front page with the widgetized layout, please create a new page with name *"Home"* (or anything else) and select **"Homepage"** as template. Then please navigate to **"Settings => Reading"** in your WordPress dashboard and set that page as static front page. If you need more help with creating a static front page in WordPress, please read and follow this tutorial: [How to set a Static Front Page in WordPress](https://mhthemes.com/support/how-to-create-a-static-front-page/).
---
### Available Widget Locations of MH Newsdesk
MH Newsdesk WordPress Theme has in total 14 locations where you can place WordPress widgets, custom widgets or add any HTML code you like. When you have completed the setup of your static front page (as stated above), you can navigate to **"Appearance => Widgets"** in your WordPress dashboard and easily drag & drop widgets in the specific widget locations.
- **Home 1:** large widget area on *"Homepage"* template on top of page
- **Home 2:** first half column widget area on *"Homepage"* template below Home 1
- **Home 3:** second half column widget area on *"Homepage"* template below Home 1
- **Home 4:** large widget area on *"Homepage"* template on bottom of page
- **Home 5:** widget area for sidebar on *"Homepage"* template
- **Global Sidebar:** widget area / sidebar on posts and pages (not Homepage)
- **Footer 1:** first column widget area in the footer *(premium)*
- **Footer 2:** second column widget area in the footer *(premium)*
- **Footer 3:** third column widget area in the footer *(premium)*
- **Contact:** widget area on contact page template *(premium)*
- **Header Advertisement:** advertisement spot in the header *(premium)*
- **Post Advertisement (Top):** advertisement spot above your post text *(premium)*
- **Post Advertisement (Bottom):** advertisement spot underneath your post text *(premium)*
- **Footer Advertisement:** advertisement spot in the footer *(premium)*
You can simply drag & drop widgets in widget locations / sidebars when you navigate to **"Appearance => Widgets"** in your WordPress dashboard. There you will find an extensive collection of default WordPress widgets and custom widgets that are included in MH Newsdesk WordPress theme, like for example: *MH Custom Posts*, *MH Custom Pages*, *MH Posts Grid*, *MH Recent Posts*, *MH YouTube*, *MH Authors*, *MH Facebook Likebox* and more.
---
### How to place the Widgets like in the Theme Demo
If you want to reproduce the same layout as used in the [theme demo](https://mhthemes.com/demo/?theme=newsdesk), please place the widgets under **"Appearance => Widgets"** in your WordPress dashboard as stated here:
- **Home 1:** MH Posts Large (Homepage)
- **Home 1:** MH Posts Grid (Homepage)
- **Home 1:** Default WordPress Textwidget with Ad
- **Home 1:** MH Posts List (Homepage)
- **Home 2:** 2 x MH Custom Posts
- **Home 3:** 2 x MH Custom Posts
- **Home 5:** Default WordPress Textwidget with Ad
- **Home 5:** MH Custom Posts
- **Home 5:** MH Recent Posts
- **Home 5:** Default WordPress Textwidget with Ad
- **Home 5:** MH Custom Posts
- **Home 5:** Tag Cloud Widget
- **Global Sidebar:** Default WordPress Textwidget with Ad
- **Global Sidebar:** MH Facebook Likebox
- **Global Sidebar:** MH YouTube
- **Global Sidebar:** MH Custom Posts
- **Footer 1:** Custom Menu Widget
- **Footer 2:** MH Recent Posts
- **Footer 3:** Custom Menu Widget
- **Contact:** MH Facebook Likebox
- **Header Advertisement:** Default WordPress Textwidget with Ad
- **Post Advertisement (Top):** Default WordPress Textwidget with Ad
- **Post Advertisement (Bottom):** Default WordPress Textwidget with Ad
- **Footer Advertisement:** Default WordPress Textwidget with Ad
---
### Map of Widget Locations on the "Homepage" Template
Here you can see the locations of the widget areas on the fully widgetized *"Homepage"* template of MH Newsdesk WordPress Theme:
---
### Images in MH Newsdesk WordPress Theme
Usually WordPress themes have defined their own image dimensions and thumbnail sizes. These thumbnails are automatically generated by WordPress when you upload an image. When you change your WordPress theme, it can happen that the thumbnail requirements of your new theme do not match the sizes of the available thumbnails in your media folder. If that's the case, your thumbnails won't look consistent in size and you'll need to [regenerate your thumbnails](https://mhthemes.com/support/regenerate-thumbnails-after-theme-change/).
Image dimensions in MH Newsdesk:
- **777 x 437px** (Thumbnails for single posts and widgets)
- **180 x 101px** (Thumbnails for posts in grid)
- **260 x 146px** (Thumbnails for posts list on archives)
- **373 x 210px** (Thumbnails for highlighted posts in *"MH Custom Posts"* widget)
- **120 x 67px** (Thumbnails for small posts in *"MH Custom Posts"* widget)
MH Newsdesk WordPress Theme will use featured images for the thumbnails on archives and in the custom widgets. If you have already uploaded images to your site or added images manually to your posts and if these images don’t appear as thumbnails, please read and follow this: [How to use featured images in WordPress](https://mhthemes.com/support/how-to-use-featured-images-wordpress/).
---
### Additional Features/Options
If you have followed the above mentioned steps of this documenation, you have completed the basic theme setup of MH Newsdesk WordPress Theme. Now you can start creating amazing content or have a look at the other available theme options and use additional theme features as you like. You can access the theme options panel through your WordPress dashboard at **"Appearance => Customize => Theme Options"**, there you will find these sections:
- **General**
- **Layout** *(premium)*
- **Typography** *(premium)*
- **Ticker** *(premium)*
---
### General Options
In the "General" options section you'll find some basic options to upload a favicon, manage excerpts and modify the copyright notice in the footer:
- Modify custom excerpt length in words
- Change custom excerpt more-text
- Change copyright text in footer
---
### Layout Options (premium)
In the "Layout" options section you can easily change the look of your theme and enable/disable several elements with only a few simple clicks. In the layout options section you can find the following options:
- Enable/Disable breadcrumb navigation
- Enable/Disable tags on posts
- Enable/Disable featured image on posts
- Enable/Disable sharing buttons on posts
- Enable/Disable post navigation
- Enable/Disable author box below post content
- Enable/Disable related articles below post content
- Change position of sidebar (left/right)
- Change layout of archives
- Enable/Disable meta data like date, categories and author byline
---
### Typography & Color Options (premium)
You can not only select your favourite font from a collection of most popular Google webfonts in the theme options panel under *"Typography"*, but you can also easily change the color scheme of your theme with a few simple clicks by using some awesome colorpickers. We have extended the basic color options of WordPress under **"Appearance => Customize => Colors"** in your WordPress dashboard with some new options to change the colors of your theme. Just check it out and create your favourite color scheme.
---
### Ticker Options (premium)

This dynamic news WordPress theme has included a nice and useful news ticker located below the main navigation where you can display articles from any category or tag. You can manage the news ticker with the following options:
- Enable/Disable news ticker
- Change ticker title
- Set number of posts on ticker
- Filter posts by categories (use [category ID](https://mhthemes.com/support/how-to-find-wordpress-category-id/))
- Filter posts by tags (use tag slug)
- Skip posts (Offset)
- Ignore sticky posts
---
### Related Articles (premium)

MH Newsdesk WordPress theme has already a built-in box with related articles below the content on posts. These recommendations are based on tags. So if you want to use this feature, please ensure that you have tagged your posts. As soon as tags match, articles will be recommended in the *"Related Articles"* box.
---
### Social Icons in Header (premium)

To display social icons in the header, you’ll just need to create a custom menu with custom links to your social media channels in your WordPress dashboard under **"Appearance => Menus"** and assign this menu to the *"Social Icons"* menu slot. The theme will automatically recognize the social networks based on their URLs and display the specific icons. Currently the following networks are supported: *Behance*, *Dribbble*, *Facebook*, *Flickr*, *Google*, *Instagram*, *LinkedIn*, *Pinterest*, *Reddit*, *Soundcloud*, *Tumblr*, *Twitter*, *Vimeo*, *Xing* and *YouTube*.
---
### Contact Page (premium)
The theme has included a *"Contact"* page template with an additional sidebar to display a different sidebar on your contact page than on other posts and pages. If you use this template for your contact page, you could for example place the *"MH Facebook Likebox"* widget and a text widget with your contact details in the *"Contact"* widget location under **"Appearance => Widgets"**. MH Newsdesk WordPress Theme also supports the popular *"Contact Form 7"* plugin to easily create working contact forms with only a few clicks. Please read this to learn more: [How to create a working contact page in WordPress](https://mhthemes.com/support/create-contact-page-wordpress/).
---
### Font Awesome Icons
MH Newsdesk WordPress Theme has included a collection of over 400 amazing icons by Font Awesome. You can view these icons in detail on the [Font Awesome website](https://fortawesome.github.io/Font-Awesome/icons/) and use them as you like on your own website to give your content a personal or professional touch. You can easily display the icons by adding the small HTML snippet of the specific icon in the WordPress **text editor** (not visual), for example a cloud icon:
---
### Shortcodes
In case you want to use shortcodes to easily add styled elements like tabs, columns, boxes, accordions or else to your website, we recommend the *"Shortcodes Ultimate"* plugin. This plugin has included tons of useful shortcodes to easily customize your website. You can find more information and the documentation [on the plugin site](https://wordpress.org/plugins/shortcodes-ultimate/).
If you want to learn more about WordPress, MH Newsdesk WordPress Theme or want to read additional tutorials, please have a look at our [support center](https://mhthemes.com/support/).
---
# How to disable comments in WordPress
Source: https://mhthemes.com/support/knb/disable-comments-wordpress/
The built-in comment feature in WordPress is fantastic to get in touch with your visitors and receive valuable feedback from your readers or start active discussions. However, depending on the type of your website, you may want to disable comments in WordPress. The reason could be that the comment feature just isn't suitable for your website or because you're receiving a lot of comment spam. In this tutorial you'll learn how to disable comments on your WordPress website or blog.
- Disabling comments on your WordPress website
- Deactivate comments for published posts
- Globally disable comments with WordPress plugins
### Disabling comments on your WordPress website
By default, comments for posts are globally enabled in WordPress. If you want to completely deactivate the comment feature in WordPress, this can be quite a challenge because the available option to deactivate comments will only take effect for new posts. That means the comment feature for posts that already have been published before the change will still be active.
To disable comments for new posts on your WordPress website, please navigate to **Settings => Discussion** in your WordPress dashboard and uncheck the particular checkbox for comments. Keep in mind what has been said before, this setting however does not apply to already published posts.
> **Important:** After you've turned off comments, it doesn't necessarily mean that the comment count on your website will automatically disappear. It just prevents that people can leave new comments. If you want to remove the comment count which may appear on posts, archives or within widgets, you need to check your [WordPress theme](https://mhthemes.com/themes/) if there is such an option available or hide it with CSS.
### Deactivate comments for published posts
After you've disabled comments for new posts in WordPress, you may want to get rid of the comment feature for already published posts as well. This usually is the case if you don't make use of comments on your WordPress website. Another possible scenario is that you may want to end a discussion on a certian topic or you're [getting lots of spam comments](https://mhthemes.com/blog/how-to-secure-wordpress-site-from-spammers/) for particular posts.
To turn off comments for single posts in WordPress, please navigate to **Posts** in your WordPress dashboard, find the post you want to disable the comments for and use the *Quick Edit* function to do so. You can see this in detail when having a look at the video in the previous section of this guide.
### Globally disable comments with WordPress plugins
In case you have a bunch of already published posts on your website and do not want to disable comments manually on each one of them (although [bulk editing is available in WordPress](https://mhthemes.com/blog/bulk-edit-content-wordpress/)), you can use certain plugins for this purpose. Using WordPress plugins to disable comments can be an alternative. These kind of plugins can do the work for you, for example [Disable Comments](https://wordpress.org/plugins/disable-comments/).
With this WordPress plugin you can globally turn off comments on your WordPress website. Just download it from the WordPress Plugin Directory and get rid of the comment feature on your WordPress website. There are [alternative 3rd party plugins](https://wordpress.org/plugins/search/disable+comments/) available as well.
The information in this tutorial also has been helpful for users with the following questions:
- How to disable comments for old posts?
- Disable comments on WordPress pages
- Deactivate comment feature in WordPress
- Which plugin can disable comments in WordPress?
- Get rid of comment function in WordPress
- How to close comments on WordPress posts?
---
# How to use browser developer tools to inspect WordPress website code
Source: https://mhthemes.com/support/knb/browser-developer-tools-to-inspect-code-wordpress-websites/
Sometimes, it can be an aggravating challenge to figure out exactly which bits of your site's code are controlling a specific part of your WordPress website. Sure you can view the source code of your website, but that only shows you the HTML initially. You could then go hunt down the CSS stylesheet but chances are, there's more than one stylesheet (e.g. from [WordPress plugins](https://mhthemes.com/category/wordpress-plugins/)).
Assuming you find the right stylesheet, you're going to have to do a search/find operation - and even then you’re not necessarily entirely sure. That’s not just true for coding novices, by the way - even expert developers often find this process annoying and time-consuming. Nowadays each major browser offers its own set of browser-based developer tools that lets you find the specific lines of code responsible for any part of your page and even experiment with and fine tune that code as preferred. [Chrome](https://developer.chrome.com/devtools), [Safari](https://developer.apple.com/safari/tools/), [Firefox](https://developer.mozilla.org/docs/Tools) and Microsoft [Edge](https://developer.microsoft.com/microsoft-edge/tools/) all give you access to these more advanced development tools. While the tools do a lot more than just inspect and let you experiment with HTML and CSS, that's the function we're going to take a closer look at in this article.
- What browser developer tools can do
- Using the Firefox browser
- Using the Chrome browser
- Using the Safari browser
- Using the Edge browser
- How to use browser developer tools
- Implementing your changes
### What browser developer tools can do
As you probably already know, each web page on your WordPress website is created through a combination of different kinds of code, the two major ones being HTML and CSS. In the case of WordPress, as with many other CMS and web technologies, there are also other kinds of code involved, such as PHP, [jQuery](https://mhthemes.com/support/implementing-jquery-scripts-wordpress/) or regular JavaScript.
Since this article is looking at code inspection tools, we're going to focus on the two languages that are responsible primarily for the stuff you *see* on the page. HTML markup covers the basic elements and content of your page - the
s (headings) and the
s (paragraphs) for instance. CSS styles those elements in specific ways - for example, by setting properties such as font families, font sizes, colors, alignment, font weight, animations, and much, much more.
The problem is that it's not always so simple to figure out which specific lines of code are governing the way a specific part of the page in question is behaving or being displayed. There’s the HTML (which may be different for each page), as well as one or more CSS stylesheets (usually each its own separate file). So even if you'd want to visually scan and search for possible lines of code, it could take awhile, depending on the size and complexity of your WordPress website.
> If you want to learn more basics of HTML and CSS, please also see these beginner tutorials:
>
> - [Beginners Guide: HTML Basics for your WordPress Website](https://mhthemes.com/support/html-basics-wordpress/)
> - [Basic CSS Tutorial to add Custom CSS to your WordPress Website](https://mhthemes.com/support/css-tutorial-to-add-custom-css-to-wordpress-website/)
The basic idea behind browser developer tools is that they let you accomplish this nearly instantly. So, just by designating a specific part of the page or website element you’re looking at, these tools can: Instantly identify the HTML and CSS code responsible for that certain part of the page; and easily experiment with that code with live previews so you can see the results of a proposed CSS change instantly on the page you are currently looking at.
So if you can’t figure out why a H3 heading isn’t displaying at the right font size, or why your hover links aren’t changing color the way they’re supposed to, then these tools can make your life so much easier. Fortunately almost all major browsers offer these tools; below, you can see screenshots from each inspector tool’s display and information on how to access the tools for each.
### Firefox

You can access the [Firefox](https://developer.mozilla.org/docs/Tools) tools in a few ways:
- If you have selected a particular element on the page, just right-click on that element and select *inspect element*. Upon your right-click the inspection screen will open in your browser.
- Otherwise, you can choose the *Inspector* option from the *Web Developer* menu.
### Chrome
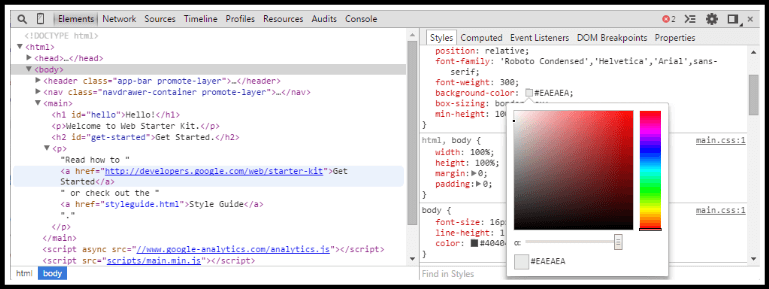
For the [Chrome](https://developer.chrome.com/devtools) DevTools, either right-click on the page element and click *inspect element*, or use the Chrome menu to select *Tools => Developer Tools*. You can also use hotkey shortcuts:
- Ctrl+Shift+I (Cmd+Opt+I on Mac) will open the DevTools
- Ctrl+Shift+J (Cmd+Opt+J on Mac) will open the DevTools with focus on the Console
- Ctrl+Shift+C (Cmd+Shift+C on Mac) opens the tools in Inspect Element mode
### Safari
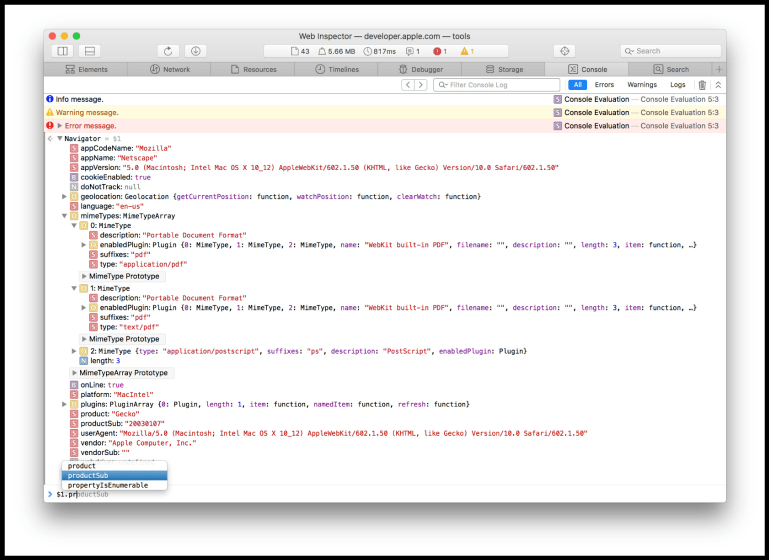
To access the [Safari](https://developer.apple.com/safari/tools/) inspector functions, first enable the Developer menu by going to *Preferences => Advanced* and clicking the box at the bottom, as shown in the screenshot below:
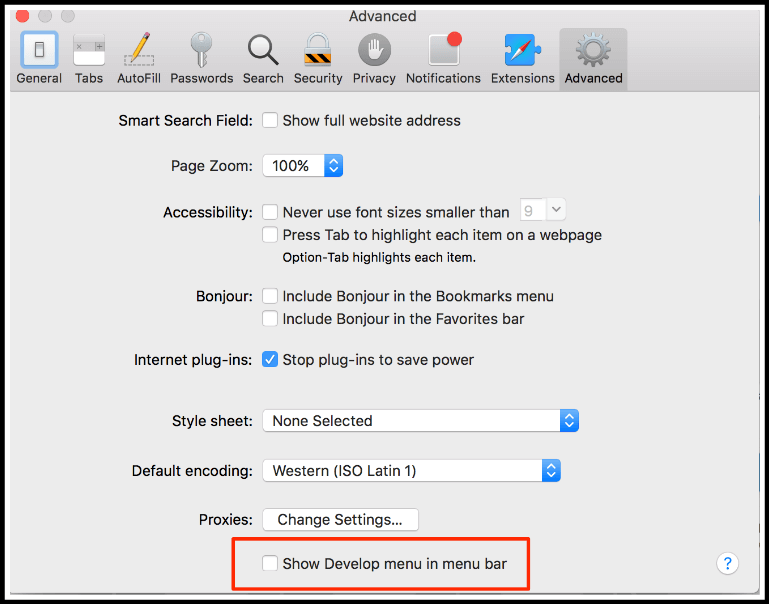
### Edge

The DOM Explorer tools for [Edge](https://developer.microsoft.com/microsoft-edge/platform/documentation/f12-devtools-guide/) can be accessed simply by using the hotkey combo CTRL + 1.
### How to use browser developer tools
Once you’ve selected a specific element and called up the inspection tools, regardless of which browser you’re using (note that there might be some differences between each set of tools, though the overall approach is fairly similar), you’ll see the HTML code in one part of the inspector window, and the associated CSS in the other part of the screen. The inspection tools give you a much better *at a glance* look at specific chunks of your code and how they display in the browser window.
When you’re first learning how to navigate and use these tools, it’s useful to take a look at several different sites other than your own using the tools. This helps you identify how the tools function without the *site blindness* that can sometimes infect website owners and developers when they’re deeply familiar with a specific site they’ve built.
Of course, the most utility comes from using the tools to debug and refine your own site. Initially, you’ll want to identify the problem area on the page in question and review the associated code just to get that *deeper big picture* view of what’s happening on the page. From there, you can either edit the code, or delete it altogether. Deletion can be helpful, especially when you’re trying to debug or figure out why an adjacent element isn’t displaying properly.
### Implementing your changes
After you've perfected your code, you can live preview your changes in that active browser window - but those changes will be lost the minute you refresh, or navigate away, of course. You *could* add the new CSS rules to your live editor within your WordPress dashboard, but this is really bad coding practice. The reason is simple: next time you update / change theme files, you’ll lose those changes.
Instead, if you want to adhere to coding best practices and preserve your changes the right, clean, and stable way, you’ll need to create a child theme and put your new rules in it or use a [plugin to add custom CSS code](https://mhthemes.com/blog/wordpress-plugins-to-implement-code/#simple-custom-css) to your website. If that makes you nervous, don’t worry! If you can write CSS property rules, you can absolutely create a WordPress child theme. And MH Themes will also walk you through the process with this tutorial on [how to create and use child themes in WordPress](https://mhthemes.com/support/creating-and-using-child-themes-wordpress/).
### Conclusion: Using browser code inspection tools
Browser developer tools are an incredibly useful set of development aids, whether you are a professional developer or you are simply trying to refine your own WordPress website. To make sure your WordPress website is displaying correctly for the majority of your users, you'll want to take advantage of the browser development tools for each major browser.
Install each of the major browsers installed on your laptop or desktop computer, in their most recent iterations. Then load your website, or the site you’re working on currently, in each of those browsers and examine them with the developer tools.
---
# Documentation: MH Magazine WordPress Theme
Source: https://mhthemes.com/support/knb/documentation-mh-magazine/
### MH Magazine: One theme - Many possibilities
Having installed [MH Magazine](https://mhthemes.com/themes/mh-magazine/) you are using one of the most popular, flexible and versatile magazine WordPress themes on the market. MH Magazine offers you the ability to create all kinds of different front page layouts by using widgets. This flexible magazine WordPress theme includes several awesome custom widgets with different layout options to select from as well as sophisticated color options to let you assemble a nice and appealing color scheme for your website. Whether you opt for one or two sidebars, boxed or wide layout - many fancy possibilities are just a few clicks away.
[Buy Now](https://mhthemes.com/buy/magazine)[Live Demo](https://mhthemes.com/demo/?theme=magazine)[Learn more](https://mhthemes.com/themes/mh-magazine/)
### MH Magazine documentation: How to start?
> MH Magazine is a WordPress theme for self-hosted websites. That means in order to run your WordPress site, you need a hosting plan at a hosting provider of your choice. In case you haven't got a hosting provider yet, we have an overview of some popular and reliable [WordPress hosting companies](https://mhthemes.com/wordpress-hosting/).
MH Magazine in general can be configured by following two simple steps: Creating a static front page and placing widgets. This documentation will show you step by step how to accomplish the basic configuration of MH Magazine. It is important that you follow these steps carefully because some steps build up on each other and that will help you a great deal to set up your website smoothly:
1 - How to upload, install and activate MH Magazine?
2 - How to set up a static front page in WordPress?
3 - How & where to place widgets on your website?
4 - How to place widgets like in the MH Magazine demos?
5 - What about articles/posts, categories, tags and menus?
6 - What are the image dimensions in MH Magazine?
7 - How to add logo, header image and site title / tagline?
8 - How to adjust options & layout?
9 - How do related articles work?
10 - How to add social icons in header?
11 - How to create contact page?
12 - How to customize MH Magazine?
13 - Video tutorial for MH Magazine WordPress Theme
14 - Answers to frequently asked questions
### 1 - How to upload, install and activate MH Magazine?
After you have purchased MH Magazine you can download the theme as a zip file. Make sure to not unpack the zip file before installation and ensure that you have no program running on your computer which automatically unzips zip files after the download. If you are running such a tool, you'll need to disable this first because WordPress requires a zip file in order to install a theme.
After you have downloaded the theme, please login to your WordPress dashboard and go to **Appearance => Themes**. Click the **Add New**, **Upload Theme** and **Install Now** buttons to upload and install the theme zip file. Finally click on **Activate** to activate your new WordPress theme. Now the installation is completed and the MH Magazine theme is activated. In case you need more detailed instructions, please see: [How to install a WordPress theme](https://mhthemes.com/support/how-to-install-wordpress-theme/).
> If you get an error that the file exceeds the maximum file size while you try uploading the theme, then there is a limit on your server which you can easily increase. See this article for more information: [How to Increase the Memory & Upload Limit in WordPress](https://mhthemes.com/support/increase-memory-upload-limit-wordpress/).
### 2 - How to set up a static front page in WordPress?
In order to create a magazine like front page like shown in the theme demos for MH Magazine, you first have to create a new page named *Home* (or else) under **Pages** in your WordPress dashboard. Then select the *Homepage* template for your just newly created page under *Page Attributes* on the right side - and publish this page.

Second, go to **Settings => Reading** in your WordPress dashboard, select *A static page* and select your just created new page *Home* as *Front page*. Don’t forget to save your changes. That’s it - you have now created a static front page which is required to display widgets on your front page as you will see later in this documentation. In case you need more detailed instructions, please see: [How to set a static front page in WordPress](https://mhthemes.com/support/how-to-create-a-static-front-page/).

### 3 - How & where to place widgets on your website?
In this important step, we will show you where and how to place widgets. You can place widgets either through the WordPress customizer **Appearance => Customize => Widgets** or in your WordPress dashboard if you go to **Appearance => Widgets**. Widgets can be placed simply via drag and drop, so just pull your favored widget to the widget area you like.
> Please notice: In case you can not see any widgets on your front page after having placed them, it is very likely you have not set a static front page correctly and probably haven't defined the *Homepage* template for your static front page as required.
Here you can see the available widget areas of MH Magazine WordPress Theme:
- **Sidebar**: Widget area (sidebar left/right) on single posts, pages and archives.
- **Sidebar 2**: Second sidebar on single posts, pages and archives. *(premium)*
- **Header 1 - Advertisement**: Advertisement position located above the header. *(premium)*
- **Header 2 - Advertisement**: Advertisement position located within the header. *(premium)*
- **Home 1 – Home 11**: Widget areas on *"Homepage"* template. *(premium)*
- **Home 12**: Sidebar on homepage template (only active if two sidebars enabled). *(premium)*
- **Posts 1**: Widget area above single post content.
- **Posts 2**: Widget area below single post content.
- **Pages 1**: Widget area above single page content. *(premium)*
- **Pages 2**: Widget area below single page content. *(premium)*
- **Footer 1 – Footer 4**: Widget areas located in the footer.
- **Contact**: Widget area (sidebar) on contact page template. *(premium)*
- **Contact 2**: Second widget area (sidebar) on contact page template. *(premium)*
> Home 12: As soon as you enable *Two sidebars* in your WordPress dashboard, the site width will automatically increase and there will be an additional sidebar on the widgetized *Homepage* template available in your WordPress dashboard under **Appearance => Widgets**.
Here is a widget map of the widget areas that are available on the widgetized *Homepage* template of MH Magazine WordPress Theme:
#### Available custom widgets in MH Magazine
Apart from the WordPress default widgets (e.g. Text, Categories, Tag Cloud etc.) MH Magazine offers some awesome flexible custom WordPress widgets which you can use on your front page, in sidebars on posts / pages and within the sidebar of your contact page to create a nice magazine site according to your requirements. These widgets provide several options and some widgets also offer multiple layouts. This is a list of the available custom widgets in MH Magazine WordPress Theme:
- **MH Slider** - to show slides of content on front page.
- **MH Custom Slider** - to display custom content in slider on front page. *(premium)*
- **MH Author Bio** - to display author avatar and biographical info. *(premium)*
- **MH Authors** - to display list of authors and the number of their published posts. *(premium)*
- **MH Custom Posts** - to display posts based on categories or tags.
- **MH Posts Grid** - to display a grid of posts with thumbnails. *(premium)*
- **MH Posts List** - to display a list of posts with thumbnails. *(premium)*
- **MH Posts Large** - to show large-sized posts including thumbnail images. *(premium)*
- **MH Posts Digest** - display posts with thumbnails and an overview of posts. *(premium)*
- **MH Posts Focus** - display 5 posts with focus on large post in the middle. *(premium)*
- **MH Posts Horizontal** - display a horizontal grid of posts including thumbnails. *(premium)*
- **MH Posts Lineup** - display one featured post and a list of additional posts. *(premium)*
- **MH Posts Stacked** - display 5 stacked posts with thumbnail, title and meta data. *(premium)*
- **MH Carousel** - to show a dynamic carousel slider of thumbnails. *(premium)*
- **MH News in Pictures** - to display thumbnails gallery linked to post content. *(premium)*
- **MH Tabbed** - to display tabs with latest posts, tags and recent comments. *(premium)*
- **MH Facebook Page** - to show your Facebook page on website. *(premium)*
- **MH Social** - to show linked social media icons in sidebar or footer. *(premium)*
- **MH YouTube Video** - to display videos from YouTube. *(premium)*
- **MH Spotlight** - to show a featured post on front page. *(premium)*
- **MH Recent Comments** - to display recent comments including user avatars. *(premium)*
- **MH Custom Pages** - to show pages based on page IDs. *(premium)*
- **MH Category Columns** - display columns with posts from specific categories. *(premium)*
> Quick tip: If you want to learn more about the design and layout of the included custom widgets, then please have a look at our [overview of custom widgets](https://mhthemes.com/support/custom-widgets/) in the MH Magazine WordPress theme.
### 4 - How to place widgets like in the MH Magazine demos?
In case you like the way we arranged widgets in the [MH Magazine demos](https://mhthemes.com/themes/mh-magazine/#demos) and if you would like to replicate one of our demos, please click on any of the following screenshots that will lead you to instructions about how you need to place your widgets on the front page and configure the settings to replicate a layout like shown in the demos:
[](https://mhthemes.com/support/how-to-configure-mh-magazine-like-demo/#demo-1)
[MH Magazine - Demo 1](https://mhthemes.com/support/how-to-configure-mh-magazine-like-demo/#demo-1)
[](https://mhthemes.com/support/how-to-configure-mh-magazine-like-demo/#demo-2)
[MH Magazine - Demo 2](https://mhthemes.com/support/how-to-configure-mh-magazine-like-demo/#demo-2)
[](https://mhthemes.com/support/how-to-configure-mh-magazine-like-demo/#demo-3)
[MH Magazine - Demo 3](https://mhthemes.com/support/how-to-configure-mh-magazine-like-demo/#demo-3)
[](https://mhthemes.com/support/how-to-configure-mh-magazine-like-demo/#demo-4)
[MH Magazine - Demo 4](https://mhthemes.com/support/how-to-configure-mh-magazine-like-demo/#demo-4)
[](https://mhthemes.com/support/how-to-configure-mh-magazine-like-demo/#demo-5)
[MH Magazine - Demo 5](https://mhthemes.com/support/how-to-configure-mh-magazine-like-demo/#demo-5)
[](https://mhthemes.com/support/how-to-configure-mh-magazine-like-demo/#demo-6)
[MH Magazine - Demo 6](https://mhthemes.com/support/how-to-configure-mh-magazine-like-demo/#demo-6)
[](https://mhthemes.com/support/how-to-configure-mh-magazine-like-demo/#demo-7)
[MH Magazine - Demo 7](https://mhthemes.com/support/how-to-configure-mh-magazine-like-demo/#demo-7)
[](https://mhthemes.com/support/how-to-configure-mh-magazine-like-demo/#demo-8)
[MH Magazine - Demo 8](https://mhthemes.com/support/how-to-configure-mh-magazine-like-demo/#demo-8)
[](https://mhthemes.com/support/how-to-configure-mh-magazine-like-demo/#demo-9)
[MH Magazine - Demo 9](https://mhthemes.com/support/how-to-configure-mh-magazine-like-demo/#demo-9)
[](https://mhthemes.com/support/how-to-configure-mh-magazine-like-demo/#demo-10)
[MH Magazine - Demo 10](https://mhthemes.com/support/how-to-configure-mh-magazine-like-demo/#demo-10)
[](https://mhthemes.com/support/how-to-configure-mh-magazine-like-demo/#demo-11)
[MH Magazine - Demo 11](https://mhthemes.com/support/how-to-configure-mh-magazine-like-demo/#demo-11)
[](https://mhthemes.com/support/how-to-configure-mh-magazine-like-demo/#demo-12)
[MH Magazine - Demo 12](https://mhthemes.com/support/how-to-configure-mh-magazine-like-demo/#demo-12)
[](https://mhthemes.com/support/how-to-configure-mh-magazine-like-demo/#demo-13)
[MH Magazine - Demo 13](https://mhthemes.com/support/how-to-configure-mh-magazine-like-demo/#demo-13)
[](https://mhthemes.com/support/how-to-configure-mh-magazine-like-demo/#demo-14)
[MH Magazine - Demo 14](https://mhthemes.com/support/how-to-configure-mh-magazine-like-demo/#demo-14)
[](https://mhthemes.com/support/how-to-configure-mh-magazine-like-demo/#demo-15)
[MH Magazine - Demo 15](https://mhthemes.com/support/how-to-configure-mh-magazine-like-demo/#demo-15)
### 5 - What about articles/posts, categories, tags and menus?
MH Magazine WordPress theme is perfectly suitable to handle large amounts of content in an appealing and well-organized way. In case your previous WordPress website already contained articles/posts, pages, categories, tags and menus, you can simply rearrange this existing content.
If you do not have any content on your website yet, you could start publishing some posts (recommended) or [upload dummy content if you like](https://mhthemes.com/support/demo-content-for-wordpress-websites/). You can also find more information about WordPress basics in our [support center](https://mhthemes.com/support/) (use the search field) or in the [WordPress Codex](https://codex.wordpress.org/).
Here we also have linked a few tutorials that already cover WordPress basics. In case you are new to WordPress, we recommend that you have a look at these articles and make yourself familiar with basic WordPress features in order to manage your website:
- [Difference between WordPress Categories and Tags](https://mhthemes.com/support/difference-wordpress-categories-and-tags/)
- [Making use of categories and category archives in WordPress](https://mhthemes.com/support/how-to-add-posts-to-pages/)
- [How to use the WordPress Text Editor](https://mhthemes.com/support/how-to-use-wordpress-text-editor-for-writing-posts/)
- [How to embed images in WordPress plus adding a caption](https://mhthemes.com/support/how-to-embed-images-in-wordpress-plus-caption/)
- [Where to find demo content for your WordPress website](https://mhthemes.com/support/demo-content-for-wordpress-websites/)
As mentioned before, these tutorials are about the handling of WordPress itself and this is not necessarily related to the theme. But it's essential that you make yourself familiar with WordPress in order to run a professional website. You can also find a lot of additional WordPress tutorials online and especially the WordPress Codex provides a lot of helpful information.
### 6 - What are the image dimensions in MH Magazine?
Each WordPress theme usually has defined its own image dimensions for thumbnails. It is very likely that the theme you were using previously to MH Magazine had different image dimensions / sizes for thumbnails. MH Magazine makes use of featured images (this is standard in WordPress) to display thumbnails on posts (large featured image), archives and within several included custom widgets.
As soon as you upload new images in WordPress, these images will be used, resized and cropped (if necessary) by WordPress to generate all required thumbnails that are defined by your particular WordPress theme for use on your website. In the following you can see the particular image dimensions for thumbnails in MH Magazine. In general it's recommended to always upload images with size of **at least 1030 x 438px** - this will ensure that WordPress can generate all thumbnails:
- **1030 x 438px** (Thumbnails for the MH Slider widget)
- **678 x 381px** (Thumbnails for featured images on posts, archives and widgets)
- **678 x 509px** (Thumbnails for some custom widgets)
- **326 x 245px** (Thumbnails for archives and widgets)
- **80 x 60px** (Thumbnails for some custom widgets)
If you have previously already uploaded images on your website or embedded images into your posts and pages, it may happen that these images don't appear as expected or that your images are inconsistent in size. Reading and following these tutorials should help you solve your issues:
- [How to upload optimal images for MH Magazine](https://mhthemes.com/support/optimal-images-for-mh-magazine/)
- [How to regenerate thumbnails after a theme change](https://mhthemes.com/support/regenerate-thumbnails-after-theme-change/)
- [How to use featured images in WordPress](https://mhthemes.com/support/how-to-use-featured-images-wordpress/)
- [How to fix issues with changing images sizes in slider](https://mhthemes.com/support/fix-issue-with-changing-image-sizes-in-slider/)
### 7 - How to add logo, header image and site title / tagline?

With MH Magazine you may customize your header in many different ways. To upload a full-width header image, go to **Appearance => Customize => Header Image** in your WordPress dashboard. To upload a logo and display/hide the site title and tagline, you can navigate to **Appearance => Customize => Site Identity** and apply your changes based on your personal requirements.
### 8 - How to adjust options & layout?
After you have carefully followed the previous steps, you have successfully completed the basic configuration of the theme. You can now further customize and manage the appearance of your website via the extensive options panel of MH Magazine.

Please navigate to **Appearance => Customize => Theme Options** in your WordPress dashboard to see the theme options panel within the WordPress customizer. Here you can make modifications and enable/disable or change options regarding the layout, typography, colors or else of your theme. The theme options panel contains the following options.
> Note: If you only see a blank page when opening the WordPress customizer, that usually means that there is a PHP or JavaScript error on your site which isn't related to the theme. In that case you could try to disable plugins and see if that solves your issue. Here you can also find more information: [Theme Customizer not working in WordPress](https://mhthemes.com/support/theme-customizer-not-working/).
#### 8.1 - General Options
In the *General* options section of MH Magazine you’ll find some basic options to manage excerpts and modify the copyright notice in the footer:
- Modify custom excerpt length in words
- Change custom excerpt more-text
- Change copyright text in footer *(premium)*
#### 8.2 - Layout Options (premium)
In the *Layout* options section of your theme you can easily change the look of your site and enable/disable several elements with only a few simple clicks. In this section you can find the following options:
##### Layout - General
- Switch site layout from boxed to wide *(premium)*
- Set number of sidebars (one/two/none) *(premium)*
- Set position of default sidebar (right/left)
- Change layout of content on archives *(premium)*
- Change layout / look of widget titles *(premium)*
- Enable/disable back to top button *(premium)*
##### Layout - Header
- Enable/disable transparent header *(premium)*
- Select content for header bar (Top - Left) *(premium)*
- Select content for header bar (Top - Right) *(premium)*
- Select content for header bar (Bottom - Left) *(premium)*
- Select content for header bar (Bottom - Right) *(premium)*
- Change title for news ticker *(premium)*
- Set number of posts for news ticker *(premium)*
- Filter posts by categories for news ticker (use [category ID](https://mhthemes.com/support/how-to-find-wordpress-category-id/)) *(premium)*
- Filter posts by tags for news ticker (use tag slug) *(premium)*
- Skip posts for news ticker (Offset) *(premium)*
- Ignore sticky posts behavior for news ticker *(premium)*
##### Layout - Posts/Pages
- Enable/disable breadcrumb navigation *(premium)*
- Enable/disable featured image on posts *(premium)*
- Enable/disable linking of featured image to attachment page *(premium)*
- Enable/disable social buttons on posts *(premium)*
- Enable/disable tags on posts *(premium)*
- Enable/disable author box
- Enable/disable author box contact information *(premium)*
- Enable/disable related articles on posts *(premium)*
- Enable/disable post/attachment navigation
##### Layout - Post Meta
- Enable/disable post meta data: date *(premium)*
- Enable/disable post meta data: author *(premium)*
- Enable/disable post meta data: categories on posts *(premium)*
- Enable/disable post meta data: categories on archives *(premium)*
- Enable/disable post meta data: comment count *(premium)*
#### 8.3 - Typography & Color Options (premium)

To change the font of your website, you can select your favourite font from a collection of most popular Google webfonts in the theme options panel under *Typography*.
You may also easily change the color scheme of your theme with just a few simple clicks by using the included colorpickers. We have extended the basic color options of WordPress under **Appearance => Customize => Colors** in your WordPress dashboard with some new theme options to easily change the colors of your theme with a few clicks in the customizer.
#### 8.4 - Advertising Options (premium)

MH Magazine already has some handy options included to easily display ads within the post content and on archives. In the *Advertising* options section you can:
- Insert ad code for content ad on posts
- Insert ad code for ads on archives
- Set to display ad every x posts on archives
We've also plenty of additional resources on how you can monetize your website. To learn more about placing advertisements on your website, you may want to have a look at these articles:
- [How to place ads and banners in your WordPress theme](https://mhthemes.com/support/place-ads-in-wordpress-theme/)
- [Solving issues with ads and banners](https://mhthemes.com/support/solving-issues-ads-and-banners/)
#### 8.5 - Custom CSS (premium)
Within the *Custom CSS* section you can add custom CSS code in case you want to apply minor CSS changes to your website that would not justify the creation of a custom child theme. The CSS code you add in this field won't be lost after theme updates.
> Since WordPress 4.7 there is a built-in CSS field in core which you can find in your WordPress dashboard under **Appearance => Customize => Additional CSS**. If you're running MH Magazine v3.6.1 or later, the theme related CSS field will automatically disappear in the WordPress Customizer if it doesn't contain code. This is in favor of the new CSS field in WordPress core to prevent duplicate fields for custom CSS.
#### 8.6 - Tracking Code (premium)
In this section you can add your tracking code like Google Analytics or Piwik to track the visitors on your website for further analysis and optimization. Please note that you are required to add the tracking code and not just the Google Analytics Tracking ID. Here you can find more information about Google Analytics: [Learn how to add Google Anlaytics to your WordPress website](https://mhthemes.com/support/how-to-add-google-analytics-to-wordpress/).
### 9 - Related Articles (premium)

MH Magazine WordPress theme includes a built-in related articles feature below the content on posts. Displaying related articles is based on tags. So if you want to use this nice feature, and show related articles, please ensure that you have tagged your posts properly. As soon as tags match, articles will automatically be recommended below your posts. Here you can find some more information: [How do related posts work](https://mhthemes.com/support/how-do-related-posts-work/).
### 10 - Social Icons inside Header (premium)

In case you want to display a social icons menu inside the header, you simply need to create a custom social menu with custom links to your social media channels in your WordPress dashboard under **Appearance => Menus** and assign this menu to the *Social Icons in Header* menu slot. Please see this tutorial for further information: [How to create a Social Icons Menu in WordPress](https://mhthemes.com/support/create-social-icons-menu-wordpress/).
After you have created the social menu correctly, the theme will automatically recognize the social networks based on their URLs and display the specific icons as expected. Currently the following networks are supported: Behance, Dribbble, Facebook, Flickr, Google, Instagram, LinkedIn, Pinterest, Reddit, Soundcloud, Tumblr, Twitter, Vimeo, Xing and YouTube.
### 11 - How to create contact page with Contact Form 7? (premium)

MH Magazine WordPress theme offers a built-in *Contact* page template with an additional sidebar to display different sidebar content on your contact page than on single posts and pages. If you want to use this template for your contact page, you could for example place the *MH Facebook Page* widget and a text widget with your contact details in the *Contact Sidebar* widget location under **Appearance => Widgets**. This comes handy if you don't want to display your regular sidebar on the contact page.
The theme also supports the popular *Contact Form 7* plugin to easily create working contact forms with only a few clicks in your WordPress dashboard. Please have a look at the following tutorial to learn more about using the *Contact Form 7* plugin: [How to create a working contact page](https://mhthemes.com/support/create-contact-page-wordpress/).
### 12 - How to customize MH Magazine?
In case you are familiar with coding and want to customize your theme beyond what is possible out of the box, you could create a custom child theme and modify the theme as you like. In that case these tutorials might be helpful as well:
- [Creating and using child themes in WordPress](https://mhthemes.com/support/creating-and-using-child-themes-wordpress/)
- [How to override parent theme functions in a child theme](https://mhthemes.com/support/overriding-parent-theme-functions-child-theme-tutorial/)
- [How to use browser developer tools to inspect WordPress website code](https://mhthemes.com/support/browser-developer-tools-to-inspect-code-wordpress-websites/)
- [Basic CSS tutorial to add custom CSS to your WordPress website](https://mhthemes.com/support/css-tutorial-to-add-custom-css-to-wordpress-website/)
- [Beginners Guide: HTML Basics for your WordPress Website](https://mhthemes.com/support/html-basics-wordpress/)
### 13 - Video tutorial for MH Magazine WordPress Theme
This video tutorial for MH Magazine (v3.0.0) covers the installation and configuration of the theme. It shows how you can easily upload and install this magazine theme through your WordPress dashboard, create a static front page with the widgetized *Homepage* template and also covers several aspects of the theme configuration like layout options or changing colors.
You can use these links to quickly jump to the particular sequences in the video:
- Installing and activating the theme ([Video](https://youtu.be/SlguzzoAA-8?t=8s))
- Creating a page and set it as static front page ([Video](https://youtu.be/SlguzzoAA-8?t=48s))
- Uploading a logo and remove the site title text ([Video](https://youtu.be/SlguzzoAA-8?t=1m31s))
- How to place widgets on the front page ([Video](https://youtu.be/SlguzzoAA-8?t=2m13s))
- How to place the footer widgets ([Video](https://youtu.be/SlguzzoAA-8?t=4m47s))
- How to place the sidebar widgets ([Video](https://youtu.be/SlguzzoAA-8?t=6m49s))
- Creating menus / navigation in WordPress ([Video](https://youtu.be/SlguzzoAA-8?t=8m38s))
- How to use the layout options ([Video](https://youtu.be/SlguzzoAA-8?t=13m53s))
- How to use the color options ([Video](https://youtu.be/SlguzzoAA-8?t=16m35s))
- How to use the post specific layout options ([Video](https://youtu.be/SlguzzoAA-8?t=22m4s))
- How to use the typography options ([Video](https://youtu.be/SlguzzoAA-8?t=26m7s))
- How to place advertisements ([Video](https://youtu.be/SlguzzoAA-8?t=27m51s))
- How to use the news ticker ([Video](https://youtu.be/SlguzzoAA-8?t=32m7s))
- How to use the options on single posts ([Video](https://youtu.be/SlguzzoAA-8?t=33m57s))
### 14 - Answers to frequently asked questions
Here we've collected answers to the most common questions that may arise while configuring the MH Magazine WordPress theme so that you save time and don't need to ask these questions again. This may be especially helpful in case you're not familiar with WordPress yet:
- How to configure MH Magazine after theme activation?
- Why are there no images on front page and archives?
- Why are my images not displaying consistent in size?
- Why are the widgets not displaying on the front page?
- Why is the MH Slider widget not displaying?
- Why are my Google AdSense ads not showing up?
> **How to configure MH Magazine after theme activation?**
>
> MH Magazine is a very powerful and flexible WordPress theme to launch websites of all kinds of niches and content genres. You can see an overview of various theme demos of MH Magazine [here](https://mhthemes.com/themes/mh-magazine/#demos). After you've activated the theme, you can proceed with the configuration by following two simple steps: Create and set a static front page correctly and then configure the layout options and place widgets as you like.
>
> If you want to configure the layout of the MH Magazine theme like one of the [theme demos](https://mhthemes.com/themes/mh-magazine/#demos), just create and set the static front page correctly and then select your preferred theme demo and follow the instructions as stated here (click the image of your preferred demo): How to replicate MH Magazine demos.
> **Why are there no images on front page and archives?**
>
> Like most professional WordPress themes nowadays, the MH Magazine theme makes use of featured images. In case you see gray image placeholders instead of images on your front page or on archives, then you haven't set featured images for your posts: [How to use featured images in WordPress](https://mhthemes.com/support/how-to-use-featured-images-wordpress/).
> **Why are my images not displaying consistent in size?**
>
> Please always [regenerate your thumbnails](https://mhthemes.com/support/regenerate-thumbnails-after-theme-change/) after you've changed the WordPress theme on your website. This will ensure that you're displaying thumbnails with correct size. In case regenerating thumbnails doesn't solve your issue, then the images you've uploaded usually are too small and you need to upload images with decent size as defined by your WordPress theme: Image dimensions in MH Magazine.
> **Why are the widgets not displaying on the front page?**
>
> In case you've placed widgets into the *Home* widget areas and in case the widgets are not displaying as expected, then you usually haven't configured your static front page correctly.
> **Why is the MH Slider widget not displaying?**
>
> In case you've placed the MH Slider widget into one of the *Home* widget areas and in case the widget isn't displaying, then you either haven't configured your static front page correctly or you're running a plugin on your site that is blocking the slider from showing up (in that case try to disable your plugins).
> **Why are my Google AdSense ads not showing up?**
>
> When it comes to displaying advertisements on your website, then please note that your WordPress theme doesn't affect your ads in any way. The theme will just output the code you've added and the rest is up to the advertiser. More information: [Common reasons why Google AdSense ads are not displaying](https://mhthemes.com/support/solving-issues-ads-and-banners/#google_adsense_not_displaying).
### Font Awesome Icons

MH Magazine WordPress theme comes with a nice collection of over 400 awesome icons by Font Awesome. You can view these icons in detail on the [Font Awesome website](https://fortawesome.github.io/Font-Awesome/icons/) and use them as you like on your own website to give your content a personal or professional touch. You can easily display the icons by adding the small HTML snippet of the specific icon in the WordPress text editor (not visual), for example a cloud icon:
### Shortcodes

If you would like to use shortcodes to easily add styled elements like tabs, columns, boxes, accordions or else to your website, we recommend the *Shortcodes Ultimate* plugin. This plugin has included tons of useful shortcodes to easily customize your website. You can find more information and the documentation [on the plugin site](https://wordpress.org/plugins/shortcodes-ultimate/).
### Do you need additional assistance?
In case you have purchased a WordPress theme by MH Themes, you have theme support included and we'll be more than happy to answer your questions in case you need additional assistance with your WordPress theme. As an alternative, we can also help you get started through our [paid theme installation service](https://mhthemes.com/support/installation-service/) where we can install and configure the theme for you to replicate the layout of the particular theme demo. This is especially useful if you are not yet familiar with WordPress.
---
# How to Solve Common Cache Issues on WordPress Websites
Source: https://mhthemes.com/support/knb/solving-common-cache-issues-on-wordpress-websites/
[Using caching on your website](/support/knb/things-to-know-about-wordpress-caching-potential-issues/) is possibly the most effective way to decrease loading times of your web pages and bring content to your visitors quickly. WordPress has an abundance of cache plugins freely available to help you [increase performance](/support/knb/optimize-performance-of-wordpress-theme/) throughout all aspects of your WordPress website.

The more complex these caching solutions become, the more cache issues people can stumble across. In this article, we'll take a look at what caching options are available to you. We'll also walk you through solutions that will help you overcome cache issues you might have on your website. Let's first take a look at some of the most popular caching plugins for your WordPress website.
- Popular Caching Plugins
- Enabling Caching in wp-config.php
- Clearing your Plugin Cache
- Find Cached Files on your Server
- Clearing Browser Cache
- Caching Issues while Developing / Coding
- Disabling Plugins when Facing Issues
- Regenerating Thumbnails
### Popular Caching Plugins
There are many caching plugins available to you for free within the official [WordPress Plugin Directory](https://wordpress.org/plugins/search.php?q=cache). Two of the [most popular WordPress caching plugins](/blog/wordpress-caching-plugins/), *WP Super Cache* and *W3 Total Cache* both have several million active installations between them. They offer a comprehensive caching solution for use on your WordPress site which can decrease loading times out of the box.
[*W3 Total Cache*](https://wordpress.org/plugins/w3-total-cache/) offers a huge suite of caching features, most of which are only available to premium users. Yet, the free version of this plugin still offers you the ability to cache many aspects of your site.
[*WP Super Cache*](https://wordpress.org/plugins/wp-super-cache/) offers a more welcoming interface and a variety of easy to understand caching options that are targeted towards ease-of-use and performance.

Furthermore, the premium plugin *[WP Rocket](https://mhthemes.com/referer/wp-rocket)* is a really good caching solution for WordPress too. WP Rocket offers tons of options when it comes to speeding up your WordPress site. It includes multiple forms of caching, mobile caching, cache preloading, GZIP compression, lazy loading, database and Google fonts optimization and much more. We also wrote a detailed review for WP Rocket and compared it to W3 Total Cache and WP Super Cache in our blog series:
- [WP Rocket Review: We Tested One of the Most Popular Premium Caching Plugins for WordPress](/blog/wordpress-caching-plugin-wp-rocket-review/)
- [WP Rocket Tutorial: How to Speed Up Your WordPress Site with WP Rocket](/blog/wp-rocket-tutorial-improve-pagespeed/)
- [Comparing WP Rocket Against Top WordPress Caching Plugins](/blog/wordpress-caching-plugin-comparison/)
Which cache plugin you opt in for is up to you. You can test the free ones for a certain period of time and see if they suit your needs and are convenient for you to handle. Make sure the cache plugins you are using are well-rated, compatible with the latest WordPress version and fairly supported.
### Enabling Caching in wp-config.php
Another caching mechanism you could take advantage of is the default WordPress object cache. You can enable or disable the native WordPress object cache using your *wp-config.php* file, like so.
define('WP_CACHE', true);
Simply add the above code **directly above** `/* That's all, stop editing! Happy blogging. */` using any text editor (Notepad is fine) and save the file. This caching method is also referenced within the *WordPress Codex* under: [Editing wp-config.php](https://wordpress.org/support/article/editing-wp-config-php/).
### Clearing Your Plugin Cache
*Not being able to view recent post or page changes* or being *unable to view changes made using the customizer*, are some of the most common cache issues users can experience when making use of a cache plugin. Most cache issues can be solved by *clearing the cache*. That can usually be done via the provided options page of the cache plugin you're currently using on your WordPress website.
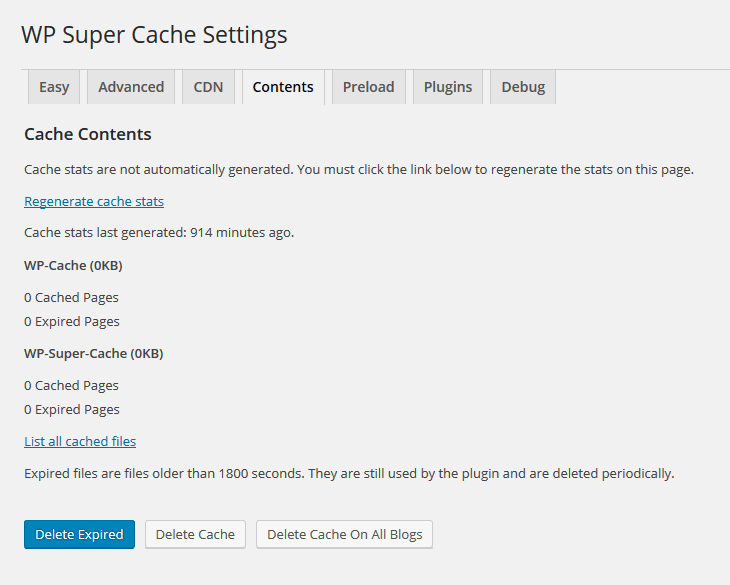
For example, when we take a look at the *WP Super Cache* plugin, you can very quickly clear the entire cache. Simply navigate to the plugin's options page via **Settings => WP Super Cache => Contents** in your WordPress dashboard and click the *Delete Cache* button.
### Find Cached Files on Your Server
You can use your preferred FTP Client to locate the cached files on your server. Typically these files are stored within a folder titled *cache*. This folder is located within the *wp-content* folder of your WordPress installation, like so (or slightly different based on your setup):
/public_html/wp-content/cache
### Clearing Browser Cache
When it comes to cache issues on your website, browsers can also play a part. Each browser has its own independent cache as well. This helps serving website pages to you in as little time as possible. Clearing this cache is still a simple process however, you just have to be sure you're clearing the correct elements of the cache. To have full control over what elements you're deleting you can follow one of the browser-specific solutions below.

#### Firefox Caching
Users of the Firefox browser can empty their cache via the **Options => Privacy** menu. Simply click the *Settings* button under the *History* heading. You can then choose which elements of your browser cache to delete. Alternatively, you can install a Firefox add-on called [Empty Cache Button](https://addons.mozilla.org/firefox/addon/empty-cache-button/). This will add a handy button at the top of the browser that allows for *1-click* cache emptying.
#### Chrome Caching
If you're a Chrome browser user then you can clear your browser cache via the **Settings => History => Clear Browsing Data** menu option. This will bring up a dialog box allowing you to select which data you would like to clear. Alternatively, you can install the [Clear Cache](https://chrome.google.com/webstore/detail/clear-cache/cppjkneekbjaeellbfkmgnhonkkjfpdn) extension for Chrome. It places a handy button at the top of your browser that allows for *1-click* cache clearance.
#### Edge & Safari Caching
Users of the Edge browser can clear their cache via the **Settings => Choose What to Clear** option. Simply check the elements you would like to clear and click the *Clear* button. When using Safari, users can clear their browser cache via the *Reset Safari* menu option. This will open a dialog box that allows you to select various elements that you would like to clear. The *Clear History* will empty the browser cache, as well as removing your website history list.
### Caching Issues While Developing / Coding
Most of the popular caching plugins will automatically clear your cache when you publish a new *Post* or a *Page* on your WordPress website (if the plugin is configured accordingly). That allows visitors to view the very latest version of your website when there is something new to read. Yet, if you're [modifying theme code](/support/knb/creating-and-using-child-themes-wordpress/) or making design changes on a live site whilst a cache is active, it's different.
You very likely won't be able to see your changes until you *clear the cache* of your plugin or browser using one of the methods described within this article. This is when a browser extension becomes a handy tool for web developers to make use of 1-click browser cache clearance can be a time-saver.
### Disabling Plugins When Facing Issues
A likely solution to most plugin-related issues is to deactivate all currently active plugins. This also applies to caching plugin issues. You can do so via the **Plugins** menu in your WordPress dashbaord. Simply tick the checkbox of each plugin you wish to disable and select **Deactivate** from the drop down menu at the top of the page in your dashboard.
When dealing with lots of plugins on your WordPress website, it may happen as well that you're facing unexpected issues. This usually can happen especially after plugin updates which may lead to scenarios like broken layouts, unresponsive websites or even:
> *I'm locked out of my admin dashboard!*
When you're locked out of your website, you obviously can't disable plugins through your WordPress dashboard anymore. Luckily you can also deactivate **all** plugins by renaming your plugins folder. You can do this either by using your preferred FTP Client, such as [FileZilla](https://filezilla-project.org/), or by using your hosts *File Manager* service. The plugins folder usually can be located at:
/public_html/wp-content/plugins
Temporarily rename the *plugins* folder to *plugins-old* and try logging in to your WordPress dashboard again. Once logged in, you can rename the *plugins-old* folder back to *plugins*. You can now activate each plugin one-by-one in an attempt to find the problematic plugin that is causing your issues.
### Regenerating Thumbnails
Although not directly related to cache issues, if you are changing themes or modifying image sizes, your *Image Attachments* may not be displayed correctly. This might be because you are seeing an old version of an image that has previously been cropped to the dimensions set by your prior theme.

Upon activating a new WordPress theme, the theme declares specific dimensions for your images to use. So unless you regenerate your images, your theme may by displaying images with undesirable effects, like squashing or stretching. Sometimes when using sliders, the [images may oddly resize](/support/knb/fix-issue-with-changing-image-sizes-in-slider/). You can solve this by ensuring that your new theme is using correctly sized thumbnails.
Simply install a plugin that allows you to [regenerate your thumbnails](/support/knb/regenerate-thumbnails-after-theme-change/). The plugin will go through your image attachments and regenerate each image in accordance with the dimensions set by the theme you're currently using. If you have a lot of images this process may take several minutes, so be patient and wait for the plugin to inform you that your images have been successfully regenerated.
---
# Beginners Guide: HTML Basics for your WordPress Website
Source: https://mhthemes.com/support/knb/html-basics-wordpress/
Learning the basics of HTML (*Hypertext Markup Language*) or any programming language can be a daunting task. Especially when you're being bombarded with jargon you don't understand. Luckily, you can use simple HTML basics to customize a WordPress website with comparative ease.
WordPress was developed with ease-of-use in mind, catering for seasoned professionals and complete beginners alike. Fortunately HTML and CSS code was designed with that premise in mind, too! Let's take a look at the basics of how beginners could add simple HTML and CSS to tweak and modify their WordPress websites a little bit, without having to touch a single line of complex code.
### Adding code to your WordPress website
To customize and tweak your WordPress website, there are several different places where you can add your CSS, PHP or JavaScript code. Which option you choose greatly depends on the kind of customization you plan to make. Simple CSS customizations with a few lines of CSS don't call for a child theme for example, but can be done by using suitable plugins. Larger customizations should usually be made via child themes. Let's see what the options are in detail.
#### Using a child theme for modifications
Typically, you should make all theme modifications via the use of [child themes](https://mhthemes.com/support/creating-and-using-child-themes-wordpress/). That's not only easier when modifying lengthy chunks of code, but it also allows you to freely update the theme you're using at some point in the future without fear of losing your custom code. For our CSS code, we shall be using an empty child theme of the current default WordPress theme, Twenty Sixteen.
#### Installing a CSS plugin for customizations
An alternative to using a child theme, for adding simple and minor CSS code, is to make use of a Custom CSS plugin, such as [Simple Custom CSS](https://wordpress.org/plugins/simple-custom-css/). This allows you to quickly [add any custom CSS code to your WordPress theme](https://mhthemes.com/support/css-tutorial-to-add-custom-css-to-wordpress-website/), via the familiar *Customizer* or a standard *options page*, which may be a less daunting experience for beginners than diving into the world of child themes.
#### Using the Additional CSS of WordPress' Theme Customizer
Another alternative to using a child theme is the Additional CSS that is made available to WordPress' Theme Customizer since WordPress 4.7. Users can now add custom CSS directly from the WordPress admin area. This is super-easy, and you would be able to see your changes with a live preview instantly.
To add CSS to WordPress, you just need to:
- Navigate to *Appearance > Customize* in your WordPress dashboard to open the WordPress Customizer
- Select the *Additional CSS* option from the menu on the left in the WordPress Customizer interface.


#### Applying custom code via WordPress Text Widgets
In this tutorial, we will be adding all HTML code via the use of one of the default widgets that comes supplied with WordPress, the *Text Widget*. Using this widget, you're able to quickly add any amount of text or HTML code to any of the widgetized areas within the WordPress theme you're using.
A widgetized area is typically referred to as *sidebar*, but isn't necessarily always located *to-the-side*. As [WordPress themes](https://mhthemes.com/themes/) get more advanced and complex in their structure and design, *sidebars* can appear anywhere within a theme. This gives you a great deal of flexibility with what you can add, in the location(s) made available to you by the theme, e.g. header, footer, widgetized front page or else.
> Are you using a WordPress theme by MH Themes? Some of our WordPress themes (e.g. [MH Magazine](https://mhthemes.com/themes/mh-magazine/)) offer a built-in custom CSS field within the customizer. This feature allows you to apply minor CSS changes to your WordPress website that wouldn't justify the creation of a custom child theme. The CSS code you add in this field won't be lost after theme updates.
### Back to HTML basics - links & images
How to create a simple link with HTML? The first thing we shall look at is how to create a link. A link also is referred to as a *Hyperlink* and it's the backbone of the *World Wide Web*, without hyperlinks the internet wouldn't be what it is today. Using a default *Text Widget*, placed into any of your current themes widget areas / sidebars, please add:
This is a standard text link.
This is a hyperlink in its simplest form. Note how we created the link using *a href*, followed by the URL the hyperlink is going to lead to, in this case, to our website *mhthemes.com*.
Before we close the hyperlink we have a single word that will be the clickable part of the text we added to the widget. So whatever is being *wrapped* by the hyperlink will become the clickable element, in this case it is the word "link". The hyperlink is then closed using ``.
#### Open links in a new window / browser tab
Notice how when you clicked the link you left your own website, effectively closing it for the user? Sometimes you may not want to do this, especially if you're linking to an external website that you don't own. You can force a hyperlink to open in a new window / browser tab by making one small addition to the code above, like so:
This is a standard text link.
We're now making use of the [target attribute](https://www.w3schools.com/tags/att_a_target.asp) of a hyperlink, there are several other target options you can use but primarily you will want to stick with the above example or have no target at all, which would simply open the link in the current window or browser tab.
#### Display image within Text Widget
Let us now add an image below this text, add the following code to another *Text Widget* and place it below the widget you already have within your widget area / sidebar.
This will display a WordPress logo within your widget, you can replace the URL in the above code to any image URL and it will display that image instead. It is good practice and beneficial for SEO to give each image a unique *identifier* or *name*, we do this by using the *alt* attribute, like `alt="logo"`.
### Taking care of CSS customizations
**Add a custom CSS class**: First we shall add a custom *CSS class* to the image calling it *logo*. That allows us to manipulate how this image, and any other image with the same class, is to be displayed:
#### Tweaking the image via custom CSS
**Control the width of the image**: We can now use basic CSS as well as the *logo* custom CSS class we just added to style this image how we want, like so:
.logo {
width: 100%;
max-width: 240px;
}
You can control the width of the image by declaring a *max-width* value as shown above if you wanted to, and to ensure the image will expand and shrink accordingly when being viewed on mobile devices we have added a *width* value of 100% too.
**Background, padding and further customizations**: Let us now make things prettier to look at by centralizing the image, adding a background color and adding some spacing around the image, which is referred to as *padding*. We can do this by firstly wrapping the image within a container that has a CSS class assigned to it. In this example we shall call the container *my-image*:
We can now manipulate the container and the image within it by using CSS again:
.my-image {
text-align: center;
}
The above code will centralize the contents of the *my-image* container, we can apply additional attributes to the same class, like so:
.my-image {
padding: 10px;
background-color: #eee;
text-align: center;
}
The end result is a centralized image on top of a colored background with spacing surrounding the image, that is suitable for viewing at all mobile widths. If you want the image to fill the container it is within, just change (or remove) the *max-width* value we declared earlier, like so:
.logo {
width: 100%;
max-width: none;
}
**Making the image clickable**: Centralizing the image and applying some space around it will make the padding surrounding the image nice and even on all sides of the image. If we combine both the hyperlink and image examples from above, we can create a clickable image.
As you can see, we haven't changed any code, we've simply wrapped the image within the hyperlink we created earlier, making the image clickable. To ensure the clickable image is presented correctly on all browsers, we need to remove any borders that may appear around the image, which we can do by adding a value of *0* to the image's border attribute, like so:
.logo {
width: 100%;
max-width: none;
border: 0;
}
You can use the above explained method to add any advertisement banner or image (and also text) to any of your theme's sidebars and make it clickable, all with the standard *Text Widget*.
### Changing colors for background, text and links
Not everything needs to be in black and white, we can use CSS to spice things up a bit by introducing some color. In this example we will create a sample promotional area using color and hyperlinks. Add another *Text Widget* to your chosen widget area / sidebar and start by creating a container div, giving it the *my-promotion* custom CSS class, like so:
#### Adding a background color
Using the custom class we just created and some simple CSS, we can now add color to this div-container and prepare it for contents by adding some padding around the edges, like so:
.my-promotion {
background: #1e8cbe;
padding: 20px;
}
The simplest way of using colors in CSS is to use a color's 6-character *HEX* code, which is preceded by a *hashtag* #. There are many ways you can obtain *HEX* codes for any color you wish, here is an easy-to-use [color picker](https://www.colorpicker.com/) that will help you find the code you need to use.
For this example, we shall be using a cool shade of blue, but you can use any color you wish. If we return to the HTML code in the widget, we can add a paragraph of text that could be used as the promotional text, you can use any text you like.
This is some super-awesome custom promotional text that we will be using for this example.
#### Tweaking the text: color & link
If you refresh your site and view the widget so far, you will see the blue container with black, left-aligned text within it. By declaring additional styles to the *my-promotion* class, we can improve the appearance of this promotional text, like so:
.my-promotion {
background: #1e8cbe;
padding: 20px;
color: #ffffff;
text-align: center;
}
We have added *color* and *text-align* attributes to the class. If you return back to your site and refresh the site in your browser, the promotional text will now be white, and centralized neatly within the colored container. And if we now make use of the hyperlink example we worked on earlier, you can easily add a clickable link within your text, like so:
This is some super-awesome custom promotional text that we will be using for this example.

#### Changing hyperlink color
All text that is wrapped within the hyperlink will now be clickable, but upon refreshing your site to see the widget in action, you will notice the link is colored differently from all other text. We can change this color by targeting the hyperlink directly by adding this to your CSS:
.my-promotion a {
color: #ffff00;
}
Your hyperlink should now be colored yellow because we have assigned that color to all hyperlinks within the *my-promotion* div using the *HEX* code for yellow.
### Responsive video embedding
We'll now take a peek at how you could add a video into one of our sidebars. Some [WordPress themes by MH Themes](https://mhthemes.com/themes/), have the *MH YouTube Video* widget included, which lets you display YouTube videos simply by entering the video ID of the particular YouTube video. And apart from the [WordPress oEmbed feature](https://mhthemes.com/support/embedding-youtube-videos-wordpress/), you can of course use the embed code provided by the various video hosting services available, such as YouTube or Vimeo, like so:
 This will display a WordPress logo within your widget, you can replace the URL in the above code to any image URL and it will display that image instead. It is good practice and beneficial for SEO to give each image a unique *identifier* or *name*, we do this by using the *alt* attribute, like `alt="logo"`.
### Taking care of CSS customizations
**Add a custom CSS class**: First we shall add a custom *CSS class* to the image calling it *logo*. That allows us to manipulate how this image, and any other image with the same class, is to be displayed:
This will display a WordPress logo within your widget, you can replace the URL in the above code to any image URL and it will display that image instead. It is good practice and beneficial for SEO to give each image a unique *identifier* or *name*, we do this by using the *alt* attribute, like `alt="logo"`.
### Taking care of CSS customizations
**Add a custom CSS class**: First we shall add a custom *CSS class* to the image calling it *logo*. That allows us to manipulate how this image, and any other image with the same class, is to be displayed: