Creating custom menus in WordPress belongs to the basics of managing WordPress websites. It’s usually one of the first things people do when configuring their website with their new WordPress theme. Custom menus in WordPress are very useful for improving usability and navigation for your website visitors and readers on your WordPress website or blog.

Once you’ve created your first custom menu, you’ll notice that it’s a simple task which can be done quickly by making use of the particular options in your WordPress dashboard. In this brief beginner’s tutorial we will show you how to create custom menus in WordPress from the start. Please follow this tutorial step-by-step to ensure you’ve completed every step of the way:
- Step 1 – Creating a custom menu in WordPress
- Step 2 – Add menu items to your custom menu
- Step 3 – Creating multi-level menus (sub-menu items)
- Step 4 – Choose menu location on your website
- Step 5 – Customize or delete certain menu items
After you’ve activated your new WordPress theme for the first time, WordPress usually will display a default menu containing the available pages on your website. To change this, it’s required to create your own custom menu with all the menu items you prefer (pages, categories, custom links, etc.).
Step 1 – Creating a custom menu in WordPress #
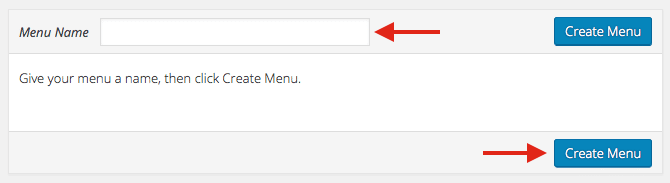
Prior to using and tweaking your WordPress custom menu, you need to create one first. Please log into your WordPress dashboard and navigate to Appearance => Menus. Here you can create and edit custom menus in WordPress. Now please enter a name for your menu (e.g. Main Menu, Header Navigation, etc.) and click on Create Menu. Your new custom menu has now been created.
Step 2 – Add menu items to your custom menu #
On the left side of the screen you see a few boxes labeled Pages, Posts, Custom Links, Categories. You can expand each box by clicking on the small arrow in the top right corner. Now you can select those menu items you want to add to your custom menu. You may add particular pages or categories and you can even create new menu items like e.g. custom links to link to an external website.

To add your preferred menu items, simply check the checkboxes of those pages, posts, categories or other items you want to add to your custom menu and click on Add to Menu. You can display more boxes with available menu items by adding them using the screen options. To display more boxes, just click on Screen Options in the upper right corner of the page. After you’ve added items to your menu, you can arrange them via drag & drop. Once you’re done, please click the Save Menu button.
Quick tip: If you want to add a custom link as menu item to your custom menu and want to link to an external website, you can enable that the external website will open in a new browser window / tab.
Step 3 – Creating multi-level menus (sub-menu items) #
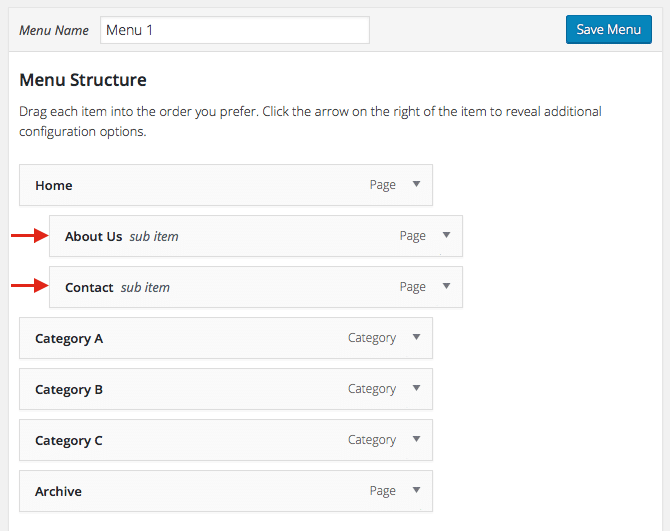
All WordPress Themes by MH Themes support multi-level menus. By using this feature you can easily create and display sub-menus on your website. Previously you’ve learned how you can change the order of appearance of your menu items in the menu by dragging them up or down. To create a sub-menu, just drag items left or right in order to create sub-levels within your custom menu.
Step 4 – Choose menu location on your website #
Usually it always depends on your WordPress theme if and how many custom menu locations are available. The popular MH Magazine WordPress theme for instance supports several practical custom menu locations (Header, Main, Footer, etc.). After you’ve created your menu, you can add it to one of the available menu slots of your theme. In addition WordPress also includes a Custom Menu widget which you can use to add one of your custom menus as widget, e.g. into your sidebar.

To add a custom menu to a Theme Location, please select the menu name under Menu Settings and then click the Save button. When you’ve configured and saved everything correctly, your custom menu now will appear in that particular location on your WordPress website or blog. If not, please make sure you have created the custom menu properly, have assigned menu items to your custom menu and saved everything correctly in WordPress.
Step 5 – Customize or delete certain menu items #
After you have created your custom menu, you can always come back to customize and re-arrange menu items or delete them if you want to remove them from your custom menu. To edit a certain menu item, just click on the arrow in the top right corner of the menu item / box to expand it.

Now you can edit the Navigation Label (title of menu item), Title Attribute or delete the menu item by clicking on Remove in the bottom left corner of the edit menu item box. When you are done customizing, please click the Save Menu button to save your changes in WordPress.
More information on WordPress Custom Menus #
This tutorial covers all necessary steps you need to take to create custom menus in WordPress. You could also have a look at the Menu User Guide in the WordPress Codex which basically covers the same steps. In case you are using a WordPress theme which supports custom menus for social icons and if you would like to create a social icons menu for your website, the following tutorial will provide the particular information: How to create a Social Icons Menu in WordPress.