There’s a lot to worry about when you run some or all of your business online. Managing your site’s maintenance, security and performance are just some of the things you’ll need to tackle on top of bringing in traffic and earning revenue.
We’ve written about these topics a myriad of times on this blog, but we’re going to focus on one in this post, specifically how to speed up your WordPress site with a premium caching plugin called WP Rocket.
This post is the second part of a three-part series on WP Rocket. Check out the first and the last post of it here:
Table of Contents
WP Rocket Overview

WP Rocket is a premium caching plugin for WordPress, as previously stated, but it offers so much more. In addition to page and browser caching, this plugin allows you to optimize HTML, CSS and JS files, lazy load media, cache CDN content, optimize your database, and more.
You can purchase a license for this plugin for as low as $49 as of early 2019. If you’d like to learn more before doing so, be sure to check out the posts we linked in the previous section. They go more in depth into what this plugin has to offer and how it performs.
This post is designed for new WP Rocket users. We’re going to cover everything you need to know to set up a basic configuration of this plugin, starting with how to install it. First, let’s find out what you’re working with so you can see just how much WP Rocket improves your site’s performance.
Benchmarking Your Site
WP Rocket has an ON/OFF feature you can use to test your site’s performance with and without caching without having to deactivate it. However, I’m going to have you test your site before you even install the plugin since it’s easier to explain.
If you’ve already activated the plugin, clear the cache by going to Settings → WP Rocket in the WordPress admin, then deactivate it. Alternatively, you can read the Getting Started article in the Getting Started section of the plugin’s documentation for help on how to test the plugin with and without caching.
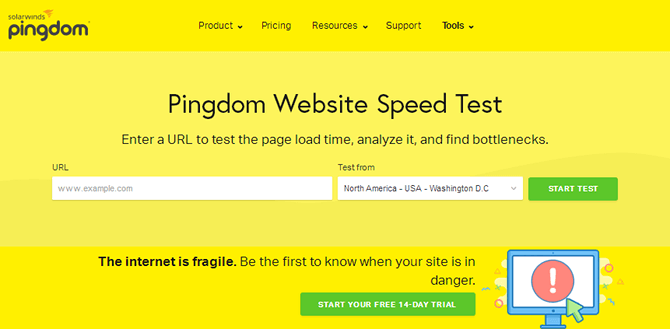
Start by going to Pingdom. Enter your homepage URL in the URL box, and select a test location closest to your server’s data center. Ask your host if you’re not sure. Start the test, and make note of the load time and performance score.
It’s best to run this test a few more times to get an accurate representation of your site’s performance. However, Pingdom doesn’t let you run consecutive tests too close together, so close the site and head to GTmetrix for now.

For this tool, all you need to do is enter your URL and start the test. Make note of your load time, PageSpeed score and YSlow score here. Close the tab afterward, and head back to Pingdom to run another test. Keep doing this until you’ve tested your site with each tool at least three times.
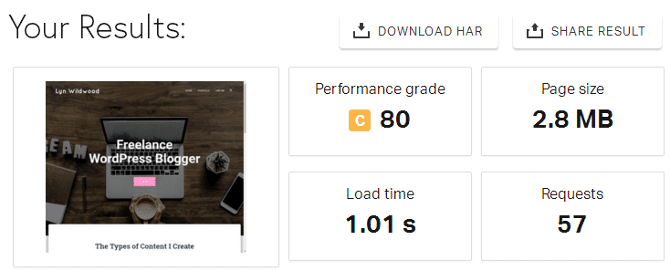
You should have an idea of how your site performs based on each tool’s load time results and performance scores.
Installing WP Rocket
Installing WP Rocket works the same as it does with any other premium plugin. All you need to do is download the ZIP folder from your account, and upload it to the backend of your WordPress site.
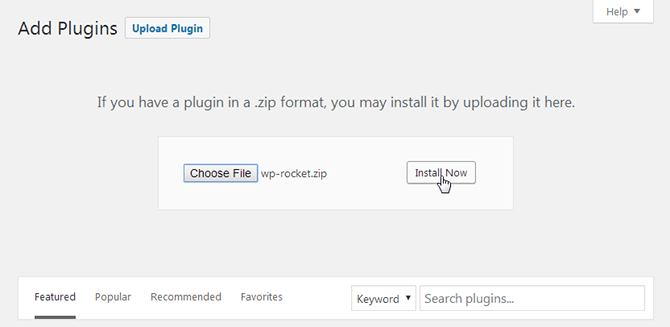
Alternatively, you can unzip the folder, and upload that version to your Plugins directory via FTP.
Activate the plugin once it installs, and navigate to Settings → WP Rocket if it doesn’t take you to the dashboard automatically.
Benchmarking WP Rocket
Most sites will see the largest improvement in performance as soon as they activate WP Rocket. You should benchmark your site immediately after activating it because of this.
Before you do, be sure to click WP Rocket’s Preload Cache button to ensure the cached version of your site is activated. Then, test your site with Pingdom and GTmetrix again just as we did before to see how much its performance has improved.
Optimizing WP Rocket

I want to touch base on a few of the actions you can perform in the Dashboard section. For starters, use View My Account to navigate to your WP Rocket account on the developer’s website.
Use Clear Cache to clear your website’s cache immediately without having to wait on the schedule you configure. Use Preload Cache to create a cached version of your site manually.
Use Ask Support to receive help from WP Rocket’s documentation and support team.
Cache
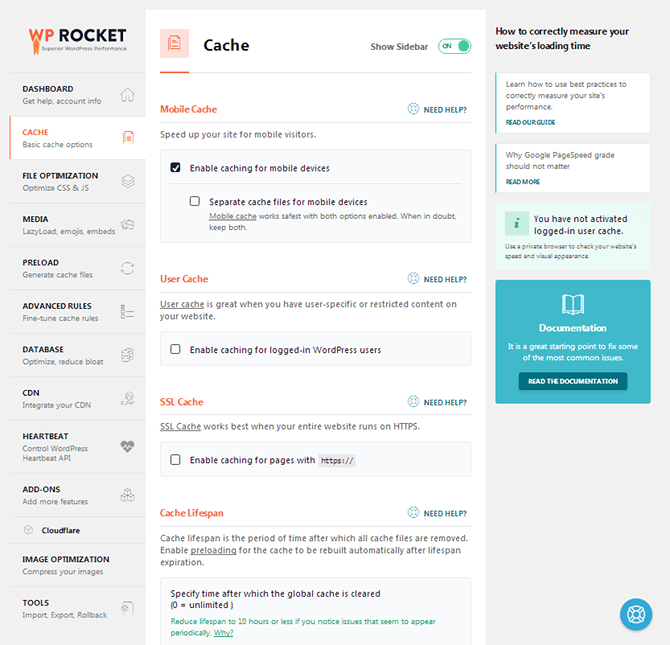
Next up is the Cache section. Most of the options in this section allow you to enable alternative forms of caching only relevant to users with specific configurations.
Here are a few quick explanations of the options in this section:
- Mobile Cache – Should be enabled by default. Do so if not.
- Enable the secondary option ‘Separate cache files for mobile devices’ if the mobile version of your site uses mobile-only functions, such as a separate set of social share buttons for mobile devices.
- User Cache – Designed for membership sites, paywalls and similar sites.
- SSL Cache – Enable if your site uses HTTPS on any page.
- Cache Lifespan – Controls how often your site’s cache is cleared. 10 hours is fine for most sites.
Be sure to save any changes you make before moving on to the next section.
File Optimization
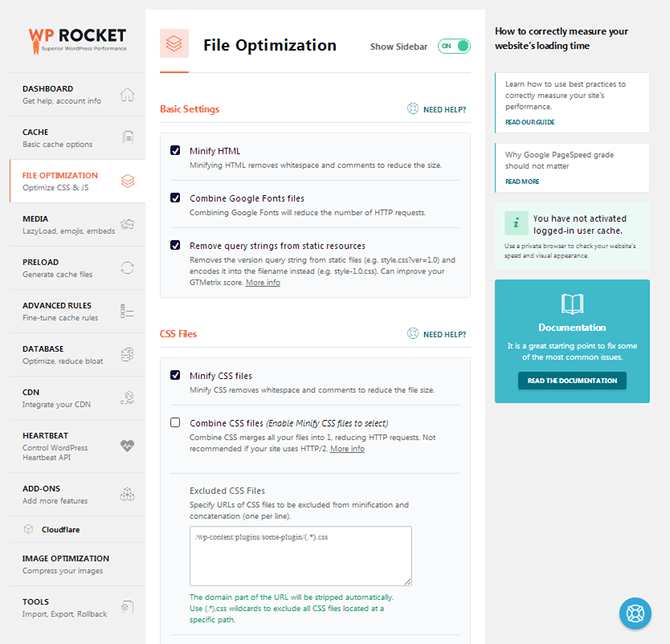
Next up is the File Optimization section. Minifying files reduces their size by removing unnecessary data, such as whitespace. I recommend selecting the following settings:
- Minify CSS Files
- Optimize CSS Delivery
- Minify JavaScript Files
- Load JavaScript Deferred
- Safe Mode for jQuery
Save your changes, clear the cache, and refresh your site. Go through a few different pages and posts to ensure everything is in order. If not, deselect the above options, and save your changes. In this scenario, you’ll need to find out which CSS and JS files are being corrupted through minification and add them to the exclusion boxes in this section.
Do not enable these settings if you’re using Cloudflare’s auto minification feature. You can check on this by visiting the Speed section in Cloudflare and seeing if the JavaScript, CSS and HTML options are ticked.
Media

In the Media section, I recommend enabling lazy loading for images, iframes and videos, and replacing YouTube’s iframe videos with preview images. Lazy loading prevents images and videos on your site from being loaded until the user scrolls to them. It improves site performance by reducing the amount of content your site needs to load when a user visits a new page.
Save your changes, clear the cache, and test the feature yourself to ensure it’s something you want on your site.
You can leave the Disable Emojis setting selected as it simply disables WordPress’ emojis and replaces them with the ones in your visitor’s browser.
The Disable WordPress Embeds reduces HTTP requests by preventing other sites from embedding your content and preventing you from embedding content as well. Don’t fret, though. You’ll still be able to embed content from popular sites, such as YouTube and Twitter.
Database

The Database section allows you to remove files you’re no longer using from your site. These include old revisions to posts and pages as well as files leftover from deleted plugins. They’re all stored in the WordPress database, an essential behind-the-scenes component of every WordPress site.
Backup your site prior to optimizing your database. Fortunately, most quality hosts offer daily backups these days. Enable every option on this page except Auto Drafts (to prevent losing pages and posts in progress, especially if you have multiple users creating them), and click Optimize to clean the database immediately.
Test your site afterward to ensure everything is in working order. You’ll need rollback to your last backup if not.
Schedule the automatic cleanup feature to run at least once a week.
CDN
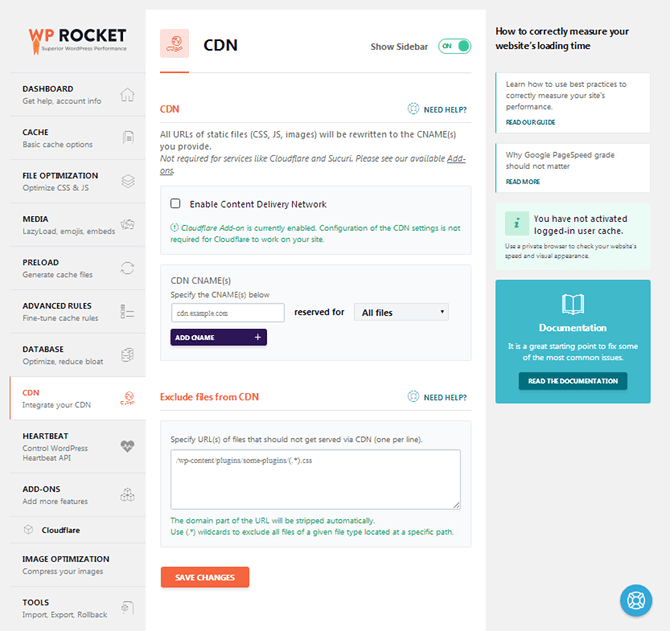
If your site uses a CDN, you can add the CNAME here. If you use Cloudflare, head to the Add-Ons section instead to use the official Cloudflare add-on. You’ll need your Global API Key, your Zone ID and the email linked to your Cloudflare account.
Final Benchmarks
Now that you’ve optimized your site with all of the other features WP Rocket offers, run a few final tests with Pingdom and GTmetrix to see how much further your site’s performance has improved.
Final Thoughts
As you can see, WP Rocket is one of the easiest caching solutions to configure as well as one of the most effective. Like I said, most sites will see the largest improvement upon activation, so if you have issues with any of the other settings or aren’t quite sure about them, don’t be afraid to leave them disabled.
If you’re still on the fence about this plugin, be sure to check out our other posts: